Written by: Danielle Miller, MD (NUEM PGY-4) Edited by: John Sarwark, MD (NUEM ‘16) Expert commentary by: Matthew Pirotte, MD

Expert Commentary
Great work by the authors to create such a handy guide to splinting. Like so many procedures in the emergency department, splinting is like snowboarding – easy to learn difficult to master! My love for emergency ortho has led me to really work on my own splinting techniques and to have a healthy respect for this skill.
The only quibbles that I would have for the otherwise excellent chart (and they are minor) are the following:
1. Mid-shaft humerus: Rare will the patient be who can manage this with just a sling. There is tons of painful fracture movement to deal with here. The appropriate splint (a coaptation splint) is extremely challenging to place but worth it for the patient with such a painful fracture
2. Distal radius fractures: After reduction I really like a double sugar-tong splint as opposed to a single. I worry about elbow extension (even involuntary at night) degrading the integrity of my splint and therefore my reduction.
My biggest teaching point with respect to splinting in the ED is the under-appreciated art of molding splints. Getting the plaster or fiberglass correctly placed, padded, and wrapped is really the easy part. The emergency provider must grasp the critical orthopedic concept that “crooked splints make straight bones.” Your splint needs to be working for you not just sitting there observing! If you have made a reduction your splint generally needs to be keeping in in place. This sounds more complicated than it is, follow my 3-step plan to learn how to make and mold splints:
Step 1: understand the concept of a 3-point mold.
The concept of the 3-point mold creates a fulcrum proximal to the fracture site and bends the splint to keep the reduction from falling away. The 3-point mold looks like this.
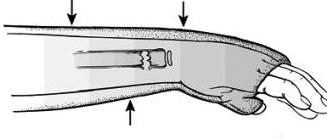
Credit: Orthobullets
Sharp-eyed readers might have noted that this is a pediatric fracture but have no fear, the splinting and molding is very similar to that of an adult. As you can see above the splint needs to be pushed and molded while it dries to keep that distal fragment from falling back. Start going into rooms with ortho residents and you’ll grasp this concept very quickly.
Step 2: start doing your own distal radius fracture reductions and splinting

Quentin Reuter MD (NUEM ’18) splinting a DRF
Unless there is nerve entrapment or some other complicating factor there is rarely a need to consult on DRF fractures in the emergency department. I basically taught myself to splint by really learning how to manage distal radius fractures. There are any number of high-quality videos out there. This is a good one that demonstrates my favorite molding technique as well. The nice thing about a DRF is that with a good hematoma block you can take the time to get it right. A pair of finger traps thrown in your shift bag is a good trick, they are a high-theft item so watch out for prowling residents. The nice thing about reducing DRFs is that you end up needing to place and mold a relatively complex splint. I like a double sugar tong followed by a good mold incorporating 3-points along with some mild flexion and ulnar deviation at the wrist. You also need to pay attention to what is going on at the elbow. Putting in all together for your mold you must manage the position of the elbow, wrist flexion, and wrist ulnar deviation all while putting good pressure on your mold points., It takes a bit of time to get right but your patients (and consultants) will thank you!
Step 3: build on what you’ve learned and apply it to other common fractures
Once you understand the principles of reduction, splinting, and molding you are ready to tackle a host of other fractures. Bimalleolar/trimalleolar ankle fractures, both bone midshaft forearm fractures in school aged kids, and boxer’s fractures are all great places to start. This is a fun and rewarding part of our practice that any emergency provider can do with a bit of practice.
Always remember to check and document your nerve function after splint placement!

Matthew Pirotte, MD
Assistant Program Director, Northwestern Emergency Medicine
How To Cite This Post
[Peer-Reviewed, Web Publication] Miller D, Sarwark J. (2019, April 1). Visual Guide to Splinting [NUEM Blog. Expert Commentary by Pirotte M]. Retrieved from http://www.nuemblog.com/blog/splinting