

Normotensive Cardiogenic Shock Diagnosis and Management
Posts tagged #Cardiology
Hypertensive Emergency
An overview of diagnosis and management of Hypertensive Emergency.
AIVR in the Emergency Department
An overview of AIVR and its management.
SonoPro Tips and Tricks for Aortic Aneurysm and Dissection

Written by: John Li, MD (NUEM ‘24) Edited by: Andra Farcas, MD (NUEM ‘21) Expert Commentary by: John Bailitz, MD & Shawn Luo, MD (NUEM ‘22)
SonoPro Tips and Tricks
Welcome to the NUEM Sono Pro Tips and Tricks Series where Sono Experts team up to take you scanning from good to great for a problem or procedure! For those new to the probe, we recommend first reviewing the basics in the incredible FOAMed Introduction to Bedside Ultrasound Book and 5 Minute Sono. Once you’ve got the basics beat, then read on to learn how to start scanning like a Pro!
Aortic ultrasound is a staple in emergency point of care ultrasound. It has incredible sensitivity (97.5-100%) and specificity (94.1-100%) in detecting abdominal aortic aneurysms and can provide a diagnosis for critically ill patients in seconds. [1-4] However, it can often be a technically difficult study for beginner sonographers due to shadowing bowel gas and patient body habitus. Follow along in this installment of our Sono Pro Tips and Tricks Series to become an expert in finding aortas!
Beyond the classic elderly male smoker with abdominal, flank, or back pain, what are other scenarios where you would use aortic ultrasound?
Older patients with limb ischemia - an aortic aneurysm can have atherosclerosis or a mural thrombus which can embolize and cause an arterial occlusion!
“But they fixed my aorta!” Aortic endograft leakage can sometimes present with symptoms that are similar to a AAA rupture, such as back pain, flank pain, or hemodynamic instability.
How to scan like a Pro
Always Start Smart: Aortic ultrasound can be tricky because of factors that seem out of our control, such as bowel gas or patient body habitus.
When scanning for an abdominal aortic aneurysm, start scanning in the epigastric region with a transverse view and apply constant pressure, gently pushing the bowel gas out of the way as you slide the probe down towards the patient’s feet.
Tell your patients to bend their knees! This relaxes the abdominal musculature and can help you move bowel gas or make better contact with the probe.
What if you still can’t see it? Try looking in the right upper quadrant view of the FAST exam!
Start with your probe in the right mix-axillary line and use the liver as your acoustic window. You may need to fan anteriorly or posteriorly depending on the patient’s body habitus and your positioning.
Unfortunately, this view predominantly visualizes the superior aspect of the abdominal aorta, and it can be difficult to visualize the inferior abdominal aorta or the bifurcation.
Here we are looking at a modified RUQ view, where the aorta is visualized on the bottom part of the screen using the liver as an acoustic window. (acep.org)
Pro Pickups!
What’s that weird aneurysm?
Most people are familiar with the classic fusiform aortic aneurysm, but saccular aneurysms can be easily missed because of shadowing bowel gas obstructing parts of the aorta. Saccular aneurysms actually have a higher risk of rupture and repair is recommended for smaller diameters.

Here you can see two images in the longitudinal axis of the different kinds of abdominal aortic aneurysms. On the left is a saccular aneurysm and on the right is a fusiform one. Be sure to pay attention to the mural thrombus in the walls of both of these aortas - they can embolize and cause arterial occlusions! (med.emory.edu)

2. How big is that aorta anyways?
Be sure to always measure the aorta from outside wall to outside wall!
Many aortic aneurysms have a mural thrombus or intraluminal clot, and it can be very easy to mistake these for extra-luminal contents.
Remember the concerning numbers: >5.5cm for men and >5cm for women!
What the Pros Do Next
Abdominal Aortic Aneurysm
If the patient is hemodynamically unstable (defined as BP <90/60, altered mental status, or other signs of end-organ damage), go straight to the OR!
If the patient is hemodynamically stable (defined as the absence of any of the above), then the next step is to obtain further imaging, such as a CT Angiogram, which is the imaging gold standard.
If you are concerned about a large AAA that could be a contained leak but the patient is hemodynamically stable, then we recommend an emergent vascular surgery consult
If you find a small AAA (defined as <5cm in women or <5.5cm in men) that you do not think is actively contributing to the patient’s symptoms, then we recommend outpatient vascular surgery follow up

SonoPro Tips - Where to Learn More
Do you want to review more examples of pathologic images that you may see when you are doing an aortic ultrasound? Be sure to check out The Pocus Atlas by our expert editor Dr. Macias. Aortic pathology is quite rare, and going through these images will help immensely in recognizing this diagnosis in emergent situations. If you’re interested in looking at some of the evidence behind aortic ultrasound, be sure to check out the evidence atlas here as well.
References
Rubano E, Mehta N, Caputo W, Paladino L, Sinert R. Systematic review: emergency department bedside ultrasonography for diagnosing suspected abdominal aortic aneurysm. Acad Emerg Med. 2013 Feb;20(2):128-38. doi: 10.1111/acem.12080. PMID: 23406071.
Hunter-Behrend, Michelle, and Laleh Gharahbaghian. “American College of Emergency Physicians.” ACEP // Home Page, 2016, www.acep.org/how-we-serve/sections/emergency-ultrasound/news/february-2016/tips-and-tricks-big-red---the-aorta-and-how-to-improve-your-image/.
Ma, John, et al. Ma and Mateer's Emergency Ultrasound. McGraw-Hill Education, 2020.
Mallin, Mike, and Matthew Dawson. Introduction to Bedside Ultrasound: Volume 1. Emergency Ultrasound Solutions, 2013.
Macias, Michael. TPA, www.thepocusatlas.com/.
Expert Commentary
Another great Sono Pro Post! Thank you John Li and Andra for helping everyone move from good to great when scanning for Abdominal Aortic Aneurysms. As noted, this application defines Emergency Ultrasound as a fast (pun intended), accurate, and life saving diagnostic tool for every EM physicians tool belt. When consistent probe pressure does not do the trick, consider the RUQ view for a quick look. Since most AAA’s are fusiform, this may quickly confirm your suspicions and prompt the call to get the OR ready. Be sure to visualize the entire abdominal aorta throughout in both short and long axis to identify saccular aneurysms and even the rare aortic occlusion!

John Bailitz, MD
Vice Chair for Academics, Department of Emergency Medicine
Professor of Emergency Medicine, Feinberg School of Medicine
Northwestern Memorial Hospital

Shawn Luo, MD
PGY4 Resident Physician
Northwestern University Emergency Medicine
How To Cite This Post:
[Peer-Reviewed, Web Publication] Li, J. Farcas, A. (2021 Oct 11). SonoPro Tips and Tricks for Aortic Aneurysm. [NUEM Blog. Expert Commentary by Bailitz, J. Shawn, L.]. Retrieved from http://www.nuemblog.com/blog/sonopro-tips-and-tricks-for-aortic-aneurysm
Other Posts You May Enjoy


SonoPro Tips and Tricks for Pulmonary Embolism
Written by: Megan Chenworth, MD (NUEM ‘24) Edited by: Abiye Ibiebele, MD (NUEM ‘21) Expert Commentary by: John Bailitz, MD & Shawn Luo, MD (NUEM ‘22)
SonoPro Tips and Tricks
Welcome to the NUEM Sono Pro Tips and Tricks Series where Sono Experts team up to take you scanning from good to great for a problem or procedure! For those new to the probe, we recommend first reviewing the basics in the incredible FOAMed Introduction to Bedside Ultrasound Book and 5 Minute Sono. Once you’ve got the basics beat, then read on to learn how to start scanning like a Pro!
Did you know that focused transthoracic cardiac ultrasound (FOCUS) can help identify PE in tachycardic or hypotensive patients? (It has been shown to have a sensitivity of 92% for PE in patients with an HR>100 or SBP<90, and approaches 100% sensitivity in patients with an HR>110 [1]). Have a hemodynamically stable patient with PE and wondering how to risk stratify? FOCUS can identify right heart strain better than biomarkers or CT [2].
Who to FOCUS on?
Patients presenting with chest pain or dyspnea without a clear explanation, or with a clinical concern for PE. The classic scenario is a patient with pleuritic chest pain with VTE risk factors such as recent travel or surgery, systemic hormones, unilateral leg swelling, personal or family history of blood clots, or known hypercoagulable state (cancer, pregnancy, rheumatologic conditions).
Patients presenting with unexplained tachycardia or dyspnea with VTE risk factors
Unstable patients with undifferentiated shock
When PE is suspected but CT is not feasible: such as when the patient is too hemodynamically unstable to be moved to the scanner, too morbidly obese to fit on the scanner, or in resource-limited settings where scanners aren’t available
One may argue AKI would be another example of when CT is not feasible (though there is some debate over the risk of true contrast nephropathy - that is a discussion for another blog post!)
How to scan like a Pro
Key is to have the patient as supine as possible - this may be difficult in truly dyspneic patients
If difficulty obtaining views arise, the left lateral decubitus position helps bring the heart closer to the chest wall
FOCUS on these findings
You only need one to indicate the presence of right heart strain (RHS).
Right ventricular dilation
Septal flattening: Highly specific for PE (93%) in patients with tachycardia (HR>100) or hypotension (SBP<90) [1]
Tricuspid valve regurgitation
McConnell’s sign
Definition: Akinesis of mid free wall and hypercontractility of apical wall (example below)
The most specific component of FOCUS: 99% specific for patients with HR>100bpm or SBP<90 [1]
Tricuspid annular plane systolic excursion (TAPSE)
The most sensitive single component of FOCUS: TASPE < 2cm is 88% sensitive for PE in tachycardic and hypotensive patients; 93% sensitive when HR > 110 [1]
Where to FOCUS
Apical 4 Chamber (A4C) view: your best shot at seeing it all
Find the A4C view in the 5th intercostal space in the midclavicular line
Optimize your image by sliding up or down rib spaces, sliding more lateral towards the anterior axillary line until you see the apex with the classic 4 chambers - if the TV and MV are out of the plane, rotate the probe until you can see both openings in the same image; if the apex is not in the middle of the screen, slide the probe until the apex is in the middle of the screen. If you are having difficulty with this view, position the patient in the left lateral decubitus.
Important findings:
RV dilation: the normal RV: LV ratio in diastole is 0.6:1. If the RV > LV, it is abnormal. (see in the image below)
Septal flattening/bowing is best seen in this view
McConnell’s sign: akinesis of the free wall with preserved apical contractility
McConnell’s Sign showing akinesis of the free wall with preserved apical contractility
4. Tricuspid regurgitation can be seen with color flow doppler when positioned over the tricuspid valve
Tricuspid regurgitation seen with color doppler flow
5. TAPSE
Only quantitative measurement in FOCUS, making it the least user-dependent measurement of right heart strain [3]
A quantitative measure of how well the RV is squeezing. RV squeeze normally causes the tricuspid annulus to move towards the apex.
Fan to bring the RV as close to the center of the screen as possible
Using M-mode, position the cursor over the lateral tricuspid annulus (as below)
Activate M-mode, obtaining an image as below
Measure from peak to trough of the tracing of the lateral tricuspid annulus
Normal >2cm

How to measure TAPSE using ultrasound
Parasternal long axis (PSLA) view - a good second option if you can’t get A4C
Find the PSLA view in the 4th intercostal space along the sternal border
Optimize your image by sliding up, down, or move laterally through a rib space, by rocking your probe towards or away from the sternum, and by rotating your probe to get all aspects of the anatomy in the plane. The aortic valve and mitral valve should be in plane with each other.
Important findings:
RV dilation: the RV should be roughly the same size as the aorta and LA in this view with a 1:1:1 ratio. If RV>Ao/LA, this indicates RHS.
Septal flattening/bowing of the septum into the LV (though more likely seen in PSSA or A4C views)

Right heart strain demonstrated by right ventricle dilation
Parasternal Short Axis (PSSA) view: the second half of PSLA
Starting in the PSLA view, rotate your probe clockwise by 90 degrees to get PSSA
Optimize your image by fanning through the heart to find the papillary muscles - both papillary muscles should be in-plane - if they are not, rotate your probe to bring them both into view at the same time
Important findings:
Septal flattening/bowing: in PSSA, it is called the “D-sign”.

“D-sign” seen on parasternal short axis view. The LV looks like a “D” in this view, particularly in diastole.
Subxiphoid view: can add extra info to the FOCUS
Start just below the xiphoid process, pointing the probe up and towards the patient’s left shoulder
Optimize your image by sliding towards the patient’s right, using the liver as an echogenic window; rotate your probe so both MV and TV are in view in the same image
Important findings
Can see plethoric IVC if you fan down to IVC from RA (not part of FOCUS; it is sensitive but not specific to PE)

Plethoric IVC that is sensitive to PE
What to do next?
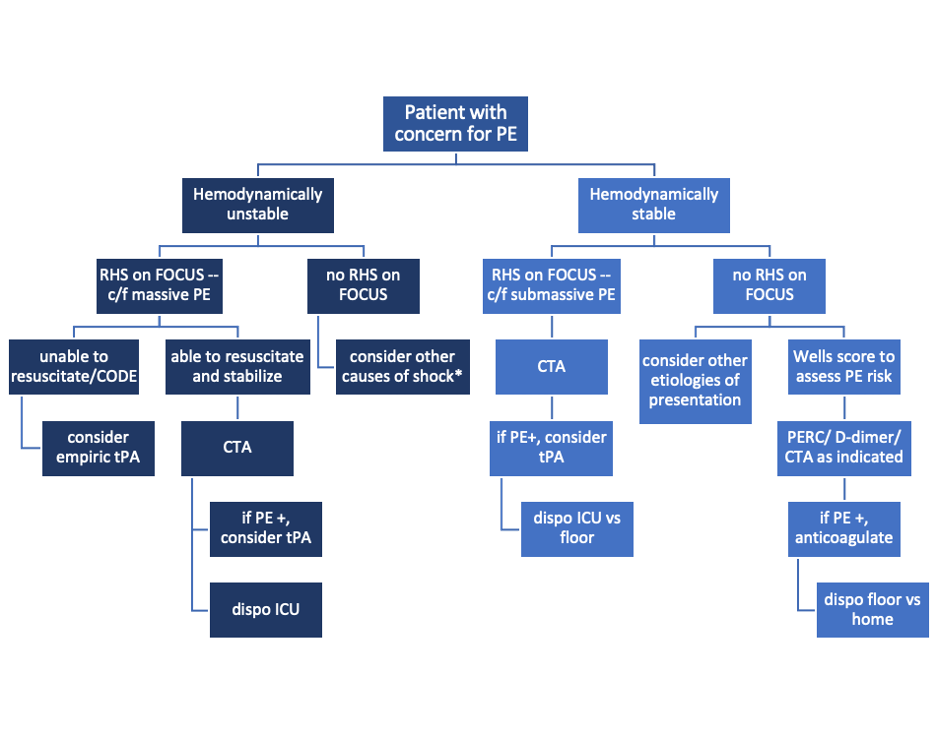
Sample algorithm for using FOCUS to assess patients with possible PE.
*cannot completely rule out PE, but negative FOCUS makes PE less likely
Limitations to keep in mind:
FOCUS is great at finding heart strain, but the lack of right heart strain does not rule out a pulmonary embolism
Systematic review and meta-analysis concluded that the overall sensitivity of FOCUS for PE is 53% (95% CI 45-61%) for all-comers [5]
Total FOCUS exam requires adequate PSLA, PSSA, and A4C views – be careful when interpreting inadequate scans
Can see similar findings in chronic RHS (pHTN, RHF)
Global thickening of RV (>5mm) can help distinguish chronic from acute RHS
McConell’’s sign is also highly specific for acute RHS, whereas chronic RV failure typically appears globally akinetic/hypokinetic

SonoPro Tips - Where to Learn More
Right Heart Strain at 5-Minute Sono: http://5minsono.com/rhs/
Ultrasound GEL for Sono Evidence: https://www.ultrasoundgel.org/posts/EJHu_SYvE4oBT4igNHGBrg, https://www.ultrasoundgel.org/posts/OOWIk1H2dePzf_behpaf-Q
The Pocus Atlas for real examples: https://www.thepocusatlas.com/echocardiography-2
The Evidence Atlas for Sono Evidence: https://www.thepocusatlas.com/ea-echo
References
Daley JI, Dwyer KH, Grunwald Z, Shaw DL, Stone MB, Schick A, Vrablik M, Kennedy Hall M, Hall J, Liteplo AS, Haney RM, Hun N, Liu R, Moore CL. Increased Sensitivity of Focused Cardiac Ultrasound for Pulmonary Embolism in Emergency Department Patients With Abnormal Vital Signs. Acad Emerg Med. 2019 Nov;26(11):1211-1220. doi: 10.1111/acem.13774. Epub 2019 Sep 27. PMID: 31562679.
Weekes AJ, Thacker G, Troha D, Johnson AK, Chanler-Berat J, Norton HJ, Runyon M. Diagnostic Accuracy of Right Ventricular Dysfunction Markers in Normotensive Emergency Department Patients With Acute Pulmonary Embolism. Ann Emerg Med. 2016 Sep;68(3):277-91. doi: 10.1016/j.annemergmed.2016.01.027. Epub 2016 Mar 11. PMID: 26973178.
Kopecna D, Briongos S, Castillo H, Moreno C, Recio M, Navas P, Lobo JL, Alonso-Gomez A, Obieta-Fresnedo I, Fernández-Golfin C, Zamorano JL, Jiménez D; PROTECT investigators. Interobserver reliability of echocardiography for prognostication of normotensive patients with pulmonary embolism. Cardiovasc Ultrasound. 2014 Aug 4;12:29. doi: 10.1186/1476-7120-12-29. PMID: 25092465; PMCID: PMC4126908.
Hugues T, Gibelin PP. Assessment of right ventricular function using echocardiographic speckle tracking of the tricuspid annular motion: comparison with cardiac magnetic resonance. Echocardiography. 2012 Mar;29(3):375; author reply 376. doi: 10.1111/j.1540-8175.2011.01625_1.x. PMID: 22432648.
Fields JM, Davis J, Girson L, et al. Transthoracic echocardiography for diagnosing pulmonary embolism: a systematic review and meta‐analysis. J Am Soc Echocardiogr 2017;30:714–23.e4.
Expert Commentary
RV function is a frequently overlooked area on POCUS. Excellent post by Megan looking specifically at RV to identify hemodynamically significant PEs. We typically center our image around the LV, so pay particular attention to adjust your views so the RV is optimized. This may mean moving the footprint more laterally and angle more to the patient’s right on the A4C view. RV: LV ratio is often the first thing you will notice. When looking for a D-ring sign, make sure your PSSA is actually in the true short axis, as a diagonal cross-section may give you a false D-ring sign. TAPSE is a great surrogate for RV systolic function as RV contracts longitudinally. Many patients with pulmonary HTN or advanced chronic lung disease can have chronic RV failure, lack of global RV thickening. Lastly remember, that a positive McConnell’s sign is a great way to distinguish acute RHS from chronic RV failure.
John Bailitz, MD
Vice Chair for Academics, Department of Emergency Medicine
Professor of Emergency Medicine, Feinberg School of Medicine
Northwestern Memorial Hospital
Shawn Luo, MD
PGY4 Resident Physician
Northwestern University Emergency Medicine
How To Cite This Post:
[Peer-Reviewed, Web Publication] Chenworth, M. Ibiebele, A. (2021 Oct 4). SonoPro Tips and Tricks for Pulmonary Embolism. [NUEM Blog. Expert Commentary by Bailitz, J. Shawn, L.]. Retrieved from http://www.nuemblog.com/blog/sonopro-tips-and-tricks-for-pulmonary-embolism
Other Posts You May Enjoy
Cocaine Chest Pain

Written by: Maren Leibowitz, MD (NUEM ‘23) Edited by: Zach Schmitz, MD (NUEM ‘21) Expert Commentary by: David Farman, MD

Expert Commentary
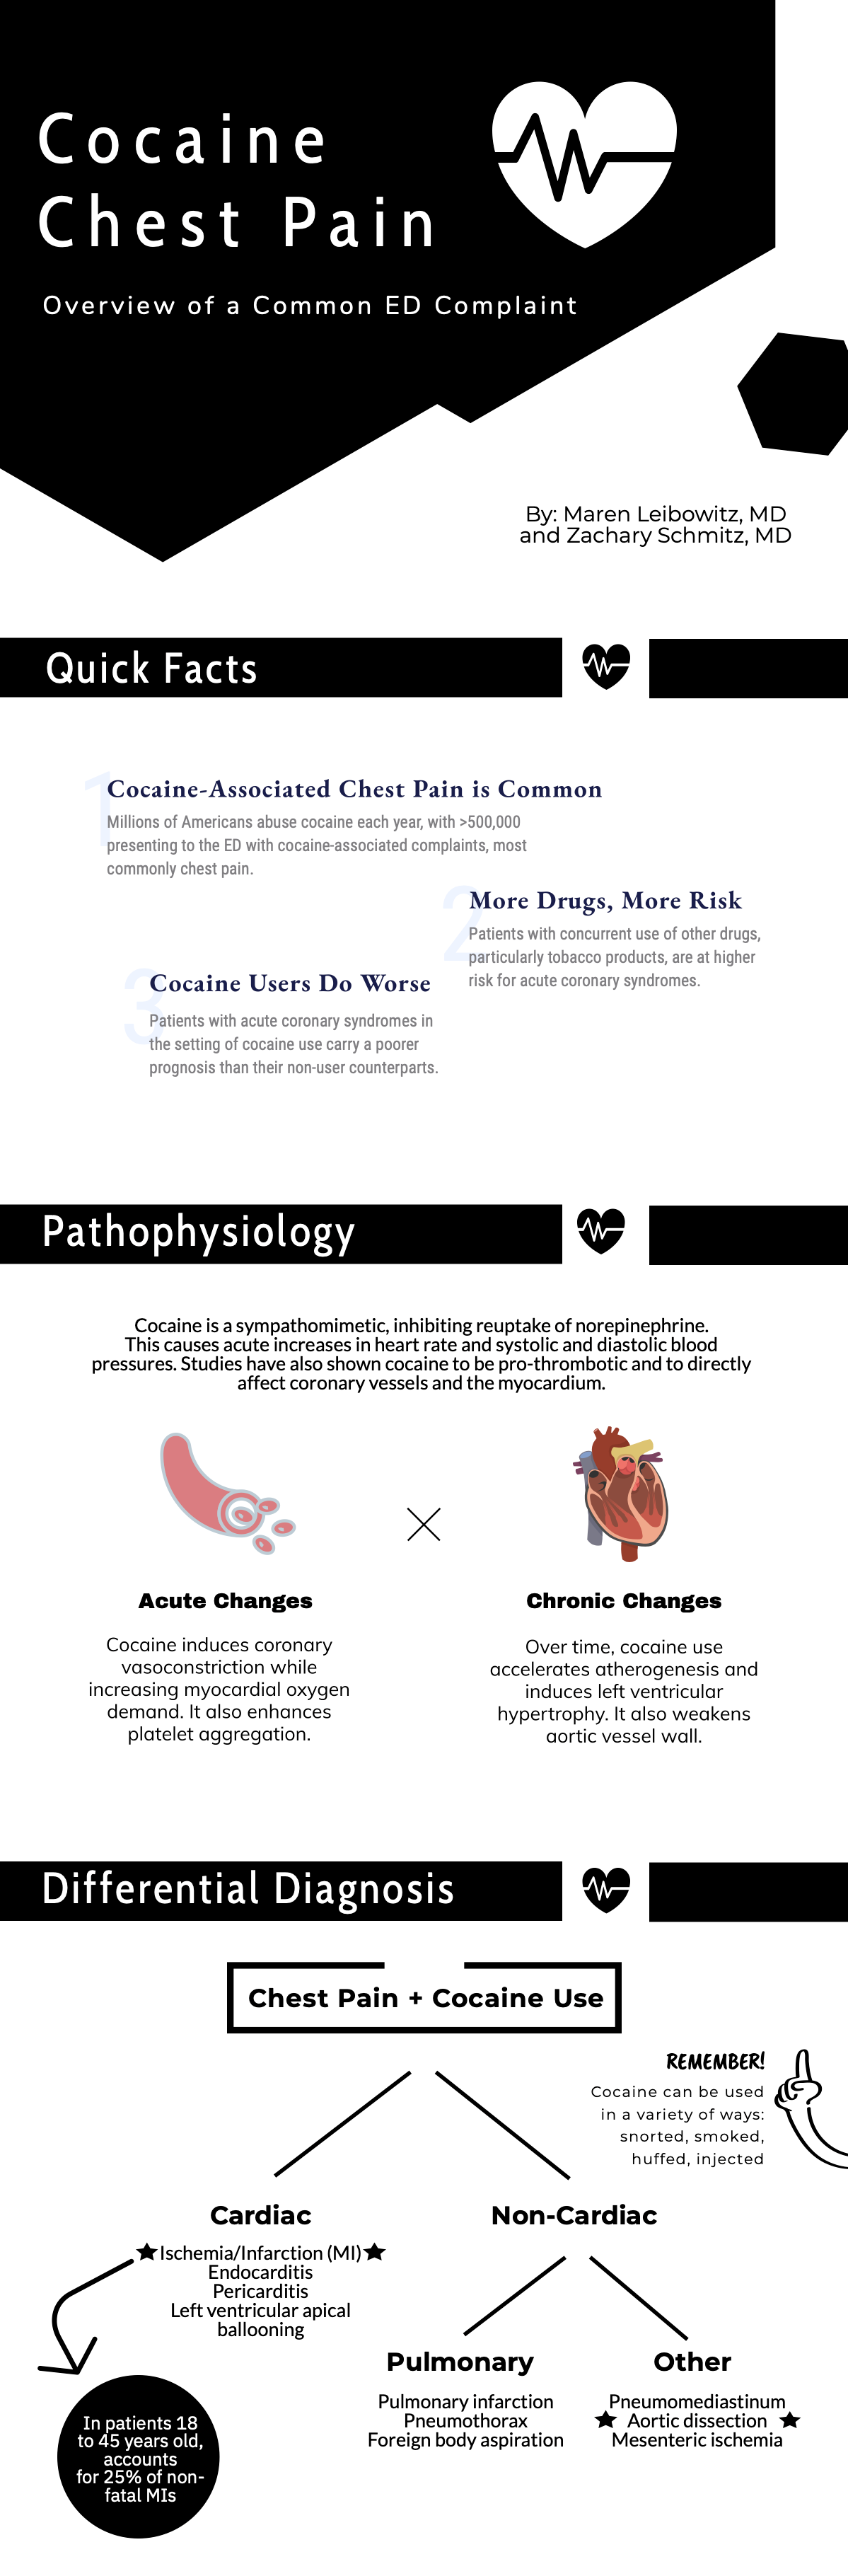
Cocaine chest pain was something that was frequently discussed but rarely encountered during my training and during my 11 years practicing in suburban and metropolitan Indiana (we're more of a heroin/meth state). I suspect there is significant regional and local variation in the epidemiology of cocaine chest pain, likely influenced by the economics and local availability or popularity of intoxicants.
When cocaine is more expensive, we tend to see more methamphetamine use. And vice-versa. I was once told by a local sheriff that "people will get high on whatever they can get for less than $20" and I have found that to be true in practice. I wouldn't expect that an emergency physician would be intimately familiar with the local micro-economics of the drug trade, but one should expect there to be a periodic waxing/waning of cocaine chest pain presentations. Similarly, it may be a more frequent complaint dependent on cocaine's local popularity and availability.
When consulting with a Cardiologist about a cocaine chest pain case, it is important for the emergency physician to avoid letting premature closure or psychosocial biases unduly influence the patient's disposition. It is not unheard of for physicians to minimize objective findings (ST segment abnormalities or biomarker elevation) and attribute them to the vasoactive properties of cocaine. I have certainly been tempted to do so myself. However, the article wisely points out the physiologic changes induced by cocaine use, both acutely and chronically. Platelet aggregation and atherogenesis can absolutely promote a scenario that would require PCI in even the most frequent of 'frequent fliers' with cocaine chest pain.
In short, I would have a low threshold to involve Cardiology in a patient who has objective findings regardless of their use of cocaine. Similarly, a Cardiology request for a Urine Drug Screen shouldn't delay a patient's trip to the cath lab if they have a STEMI. An exception to this may be a patient who has had recent coronary angiography that objectively demonstrates normal coronaries. In that scenario I would consider serial markers, conservative management and strong consideration of non-cardiac causes of the pain (dissection, pneumothorax, etc.).

David Farman, MD FACEP
Emergency Medicine Physician
Franciscan Health Lafayette East
How To Cite This Post:
[Peer-Reviewed, Web Publication] Leibowitz, M. Schmitz, Z. (2021, May 10). Cocaine Chest Paine. [NUEM Blog. Expert Commentary by Farman, D]. Retrieved from http://www.nuemblog.com/blog/cocaine-chest-pain
Other Posts You May Enjoy


Pericardiocentesis

Written by: David Feiger, MD (NUEM ‘22) Edited by: Abiye Ibiebele, MD (NUEM ‘21) Expert Commentary by: Daniel Schimmel, MD, MS
Introduction
An emergent pericardiocentesis may be a life-saving procedure and is indicated in patients with pericardial effusion and associated hemodynamic instability. The degree of pericardial effusion severity lies on a continuum and when associated with hemodynamic instability, is known as cardiac tamponade. The volume and rate at which the effusion develops most affects a patient’s hemodynamics. The clinical exam findings – hypotension, distant heart sounds, and jugular venous distention (known as Beck’s Triad) – often do not occur simultaneously if cardiac tamponade is suspected and confirmed early.
Given the urgency of the situation and severity of the patient’s clinical status, blind insertion of a needle into the pericardial space using anatomic landmarks has historically been the method of choice to restore hemodynamic stability. The availability of bedside ultrasound in many emergency departments more recently has led many physicians to pursue an image-guided pericardiocentesis. Various studies have demonstrated decreased mortality and morbidity with an ultrasound-guided approach when compared to a blind approach. However, depending on the clinical context and tools available, a blind approach may be the optimal choice.
Indications and Contraindications
Hemodynamic instability secondary to pericardial effusion, is the number one reason to perform an emergent pericardiocentesis in the emergency room. Pericardiocentesis for patients with symptomatic pericardial effusion but without hemodynamic instability may be deferred to inpatient management.
An emergent pericardiocentesis has few contraindications. Aortic dissection or cardiac free wall rupture is sometimes considered an absolute contraindication to pericardiocentesis, but in the absence of immediately available life-saving procedures, pericardiocentesis should be strongly considered. Relative contraindications include use of anticoagulation, platelets < 50K, and uncorrected coagulopathy. Furthermore, trauma patients with hemopericardium should preferentially undergo surgical pericardial drainage or emergency thoracotomy.
Blind Emergent Pericardiocentesis
Relevant Anatomy to Keep in Mind
Internal thoracic artery (internal mammary artery) – artery running cephalad to caudal on the anterior chest wall parallel to the sternum bilaterally
Neurovascular bundle – a collection of an intercostal vein, artery, and nerve running caudal to each rib
Materials
Sterile gloves, gown
Chlorhexidine swab
At least a 7 cm 18-gauge spinal needle or introducer needle if planning for continuous access to pericardial space
Syringes (10mL and 60-80mL)
Three-way stopcock
Plastic drainage tubing
Surgical clamp (optional)
1) Position the patient appropriately.
Provide respiratory support with nasal cannula or mechanical ventilation as indicated. Placing patients upright at 30 degrees to enhances comfort and allows gravity-dependent pooling of pericardial fluid.
2) Select an entry site.
Left parasternal and apical approaches are the most commonly pursued and have been shown to be superior to the classic subxiphoid approach in observational studies. When selecting an entry point, recall the location of the internal thoracic artery and subcostal neurovascular bundle. Cleanse a large area of the chest and upper abdomen with the chlorhexidine swab.
3) Insert and advance the spinal needle.
Insert the spinal needle into skin. Once the bevel is in the skin, remove the stylet, attach a three-way stopcock with a large volume syringe attached and maintain negative pressure as you advance the needle. Avoid sliding the needle laterally to prevent lacerating tissues. If a different trajectory is required, retract the needle, keeping the bevel in the skin and drive the needle at the desired angle maintaining negative pressure on the syringe. Momentary resistance may be met as the needle approaches the pericardium, but with continued advancement, a “pop” may be felt followed by aspirate in the syringe and improving patient hemodynamics. See below for more detailed instructions for each approach.

Subxiphoid
Insertion: 1 cm inferior to the left xiphocostal angle, 30 degrees with the patient’s chest
Direction: Towards left mid-clavicle. If unsuccessful, retract the spinal needle and redirect 10 degrees towards the patient’s right
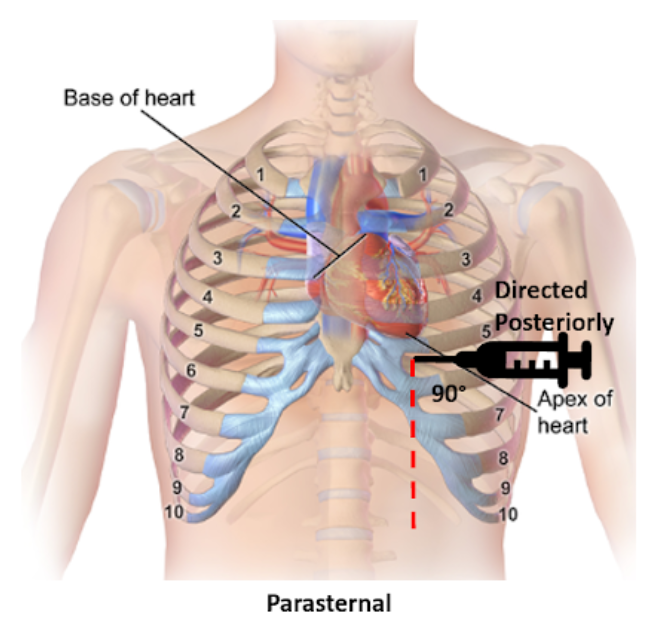
Parasternal
Insertion: Fifth intercostal space at the left parasternal border no more than 1 cm lateral, cephalad to the inferior rib and perpendicular to the patient’s chest
Direction: Posterior

Apical
Insertion: Fifth, sixth, or seventh left intercostal space approximately 6 cm from the parasternal border, cephalad to the inferior rib
Direction: Patient’s right shoulder
4) Draining the pericardial effusion.
Steady the needle with a surgical clamp at the needle shaft closest to the surface of the skin effectively preventing further needle advancement. Attach the plastic tubing to the stopcock allowing emptying of the syringe contents into a collecting vestibule without exchanging syringes. If planning to place a more permanent line (see “Establishing Continuous Access to the Pericardial Space”), consider aspirating just enough fluid to stabilize the patient’s hemodynamics and leave the remaining pericardial fluid to provide space for placing a line.
Tips for Pericardiocentesis with Ultrasound Guidance
Additional materials:
Bedside ultrasound
Sterile ultrasound probe cover
Skin marker
The safety and success of the steps above can be enhanced with bedside ultrasound. Bedside ultrasound can help prior to the procedure by finding the largest effusion nearest the skin and during the procedure by visualizing the needle trajectory in order to avoid important organs and other structures. There are several methods of ultrasound use in pericardiocentesis.
In static guidance, ultrasound is only used for procedure planning. The subxiphoid, parasternal, and apical views can be explored to find the largest effusion and determine the optimal entry. Often, the needle entry point is marked with a skin marker and another mark is made for the planned trajectory. Distance and angle from the skin to the effusion is also noted.
In dynamic guidance, the needle is passed through the skin parallel to the 2D plane created by the ultrasound probe after finding an effusion pocket. The needle can be visualized as it is advanced towards the pericardial effusion and enters the pericardial space.
No ultrasound? Hook up an EKG!
Additional materials:
Continuous EKG monitor
Wire with alligator clips
A continuous EKG can be used to prevent inadvertent traversing of the myocardium with the needle without an ultrasound. Attach one alligator clip to the needle and the other to an anterior lead on a continuous EKG. ST-elevations will be apparent on the EKG if the myocardium is touched. If ST-elevations are noted, simply retract the needle.
Confirmation of Pericardial Access with Ultrasound Guidance
Additional materials:
Bedside ultrasound
Two 10 mL syringes (one with 4 mL of saline, one with 0.5 mL of air)
Confirming success in accessing the pericardial space can also be made injecting agitated saline and visualizing bubble artifact on ultrasound. To do so, attach the two saline syringes to the three-way stopcock. Turn off access towards the patient and rapidly push the contents from one syringe to the other until the fluid appears opacified. When all the saline is in one syringe, close off the access to the empty syringe and push the fluid towards the patient, visualizing it on the ultrasound. Confirmation is especially important when blood is aspirated and helps distinguish between pericardial versus ventricular placement.
Establishing Continuous Access to the Pericardial Space
Additional materials:
Flexible or curved-tip (J) guidewire
6-8 Fr drainage catheter (pigtail, sheath, or central venous catheter)
7 cm or longer 18-gauge introducer needle (as opposed to spinal needle)
Dilator
11 blade scalpel
Suture
Needle driver
Many of the materials above may be found in a central venous kit. Using the Seldinger technique, a line can be placed for continuous access to the pericardial space. Ensure that an introducer needle is used when initially accessing the pericardial space. Keeping the surgical clamp and needle in place, remove the stopcock and syringe, and gently advance the guidewire just beyond the bevel of the needle. Remove the introducer needle, ensuring the guidewire does not move, and use the scalpel to make a short incision at the guidewire’s entry into the skin. Advance the dilator over the guidewire to loosen the tissue. Remove the dilator leaving the guidewire in place and advance the drainage catheter just 1 cm beyond the guidewire into the pericardial space. Retract the guidewire while maintaining the position of the catheter, aspirate fluid to confirm placement, and secure the drain’s position with sutures and placement of a sterile dressing. Further confirmation of proper placement can be made using the agitated bubble study as described in “Confirmation of Pericardial Access with Ultrasound” above.
Conclusion
There are very few contraindications for an emergent pericardiocentesis in a patient with pericardial effusion and hemodynamic instability. While ultrasound-guided pericardiocentesis have lower morbidity and mortality rates, clinical context and emergent patient decompensation may make an image-guided procedure infeasible. Apical and parasternal access with a blind procedure have fewer complications than a subxiphoid approach. A pericardiocentesis may be a life-saving intervention as even a small amount of fluid aspirated may dramatically improve a patient’s hemodynamics.
Expert Commentary
Thank you Dr. Feiger for this excellent summary of pericardiocentesis. From center to center there can be variability in the expertise and mechanism through which pericardiocentesis is performed. Some institutions may have an echo focused pericardiocentesis service, while some institutions may perform the bulk of their pericardiocentesis in an interventional suite with the assistance of fluoroscopic imaging. However, there are times when pericardiocentesis must be performed as an emergency procedure with landmark guidance. Luckily, point of care ultrasound has been very commonplace in the emergency department and intensive care units facilitating visualization of fluid pockets that can be identified for safer access and to demonstrate successful drainage at the end of the procedure.
The relevant anatomy and associated complications from tissue injury during needle advancement for pericardiocentesis changes depending on the planned access route.
Subcostal
Liver laceration or puncture
Pneumothorax
Right atrial or ventricular laceration
Apical
Pneumothorax
Left or right ventricular laceration
Parasternal
Pneumothorax
Right ventricular laceration
In each location, careful use of ultrasound can avoid potential life-threatening complications. How the ultrasound is used also varies depending on location. Generally the ultrasound can be used to identify a path and I will have trainees hold the ultrasound the exact same way as they would hold their needle to mimic the path they will use when advancing into the pericardial space.
Common errors that I have seen are listed below.
Moving the needle side to side while it is in the body to try and find the appropriate space. I am impressed at the body’s ability to tolerate a straight in and out movement of a needle. But moving a needle tip back and forth creates lacerations that are difficult to heal and may result in tissue damage and uncontrollable bleeding requiring surgical intervention.
Moving the needle to find it under ultrasound, rather than moving the probe to find the needle can be dangerous. If the needle is in the wrong location, it should be moved. Otherwise, do not bounce the needle within the body to try and identify it on ultrasound.
A common subcostal error is needle path facing towards the spine through the torso. The subcostal position can be more successful with the patient upright at 30 degrees so that the fluid layers to the bottom portion of the heart, increasing the pocket size for needle entry. However, this position then requires the physician to aim slightly up, almost moving parallel to the ribs, to avoid needle entry being too low and passing underneath the effusion.
Also from the subcostal position, the initial position angle for subcostal pericardiocentesis should be to the left middle cervical bone as Dr. Feiger mentioned. However, many performing subcostal pericardiocentesis overcompensate initially and head too laterally to capture fluid.
From the apical position, the fluid is likely best obtained with the patient in the left lateral decubitus position. A drop door that is often present on an sonographer’s bed for performing echocardiograms is nice but not necessary.
As mentioned, the cardiac probe is not generally used to watch needle entry but to identify the most optimal path. However, if also equipped with a vascular probe, in the parasternal location, the vascular probe can easily watch the needle enter into the pericardial space while avoiding delicate structures like the internal thoracic artery.
Using fluoroscopic guidance, needle location can be identified in relation to the movement of the cardiac border and wire advancement can be used to identify a course consistent with the pericardial space and not limited by other cardiac structures. A small amount of contrast can be injected into the space and seen to highlight the cardiac borders allowing confirmation of the pericardial space.
But in the absence of fluoroscopy, and a more specific confirmation, an echo with agitated bubbles injected can verify presence of the needle, or a microcatheter, in the pericardial space. If after injection, bubbles are seen within the cardiac chambers, the needle should be withdrawn. If possible to obtain a pressure measurement during the procedure, this is one other guide to inform the operator of the needles location. If a right ventricular waveform Is present, the needle has entered the ventricular space. It may be possible to withdraw the needle until the high pressures of the ventricle reduce and if the needle aspirates, another agitated bubble injection can be performed.
An urgent pericardiocentesis with a large effusion can be easily performed at the bedside, particularly with the aid of an ultrasound and knowing the anatomy with immediate improvement in hemodynamics. Send the fluid for analysis and exchange the needle for a drain to ensure patient stability until the evaluation is complete.

Daniel Schimmel, MD, MS
Interventional Cardiologist
Northwestern Memorial Hospital
Associate Professor
Feinberg School of Medicine
How To Cite This Post:
[Peer-Reviewed, Web Publication] Feiger, D. Ibiebele, A. (2021, Feb 8). Pericardiocentesis. [NUEM Blog. Expert Commentary by Schimmel, D]. Retrieved from http://www.nuemblog.com/blog/pericardiocentesis.
Other Posts You May Enjoy
References
Gueria, Rajesh. “Ultrasound Guided Procedures in Emergency Medicine Practice - Pericardiocentesis.” Sonoguide, 2008, www.acep.org/sonoguide/pericardiocentesis.html.
Heffner, Alan C. “Emergency Pericardiocentesis.” Edited by Allan B Wolfson et al., UpToDate, 29 May 2019, www.uptodate.com/contents/emergency-pericardiocentesis?search=pericardiocentesis&source=search_result&selectedTitle=1~65&usage_type=default&display_rank=1.
Konnoff-Phillips, Kelly and Janis Provinse, directors. Agitated Saline Bubble Study. Highland Hospital Emergency Department, 2015.
Maisch, Bernhard, and Sabine Pankuweit. Interventional Pericardiology: Pericardiocentesis, Pericardioscopy, Pericardial Biopsy, Balloon Pericardiotomy, and Intrapericardial Therapy. Springer, 2011.
Nicks, Bret A, et al. Emergency Pericardiocentesis. New England Journal of Medicine, 22 Mar. 2012, www.nejm.org/doi/full/10.1056/NEJMvcm0907841.
Apple Heart Study

Written by: Em Wessling, MD (NUEM ‘22) Edited by: Dana Loke, MD (NUEM ‘19) Expert Commentary by: Rod Passman, MD
Chief Complaint: My watch thinks I have Atrial Fibrillation!
As technology advances, medicine must continue to advance in pace. Wearable technology has been evolving for decades. The information gathered from a wide range of these devices may someday help to provide healthcare workers with valuable information about a patient’s condition. However, for now, there is limited research on their utility within the healthcare field.
Thus far, both Apple Watch and Fitbit have been shown to correctly identify tachycardia during atrial tachyarrhythmias, but their accuracy to the heart rate varied with the type of arrhythmia (1,2). Apple Watch has been shown to be more accurate than Fitbit (1,2). The WATCH AF trial demonstrated it was possible with reasonable sensitivity (93.7%) and specificity (98.2) to use smart watches to diagnose Atrial Fibrillation (3).
How Apple Watch is tracking atrial fibrillation:
- Photoplethysmography: the use of light to determine volume within a structure at a given time
- Pulse is estimated by time between peak volume seen by photoplethysmography.
- When the pulse is highly variable between consecutive beats, irregular heart beat is suspected.
Apple Heart Study: The plan and the preliminary data (4, 5)
Study Design: Prospective, single arm pragmatic study
- Enrolled 419,093 participant
- Inclusion Criteria: appropriate Apple technology, Age≥22 years, US resident, proficient in English, valid phone number and email.
- Exclusion criteria: self-reported atrial fibrillation , atrial flutter, or anticoagulation
- Methods: “Irregular Pulse Notification” (indication of possible atrial fibrillation) sent to participants if 5/6 irregular pulses within 48 hour period, at which point participant was instructed to wear EKG patch for up to 7 days.
- Primary Outcome: Proportion of patients alerted with “Irregular Pulse Notification” who were found to have atrial fibrillation or atrial flutter on EKG patch, in the 65+ population as well as in all-comers.
- Secondary Outcomes: Positive predictive value (PPV) of irregular heart rhythm notification; percentage of those with irregular notification who contacted a health care professional within 3 months.
Preliminary Data presented at ACC:
- Participants who received “Irregular Pulse Notification”: 2,161 (0.52% all comers)
- Participants age >65 who received “Irregular Pulse Notification”: >3%
- EKG Patches sent to 658 participants; 450 returned.
34% of those returned showed atrial fibrillation
PPV for Tachogram: 71%
PPV for “Irregular Pulse Notification”: 84%
- Notification to doctor - approx. 50%
Limitations:
Small sample size for EKG patches, despite high enrollment
Self-reported data
Self-selecting group, i.e.may not be able to extrapolate prevalence data to those who do not wear smart watches
Potential Impact on Emergency Departments:
As more and more studies validate the accuracy of wearable technology to measure and recognize health conditions, the implications must be analyzed as well.
Prior to 2017, researchers began to predict that there would be an expansive increase in the rates of atrial fibrillation due to “worldwide aging” (6). While this review acknowledged there were “potential applications” for smart phone technology in the diagnosis, their predictions of the expanse of the epidemic of atrial fibrillation preceded definitive research showing increased diagnosis rates with wearable technology, which will likely only further expedite this growing patient population. The mSToPS Trial showed that immediate in-home monitoring with an EKG patch had 3% greater rates of atrial fibrillation diagnosis compared to delayed EKG monitoring at 4 months. This led to increased use of anticoagulants and increased health care utilization (7). If this increase was seen with EKG patches, consider the influx of patients to primary care and cardiology clinics in addition to emergency departments that can be projected based on the rise of smart watch detection of atrial fibrillation. Researchers in Australia had begun studying this prior to the commencement of the Apple Heart Study (8). When cardiac patients were asked if they trusted smart watches to predict arrhythmia and measure their heart rate only 53% agreed; however, that did not stop 91% from reporting they would seek care if their watch alerted them about an abnormality (8). While the preliminary data from the Apple Heart study shows that a much smaller percentage of those who were not previously cardiac patients sought medical care when alerted by their Apple Watch, further study is needed to see the extent to which advances in smart watch health technology will lead to an influx in patients to the Emergency Department due to concerns of arrhythmia found by a smartwatch (5).
While the accuracy of these methods of arrhythmia detection are still being studied, the potential for ED presentation with this chief complaint will continue to rise. In the fourth quarter of 2017 financial year, Apple alone sold greater than 8 million smart watches worldwide, making it the largest watch vender in the world (9). With these increased sales, comes the potential for increased recognition of arrythmia by smartwatch. Healthcare organizations throughout the country must strive to develop effective and efficient clinical pathways in order to evaluate, potentially diagnose, and treat this patient population. Upon presentation to the Emergency Department, each patient should receive an EKG, telemetry monitoring while in the Emergency Department and screaming lab work: often including CBC, BMP + Mg, and troponin. From there, the pathway may vary. Many would agree, if the patient is and has always been asymptomatic, work up is unremarkable, with normal sinus rhythm on their EKG, discharge home with an EKG patch and follow up with cardiology is reasonable. Conversely, an EKG showing atrial fibrillation would constitute a new diagnosis and further work up would proceed as with any other new diagnosis of Atrial Fibrillation. However, for those who fall in-between, the disposition is not as clear. What would you do?
Expert Commentary
More than 800 years ago, Maimonides described an irregular pulse that likely represented atrial fibrillation (AF). The development of the electrocardiogram by Einthoven 700 years later allowed surface recordings of human AF for the first time.1 With the recognition that AF is often asymptomatic and paroxysmal, the development of inexpensive, non-invasive, passive monitors for irregular rhythm identification has long been recognized as a potentially important tool for arrhythmia detection and management.
At its core (pun intended), the purpose of the Apple Heart Study was to assess the feasibility of AF screening in large populations by monitoring participants with a wrist-worn photoplethysmography (PPG) monitor.2 The PPG algorithm in the Apple Watch samples the pulse several times daily during periods of physical inactivity and increases the sampling rate if an irregular tachogram is detected. If 5 out of 6 tachograms are consistent with AF (requiring > 60 minutes of AF), the wearer receives an irregular rhythm notification. Since the version of the Apple Watch used in the study did not have the 30-second ECG feature (available in Series 4 watches and later), the Apple Heart Study protocol asked those who received the irregular rhythm notification to wear an ECG patch at a later date.
Several important facts can be gleaned from the Apple Heart Study. First, the study virtually enrolled 419,297 individuals in less than a year, a testament to the interest in the subject matter, the ease of remote enrollment when appropriate, and the enormous potential of digital health studies. Second, the fear that the healthcare system would be inundated with false positive AF notifications appears unfounded as 99.8% of participants under age 40 did not receive an irregular rhythm notification. Third, the positive predictive value for the irregular rhythm notification was surprisingly high (84%) despite that fact that the patch was applied a mean of 13 days following the notification and was worn for less than 7 days on average. This last point is worth emphasizing since with paroxysmal AF, a negative monitor placed two weeks after an irregular rhythm notification may simply mean that AF was not present during both time periods.
The study also has some important caveats. The Apple Heart Study did not report the sensitivity and specificity of the PPG algorithm for AF detection, a critical piece of missing data needed for clinical care and future research. Furthermore, only a minority of patients who received an irregular rhythm notification actually wore and returned the ECG monitor, showing that virtual enrollment doesn’t always translate into virtual protocol compliance. From a research perspective, wearable AF monitors have allowed for large-scale screening studies such as the Huawei Heart and Heartline Studies aimed at understanding the true prevalence of AF and the risks and benefits of early detection and treatment.3,4 From a clinical perspective, a patient who says “my watch says I have AF” still requires ECG confirmation, but that too has been made easier with the new generation of wearables.
References
1. Prystowsky EN. The history of atrial fibrillation: the last 100 years. J Cardiovasc Electrophysiol. 2008;19(6):575-582. doi:10.1111/j.1540-8167.2008.01184.
2. Perez MV, Mahaffey KW, Hedlin H, et al. Large-Scale Assessment of a Smartwatch to Identify Atrial Fibrillation. N Engl J Med. 2019;381(20):1909-1917. doi:10.1056/NEJMoa1901183
3. Guo Y, Wang H, Zhang H, et al. Mobile Photoplethysmographic Technology to Detect Atrial Fibrillation. J Am Coll Cardiol. 2019;74(19):2365-2375. doi:10.1016/j.jacc.2019.08.019
4. www.heartline.com

Rod Passman, MD
Professor, Feinberg School of Medicine
Cardiac Electrophysiology
Northwestern Memorial Hospital
How To Cite This Post:
[Peer-Reviewed, Web Publication] Wessling, E. Loke, D. (2021, Jan 25). Apple Heart Study. [NUEM Blog. Expert Commentary by Passman, R]. Retrieved from http://www.nuemblog.com/apple-heart.
Other Posts You May Enjoy
References
1. Koshy, Anoop N., et al. "Smart watches for heart rate assessment in atrial arrhythmias." International journal of cardiology 266 (2018): 124-127.
2. Koshy, A., et al. "Heart Rate Assessment by Smart Watch: Utility or Futility?." Heart, Lung and Circulation 26 (2017): S280-S281.
3. Dörr, Marcus, et al. "The WATCH AF trial: SmartWATCHes for detection of atrial fibrillation." JACC: Clinical Electrophysiology5.2 (2019): 199-208.
4. Turakhia, Mintu P., et al. "Rationale and design of a large-scale, app-based study to identify cardiac arrhythmias using a smartwatch: The Apple Heart Study." American heart journal207 (2019): 66-75.
5. ACC News Story. “Apple Heart Study Identifies AFib in Small Group of Apple Watch Wearers.” American College of Cardiology: Latest in Cardiology, American College of Cardiology, 16 Mar. 2019, www.acc.org/latest-in-cardiology/articles/2019/03/08/15/32/sat-9am-apple-heart-study-acc-2019.
6. Morillo CA, Banerjee A, Perel P, Wood D, Jouven X. Atrial fibrillation: the current epidemic. J Geriatr Cardiol. 2017;14(3):195–203. doi:10.11909/j.issn.1671-5411.2017.03.011
7. Steinhubl SR, Waalen J, Edwards AM, et al. Effect of a Home-Based Wearable Continuous ECG Monitoring Patch on Detection of Undiagnosed Atrial Fibrillation: The mSToPS Randomized Clinical Trial. JAMA.2018;320(2):146–155.
8. Koshy, A., et al. "Cardiac Patients Likely to Seek Medical Assistance Based on Abnormal Heart Rate Readings on Smart Watches or Smartphone ECG Monitors." Heart, Lung and Circulation 26 (2017): S280.
9. Canalys Press Team. “18 Million Apple Watches Ship in 2017, up 54% on 2016.” Canalys Newsroom, Canalys, 6 Feb. 2018, www.canalys.com/newsroom/18-million-apple-watches-ship-2017-54-2016.
Double Sequence Defibrillation For Vfib
What is better than shocking someone back into rhythm? Shocking them with twice the electricity. This week we discuss the utility of dual sequential defibrillation (DSD) in refractory ventricular fibrillation.
Myocarditis in the ED
Myocarditis is an inflammatory change of the heart muscle and an important differential diagnosis for patients presenting with non-specific symptoms such as low grade fever, fatigue, malaise, dyspnea on exertion, palpitations, and/or chest pain in the ED.
Beta Blocker Toxicity
Beta-blockers are the fifth most commonly prescribed medication in US and are frequently involved in potentially fatal single or multi-drug ingestions. Cardiovascular drugs as a whole are the 2nd most common culprit of adult death from all overdoses.
The Achy Breaky Heart
In 1990, only two years before singer Billy Ray Cyrus revealed his cardiac myocytes to be “achy breaky”, Japanese scientists first described a pathophysiologic mechanism for a common condition which has, for centuries, plagued philosophers and poets, cardiologists and lyricists alike: the broken heart.
The Utility of D-Dimer in Non-Traumatic Aortic Dissection
Acute aortic dissection is a potentially catastrophic cardiovascular disease, and is a somewhat rare but exceedingly important diagnosis to make. A low-risk, cost-efficient diagnostic test with the ability to reliably exclude this disease would be useful. Is the D-dimer that test?