

Understanding odontoid process fractures and their management in the ED
Posts filed under Orthopedics
Fracture-Related Vascular Injury
Identifying signs of fracture-related vascular injury with tips for management
Patellar Dislocations
How to identify, treat, and continue to manage patellar dislocations. Outlined by Emergency Medicine Residents and commented on by attending faculty at Northwestern Memorial Hospital.
Compartment Pressure Measurement: Using the Stryker Method
An overview of Compartment Pressure measurement using the Stryker Method.
Traumatic Arthrotomy

Written by: Parisa Kermani, MD (NUEM ‘23) Edited by: Alex Herndon, MD (NUEM ‘21)
Expert Commentary by: Matt Levine, MD
Case: A 25-year-old male comes into the ER after a saw accident at work. The patient was using a circular saw to cut wood when it slipped and the saw touched up against his knee. The patient has a 10cm linear vertical laceration over the anterior surface of his left knee (Figure 1). Bleeding is controlled. Patient ambulatory. Reporting 10/10 pain over the laceration.
What are the next best steps for evaluation and treatment of his injury?
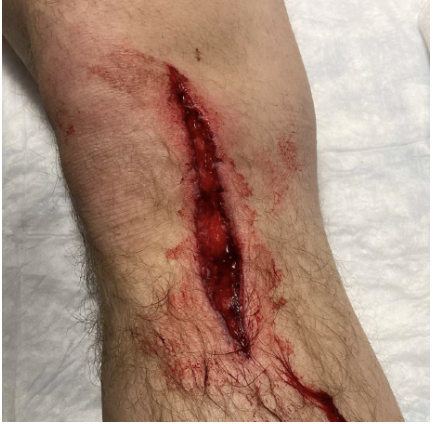
Figure 1: Knee laceration
Background
Traumatic arthrotomy is defined as a soft tissue injury over a joint that penetrates the joint space. Violation of the joint capsule exposes the sterile intra-articular space to the environment which can result in a deep infection and sepsis. The morbidity associated with septic arthritis is high, so it is important that providers have a high index of suspicion when evaluating wounds over joint surfaces.
The knee joint is the most common joint to be affected, followed by the ankle. Penetrating injuries have a higher rate of capsule violation so a history of knives or bullets should raise suspicion, though MVCs, falls, motorcycle accidents can also result in a deep injury. The capsule has little protection lateral to the patella (Figure 2 & 3), so even if the laceration does not appear deep there is potential that it penetrates the joint space.

Figure 2: Knee capsule anatomy

Figure 3: Knee CT scan
Evaluation
Exploration: The first step of evaluation is local wound exploration. It is useful to anesthetize the wound at this point, as this will make the patient more comfortable and allow for a better exam. Irrigate the wound with sterile saline. It is extremely important to visualize the base of the wound. Using a hemostat or q-tip to probe the tissue at the base can be helpful as to not miss any tunneling segments. Keep a close eye out for bubbles, synovial fluid (appears straw colored and oily) or visible bone/tendon as all of these indicate joint involvement. It is important to note that the absence of these findings does not rule out a traumatic arthrotomy.
X-ray: Many times, next step will be to get an X-ray to look for associated fractures. Though this is not the most sensitive test for evaluating for joint space violation, if you see intra-articular air, this signifies joint involvement and no further imaging is required before calling the orthopedic surgeons. Many times, the X-ray will be normal and further testing will need to be completed. Of note, an x-ray is not required if there is no concern about injury to the bone as it is unlikely going to give a definitive answer on traumatic arthrotomy in less obvious cases.
CT Scan: As far as imaging goes, CT scan is the imaging modality of choice for traumatic arthrotomy. Though not currently the gold standard for ruling out joint violation, CT scan has become more accepted as an alternative to saline load testing the joint. Although limited, a 2013 study by Konda et al, where direct arthroscopic visualization or septic arthritis at follow-up were used as the gold standard for diagnosis, found imaging by CT scan to be 100% sensitive and specific for diagnosing traumatic knee arthrotomy. When viewing a CT scan to evaluate for traumatic arthrotomy, the presence of gas in the joint, known as pneumarthrosis, indicates intra-articular extension (Figure 4).

Figure 4: Traumatic arthrotomy on CT scan
Source: Konda et al, 2013
Saline Load Test (SLT): Though not strongly backed by the literature, SLT is a standard tool used to assess for traumatic arthrotomy. SLT is done by performing an arthrocentesis of the affected joint away from laceration, once confirmed in the correct space, sterile saline is injected into the joint and the laceration site is observed for extravasation. The provider should also passively range the joint while injecting to ensure greater sensitivity. Table 1 below summarizes how much sterile saline should be injected to obtain 95% sensitivity for traumatic arthrotomy. Adding methylene blue to the saline has not been proven to increase sensitivity and generally no longer recommended. The sensitivity will be highly variable based on provider experience with the procedure and patient tolerance. It is important to remember that this procedure can be exquisitely painful and special attention should be paid towards the patient’s comfort.

Table 1: Amount of saline for 95% sensitivity SLT
Because strong, conclusive literature is lacking, the choice between CT versus SLT to rule out traumatic arthrotomy will depend on many different factors including provider procedural comfort, local practice patterns, available resources and patient input.
Treatment
Once a diagnosis of traumatic arthrotomy is confirmed through an above modality, orthopedics should be emergently consulted. Tetanus prophylaxis should be updated and the patient should be started on an IV antibiotic that covers both strep and staph. A 1st generation cephalosporin is usually sufficient. Other antibiotics should be considered if injury is from a human/animal bite, happened underwater, or if there is concern for fecal/other contamination. Definitive treatment is joint wash out in the Operating Room.
If the above modalities do not show evidence of arthrotomy the patient’s laceration may be repaired in usual fashion. The patient should be given strict return precautions and have close follow-up for wound/joint reevaluation and suture removal.
Sources
Browning BB, Ventimiglia AV, Dixit A, Illical E, Urban WP, Jauregui JJ. Does the saline load test still have a role in the orthopaedic world? a systematic review of the literature. Acta orthopaedica et traumatologica turcica. 2016;50(6):597-600. doi:10.1016/j.aott.2016.01.004
Gittings D, Dattilo J, Fryhofer G, Martin A, Hast M, Mehta S. The saline load test is effective at diagnosing traumatic arthrotomies of the shoulder. Journal of surgical orthopaedic advances. 2019;28(4):268-271.
Gittings DJ, Fryhofer GW, Hast MW, Steinberg DR, Levin LS, Gray BL. The saline load test is effective at diagnosing traumatic arthrotomies of the wrist. Techniques in hand & upper extremity surgery. 2019;23(2):59-61. doi:10.1097
Jonathan Michael Strong. Saline Load or CT: What’s the Best Test for Traumatic Arthrotomy. Acepnow magazine. 2020; https://www.acepnow.com/article/saline-load-or-ct-whats-the-best-test-for-traumatic-arthrotomy
Konda SR, Howard D, Davidovitch RI, Egol KA. The saline load test of the knee redefined: a test to detect traumatic arthrotomies and rule out periarticular wounds not requiring surgical intervention. Journal of orthopaedic trauma. 2013;27(9):491-497. doi:10.1097/BOT.0b013e31828211f3
Konda SR, Davidovitch RI, Egol KA. Computed tomography scan to detect traumatic arthrotomies and identify periarticular wounds not requiring surgical intervention: an improvement over the saline load test. Journal of orthopaedic trauma. 2013;27(9):498-504. doi:10.1097/BOT.0b013e31828219bc
Metzger P, Carney J, Kuhn K, Booher K, Mazurek M. Sensitivity of the saline load test with and without methylene blue dye in the diagnosis of artificial traumatic knee arthrotomies. Journal of orthopaedic trauma. 2012;26(6):347-349. doi:10.1097/BOT.0b013e3182255167
Nord RM, Quach T, Walsh M, Pereira D, Tejwani NC. Detection of traumatic arthrotomy of the knee using the saline solution load test. The journal of bone and joint surgery american volume. 2009;91(1):66-70. doi:10.2106/JBJS.G.01682
Timothy D. Roberts. Traumatic arthrotomy with pneumarthrosis on plain radiograph of the knee. Western journal of emergency medicine. 2016;17(2):184-185. doi:10.5811/westjem.2015.12.29317
Expert Commentary
What a great review of traumatic arthrotomy! You now have a concise reference that teaches you everything you would probably ever need to know about this tricky diagnosis! These injuries are so uncommon that the first hurdle to overcome is actually considering the diagnosis. If you don’t consider it, then you hopefully just get lucky by a diagnostic x-ray that was ordered for other reasons!
Physical exam and exploration is indeed important but has limitations and does not rule out the diagnosis if the suspicion is high enough. The tract may be small, jagged, or there may be soft tissue destruction that limits your visualization. Be sure to inspect the wound while passively ranging the joint in question since it is often unclear the precise position of the joint (fully flexed, fully extended, or somewhere in between) when the wound occurred. This may bring the wound tract into your field of view. Ideally your exploration should be in a bloodless, painless field and documented as such.
While x-rays lack sensitivity, they are a worthwhile starting point since they are less expensive, noninvasive, readily available, and you can stop if they are positive. X-rays may also better define the extent and trajectory of the wound tract which my either heighten your suspicion or provide reassurance that the trajectory was away from the joint.
If the diagnosis is still in question, I prefer CT in most scenarios. It provides additional information about any associated fractures. CT is painless. Intra-articular air is very easy to see on CT. The downside is increased cost. Saline load testing seems to have more room for error. The joint must be properly entered. Enough fluid must be injected to fill the joint enough to cause visible extravasation. And the diagnosis can still be missed if it is forgotten to range the joint during the SLT. It is also quite painful. Consider all the patients you see who present with a painful joint effusion that has gradually accumulated. In the SLT you are giving the patient a sudden acute joint effusion. Ouch! So just be thoughtful about the route you choose to go.

Matthew Levine, MD
Associate Professor
Department of Emergency Medicine
Northwestern Memorial Hospital
How To Cite This Post:
[Peer-Reviewed, Web Publication] Kermani, P. Herndon, A. (2022, Apr 25). Traumatic Arthrotomy. [NUEM Blog. Expert Commentary by Levine, M]. Retrieved from http://www.nuemblog.com/blog/traumatic-arthrotomy
Other Posts You May Enjoy


Nursemaid's Elbow
Written by: Richmond Castillo, MD (NUEM ‘23) Edited by: Shawn Luo, MD (NUEM ‘22)
Expert Commentary by: Jacob Stelter, MD (NUEM ‘19)
Expert Commentary
This is an excellent summary of the diagnosis and management of radial head subluxation (nursemaid’s elbow) in children. Clinically, as pointed out, these patients are usually toddlers and will come in after an injury to the arm. Usually, the clinical history will involve the child’s arm having been pulled on while the elbow was extended leading to sudden onset of pain and reduced mobility of the arm. The patient will most often be holding the elbow in flexion and be resistant to having it manipulated. In general, I have a low threshold to obtain radiographs on these patients. If the story and exam is classic for a radial head subluxation, imaging is technically not indicated, and reduction can be attempted. However, more often than not, the history can be vague, and the mechanism of injury may be unclear. In this situation, it is better to rule out a fracture first than to attempt a reduction without imaging. Attempted reduction could worsen or lead to displacement of a supracondylar humerus fracture if that is present. Keep in mind that it is not uncommon for the subluxation to reduce spontaneously during the process of obtaining x-rays.
There are two preferred techniques for reduction of a radial head subluxation. The method I start with is to support the patient's elbow and forearm and gently supinate the forearm while flexing the elbow and applying gentle pressure over the radial head. A “pop” sensation will often be felt as the radial head reduces. The other technique that can be used is to hyper-pronate the forearm while maintaining the elbow in a flexed position. Both of these techniques have a high success rate. Typically, the child will start using the arm again, but it may not be immediate. I will typically reassess the patient about 10-15 minutes post-reduction to ensure they are using their arm normally again. If the child is using their arm and able to extend and flex at the elbow without pain, they can be discharged, and no splinting is necessary. If no radiographs were obtained prior to reduction and the patient is not back to baseline post-reduction, x-rays should be obtained to rule out a fracture. Keep a broad differential, especially if the patient is not responding as you would expect or has other vital sign or exam abnormalities.

Jacob Stelter, MD, CAQ-SM
Division of Emergency Medicine | NorthShore University HealthSystem
NorthShore Orthopaedic Institute | Primary Care Sports Medicine
Clinical Assistant Professor | University of Chicago Pritzker School of Medicine
How To Cite This Post:
[Peer-Reviewed, Web Publication] Castillo, R. Luo, F. (2022, Feb 7). Nursemaid’s Elbow. [NUEM Blog. Expert Commentary by Stelter, J]. Retrieved from http://www.nuemblog.com/blog/nursemaids-elbow.
Other Posts You May Enjoy


Running Injuries
Written by: Eric Power, MD (NUEM ‘24) Edited by: Justin Seltzer, MD (NUEM '21) Expert review by: Terese Whipple, MD (NUEM '20)
With over 40 million runners in the United States alone and an ever-increasing interest in fitness among the general population, the frequency of running injuries presented to urgent care and emergency departments will only grow with time. This is especially true due to the high rate of injury among runners, with a published annual incidence rate ranging from 19% to 79%; with even conservative estimates, that is nearly 8 million running injuries annually.
There are several risk factors for running injuries with which the emergency physician should be familiar. Running injuries are generally the sequela of repetitive stress. Acute injuries represent a small minority of cases and are usually not serious. The strongest risk factors include older age, high mileage running, beginners or suddenly restarting running, those making a rapid increase in speed and/or distance, low bone density, and those with a history of previous injuries.
This article will focus primarily on several “low acuity” running injuries along with their initial evaluation and management. A vast majority of running injuries are not serious, however, the evaluation of the injured runner still demands detailed musculoskeletal examination and thoughtful consideration of more dangerous potential causes of the symptoms. Proper clinical diagnosis and recommendations can certainly speed recovery and return to activity.
Iliotibial (IT) band syndrome
Major population: Young, active with a recent change in running mileage and/or runs on hilly terrain
Presentation: Lateral knee pain, especially with activity, with or without lateral thigh and hip pain
Diagnosis: Tenderness along lateral thigh extending into the lateral knee, swelling at the distal aspect may be present, Ober’s test for IT band tightness (not diagnostic)
EM differential: meniscus injury, stress fracture, lateral ligamentous injury
Initial treatment: No running until pain resolves then gradual return at painless speeds, distances, home exercise program to stretch IT band
Follow-up: Routine primary care, consider PT referral
Patellofemoral pain syndrome
Major population: Young, usually female, participating in sports with high volume running and/or jumping
Presentation: Anterior, aching knee pain worse with knee flexion (e.g. climbing stairs)
Diagnosis: Anterior patella tenderness; pain with patellar grind test, deep knee flexion
EM differential: meniscus injury, stress fracture, ligamentous injury
Initial treatment: home exercise program or formal physical therapy to strengthen quadriceps, core, and hip abductors. consider a patella stabilizing knee brace
Follow-up: Routine primary care, consider PT referral
Medial Tibial Stress Syndrome (“Shin Splints”)
Major population: Any patient with a recently initiated intense exercise regimen
Presentation: Anteromedial tibial pain provoked by activity and improved with rest
Diagnosis: Reproduction of pain with palpation of a diffuse area of the posteromedial border of the tibia
EM differential: stress fracture, DVT, exertional compartment syndrome
Initial treatment: Rest, icing (~20 minutes per hour) until the pain has resolved, then a gradual return to activity at painless speeds, distances
Follow-up: Routine primary care, consider PT, sports medicine referral due to high failure rate of conservative management
Achilles Tendinopathy
Major population: Usually middle-aged with recently initiated exercise or increased intensity/frequency
Presentation: Chronic, gradually worsening posterior heel and foot pain, often worst in the morning, with an impaired plantarflexion and explosive movements of the ankle
Diagnosis: Tendon palpation reproduces the pain, diminished range of motion and strength, calf muscle atrophy (late finding)
EM differential: calcaneal stress fracture, DVT, Achilles tendon rupture
Initial treatment: Reduce the intensity of activity to walking only until pain resolves, home exercise program to stretch and eccentrically load the Achilles tendon
Follow-up: Sports medicine and PT referrals due to benefit of rehabilitation and availability of multiple specialized therapies; some cases are treated surgically
Plantar Fasciitis
Major population: High volume or newly initiated/increased running or sports, slightly more common in women
Presentation: Classically plantar midfoot to heel pain worse with the “first step” in the morning
Diagnosis: Pain reproduced with palpation of the medial tubercle of the calcaneus and proximal plantar fascia, positive windlass test
EM differential: Foot stress fracture
Initial treatment: Avoid triggering activities, home exercise program to stretch and deeply massage the plantar fascia
Follow-up: Referral to PT and a foot and ankle specialist (orthopedic surgeon or podiatrist) as chronic symptoms are common
Key points
A majority of running injuries are not serious or acute but can be function limiting if not properly diagnosed and managed
It is important to rule out major relevant differential diagnoses such as stress fractures, DVT, and ligament/tendon injuries prior to discharge
Universal management is with rest, as needed NSAIDs, a gradual return to activity when the pain has resolved, and routine primary care follow up; primary care sports medicine or orthopedic surgery should be reserved for severe symptoms or failure of conservative management
Alongside home exercises and stretches, consider PT referral routinely
References
Li HY, Hua YH. Achilles Tendinopathy: Current Concepts about the Basic Science and Clinical Treatments. Biomed Res Int. 2016;2016:6492597.
McClure CJ, Oh R. Medial Tibial Stress Syndrome. [Updated 2020 Aug 10]. In: StatPearls [Internet]. Treasure Island (FL): StatPearls Publishing; 2020 Jan-. Available from: https://www.ncbi.nlm.nih.gov/books/NBK538479/
Petersen W, Ellermann A, Gösele-Koppenburg A, et al. Patellofemoral pain syndrome. Knee Surg Sports Traumatol Arthrosc. 2014;22(10):2264-2274.
Petraglia F, Ramazzina I, Costantino C. Plantar fasciitis in athletes: diagnostic and treatment strategies. A systematic review. Muscles Ligaments Tendons J. 2017;7(1):107-118. Published 2017 May 10.
Strauss EJ, Kim S, Calce JG, Park D. Iliotibial Band Syndrome: Evaluation and Management. American Academy of Orthopaedic Surgeon. 2011;19(12):728-736.
van der Worp MP, ten Haaf DS, van Cingel R, de Wijer A, Nijhuis-van der Sanden MW, Staal JB. Injuries in runners; a systematic review on risk factors and sex differences. PLoS One. 2015;10(2):e0114937. Published 2015 Feb 23.
Expert Commentary
Thank you to Drs. Power and Seltzer for their concise and relevant review of common overuse injuries seen in runners. Although most of these injuries would not be considered emergent, correct diagnosis and referral of these patients is important to keep them active and decrease their likelihood of suffering the heart attacks, strokes, and chronic pain we see daily. This post did an excellent job of walking through several common injuries however, there is one more that I would like Emergency Physicians to consider in their differential for runners with extremity pain: Stress Fracture.
A stress fracture is break down in bone that occurs when abnormal stress is applied to healthy bone or normal stress is applied to unhealthy bone (osteopenia/porosis)
Female athletes are at particular risk if they are not fueling well enough, sometimes manifesting in menstrual dysfunction and decreased bone density
Commonly occurs in healthy runners when an athlete is increasing their training volume or intensity, or other new stress is applied such as a new running surface
Complain of insidious onset pain that worsens with running and other pounding activity. Pain is often better with rest early on.
If the bone is palpable from the surface, it will have point tenderness over the area. Pain will be reproduced with the hop test and the fulcrum test.
X-rays may be normal early on, later in the course, they may show periosteal reaction or fracture line. MRI can be obtained on an outpatient basis if needed.
Most stress injuries can be managed by decreased weight bearing through alterations in training, however, sometimes offloading with a walking boot or crutches may be necessary depending on severity and location.
High-risk stress injuries that warrant prompt sports medicine or orthopedics referral: femoral neck (superior aspect), patella, anterior tibia, medial malleolus, talus, tarsal navicular, the proximal fifth metatarsal, tarsal sesamoids.
If strong suspicion of a high-risk stress injury or diagnosis is confirmed in the ED, these patients should be given crutches and made non-weight bearing until follow-up.
Hopefully, this post will help you build a differential for overuse injuries you may encounter in the ED, and provide proper follow-up in order to keep our patients healthy, active, and engaged in the activities they enjoy.

Terese Whipple, MD
Assistant Professor
Department of Emergency Medicine
University of Iowa Hospitals and Clinics
How To Cite This Post:
[Peer-Reviewed, Web Publication] Power, E. Seltzer, J. (2022, Jan 3). Running Injuries. [NUEM Blog. Expert Commentary by Whipple, T]. Retrieved from http://www.nuemblog.com/blog/runninginjuries
Other Posts You May Enjoy
Featured


Hip Pain in Pediatrics
Written by: Tommy Ng, MD (NUEM ‘24) Edited by: Patricia Bigach, MD (NUEM ‘22) Expert review by: Terese Whipple, MD '20
So your kid won’t walk
One of the most common complaints in a pediatric Emergency Department is a child refusing or inability to ambulate. For normal development, a child is typically able to stand at 9 months, walk at 12 months, and run at 18 months. There is a certain degree of variability for these age constraints however any acute decrease in mobility should prompt an evaluation. A limp is defined as any abnormality in gait caused by pain, weakness, or deformity [1]. There are a plethora of conditions that can manifest with an antalgic gait or refusal to bear weight and it may be difficult to distinguish between etiologies given a child’s age.
History and physical
Age is an important factor as certain conditions are more likely depending on the patient’s age
Acuity should be determined as the chronicity of limp as certain etiologies are more acute while others are indolent. Additionally, certain infectious etiologies are more likely to present acutely or chronically.
Fever may suggest an infectious or rheumatologic cause
Trauma can help distinguish soft tissue vs orthopedic injuries
Past medical history is important to be focused on recent illnesses, antibiotic use, history of sickle cell disease, or hormonal diseases.
Physical examination should always include an attempt to ambulate the child unless there is an obvious contraindication noted immediately (eg open fracture). If the child refuses to bear weight, the child should be made non-weight bearing until serious pathology which can be worsened by walking is ruled out. Strength and range of motion of both lower extremities should also be examined [2].
Normal gait cycle (orthobullets.com)
Differential: the bad, the worse, and the ugly
Infectious
Transient Synovitis - Relatively common with a lifetime risk of 3%. Affects ages 3-8, males to females 2:1 [3]. Typically well appearing with normal labs, however, this is a diagnosis of exclusion and a septic joint should be ruled out. Management includes NSAID use and return to activity as tolerated [4].
Septic Arthritis - A “do not miss” diagnosis, commonly ages 3-6 with a slight male predominance [5]. Typically presenting with fevers and abnormal labs. The Kocher Criteria (originally developed in 1999 and validated in 2004) can be helpful in determining the likelihood of septic arthritis [6]. Management includes imaging studies, typical ultrasound to assess for a joint effusion, then a diagnostic arthrocentesis & antibiotics. The antibiotic regimen should be tailored to the child’s age and other predisposing factors to certain pathogens.


Osteomyelitis - Occurs in 1:5000-7700 kids in increased prevalence with MRSA communities; 2:1 male to female predominance with half of all cases occurring in ages less than 5 [7]. Commonly hematogenous spread from bacteremia; clinical suspicion should prompt radiologic evaluation. X-rays may be likely to be normal/inconclusive early in the disease course and MRI may be often indicated. Labs can be helpful but are not specific; a systematic review of >12,000 patients showed that elevated WBC was only present in 36% of patients [7]. ESR and CRP are non-specific but have a sensitivity of 95% [7]. Antibiotic therapy guidelines are similar to the management of septic arthritis. Surgical intervention may be indicated if there is a lack of improvement after 48-72 hours [8].

Osteomyelitis of the distal tibia (orthobullets.com)
Orthopedic
Legg-Calve-Perthes / Avascular Necrosis of the Hip - Age range 3-12 with a peak at 5-7, male to female ratio 3:1, can be bilateral in 10-20% of patients [9]. Radiographs should be obtained with high clinical suspicion but are often normal early in the course. An MRI would show fragmentation of the femoral head. The patient should be made non-weight bearing and be referred to a specialist. Children under 8 typically have a better prognosis however long-term management is poorly defined as there has been no long-term study [10].

Avascular necrosis of bilateral hip (orthobullets.com)


SCFE of left hip (orthobullets.com)
Slipped Capital Femoral Epiphysis - Typically obese child, median age 12, bilateral in 20-40% of cases [11]. Presentation is classically chronic hip pain with antalgic gait however may present with knee pain. Physical exam classically shows external rotation and abduction of the hip during hip flexion. Management is orthopedic consultation for operative stabilization [12].
References
Smith E, Anderson M, Foster H. The child with a limp: a symptom and not a diagnosis. Archives of disease in childhood - Education & practice edition. 2012;97(5):185-193. doi:10.1136/archdischild-2011-301245.
Naranje S, Kelly DM, Sawyer JR. A Systematic Approach to the Evaluation of a Limping Child. Am Fam Physician. 2015 Nov 15;92(10):908-16. PMID: 26554284.
Landin LA, Danielsson LG, Wattsgård C. Transient synovitis of the hip. Its incidence, epidemiology and relation to Perthes' disease. J Bone Joint Surg Br. 1987;69(2):238-242.
Kermond S, Fink M, Graham K, Carlin JB, Barnett P. A randomized clinical trial: should the child with transient synovitis of the hip be treated with nonsteroidal anti-inflammatory drugs?. Ann Emerg Med. 2002;40(3):294-299. doi:10.1067/mem.2002.126171
Bennett OM, Namnyak SS. Acute septic arthritis of the hip joint in infancy and childhood. Clin Orthop Relat Res. 1992;(281):123-132.
Kocher MS, Zurakowski D, Kasser JR. Differentiating between septic arthritis and transient synovitis of the hip in children: an evidence-based clinical prediction algorithm. J Bone Joint Surg Am. 1999;81(12):1662-1670. doi:10.2106/00004623-199912000-00002
Dartnell J, Ramachandran M, Katchburian M. Haematogenous acute and subacute paediatric osteomyelitis: a systematic review of the literature. J Bone Joint Surg Br. 2012;94(5):584-595. doi:10.1302/0301-620X.94B5.28523
Kaplan SL. Osteomyelitis in children. Infect Dis Clin North Am. 2005;19(4):787-vii. doi:10.1016/j.idc.2005.07.006
Johansson T, Lindblad M, Bladh M, Josefsson A, Sydsjö G. Incidence of Perthes' disease in children born between 1973 and 1993. Acta Orthop. 2017;88(1):96-100. doi:10.1080/17453674.2016.1227055
Canavese F, Dimeglio A. Perthes' disease: prognosis in children under six years of age. J Bone Joint Surg Br. 2008 Jul;90(7):940-5. doi: 10.1302/0301-620X.90B7.20691. PMID: 18591607.
Herngren B, Stenmarker M, Vavruch L, Hagglund G. Slipped capital femoral epiphysis: a population-based study. BMC Musculoskelet Disord. 2017;18(1):304. Published 2017 Jul 18. doi:10.1186/s12891-017-1665-3
Reynolds RA. Diagnosis and treatment of slipped capital femoral epiphysis. Curr Opin Pediatr. 1999;11(1):80-83. doi:10.1097/00008480-199902000-00016
Expert Commentary
Thank you to Drs. Ng and Bigach for compiling a concise approach to a common chief complaint encountered by Emergency Physicians across the county: a child with a new limp or the refusal to bear weight.
The first step to this often-challenging problem is to try to localize the pain, and in non-verbal kiddos, this can be the most difficult task. As highlighted above, if the child is able, observe their ambulation and establish laterality of the limp and when it occurs during the gait cycle. Most of the disease processes we as Emergency Physicians are concerned about will cause an antalgic gait or a shortened stance phase. Shortening the stance phase decreases the amount of time that the child is bearing weight on the painful limb in an effort to decrease their pain. Sometimes this is so effective that their parents will observe a limp, but the child will not complain of any pain. A thorough exam of the back and lower extremities including inspection, palpation, and range of motion of all joints is also imperative for trying to localize the cause of their symptoms.
Let your exam and history guide lab evaluation and imaging, however, a good place to start is usually basic labs and inflammatory markers and a plain film of the affected joint. In some cases, you won’t be able to localize pain or exam findings at all, and a broad workup including plain film imaging of the entire extremity may be necessary.
A few additional pearls:
Always consider non-accidental trauma in children with new limp or refusal to bear weight.
Systemic symptoms such as fever should raise your suspicion for infectious etiology such as osteomyelitis or septic arthritis.
Classically children with transient synovitis will have had a recent viral illness, but this is not always the case.
Always examine the hips and consider hip plain films in children complaining of knee or thigh pain, but with a benign knee exam. They could be hiding an SCFE or Leg-Calve-Perthes disease.
Don’t forget to examine the SI joint, as it too can become infected or inflamed.
History of night pain should raise your antenna for malignancy like osteosarcoma, Ewing’s sarcoma, or leukemia.
Consider Lyme arthritis in your differential for joint pain and swelling in endemic areas.
Ultrasound can be useful when evaluating for septic arthritis and transient synovitis and can be performed at the bedside. However, both septic arthritis and transient synovitis can cause effusion, and therefore it is not useful in differentiating between the two. (That’s where the Kocher Criteria should be used to risk-stratify and determine if joint aspiration and fluid analysis are warranted)

Ultrasound evaluation of a pediatric hip joint demonstrating effusion courtesy of Dr. Maulik S Patel (https://radiopaedia.org)
Finally, make sure that the parents understand the diagnosis, expected course, and follow-up plan. If the child continues to refuse to bear weight, their symptoms worsen or do not improve, or they develop new concerning symptoms such as new fever or new urinary retention, they should return to the Emergency Department or their pediatrician for re-evaluation. More than once I’ve had patients who seemed for all the world to have transient synovitis eventually be diagnosed with spinal cord tumor, chronic recurrent multifocal osteomyelitis, etc.
Terese Whipple, MD
Assistant Professor
Department of Emergency Medicine
University of Iowa Hospitals and Clinics
How To Cite This Post:
[Peer-Reviewed, Web Publication] Ng, T. Bigach, P. (2021, Dec 20). Hip Pain in Pediatrics. [NUEM Blog. Expert Commentary by Whipple, T]. Retrieved from http://www.nuemblog.com/blog/hippainpediatrics
Other Posts You May Enjoy
Featured
Ankle Injuries
Written by: Eric Power, MD (NUEM ‘24) Edited by: Brett Cohen, MD (NUEM ‘21)
Expert Commentary by: Jake Stelter, MD (NUEM ‘19)
Stepwise Approach to Management of Ankle Injuries in the Emergency Department
Introduction
Ankle injuries are a common presentation to the emergency department. This group of injuries varies in severity with different treatments, discharge instructions, and follow up plans based on the injury classification.. Ankle fractures also have a large degree of variability in severity and require different initial management. In this post, we will focus on the most common types of ankle injuries and discuss the most important steps for initial assessment, management, and discharge instructions ED clinicians should be giving to their patients.
Ankle Sprains
A very common presentation of ankle injuries, especially for young athletes, is a patient coming in saying they “rolled” their ankle. This most often infers a mechanism of an inversion injury to the ankle, often after making a cut or sudden change in direction in a sporting event or landing on another competitor’s foot. In fact, it is estimated that 25% of all musculoskeletal injuries are inversion ankle injuries, and that half of all these injuries occur during sporting events. Sudden, forced inversion of the ankle, often while in slight plantar flexion, may result in injury to one or more ligaments of the lateral ankle ligament complex. The anatomy of this complex, from anterior to posterior, consists of the anterior talofibular ligament (ATFL), the calcaneofibular ligament (CFL), and the posterior talofibular ligament (PTFL) [1].
Isolated damage to the ATFL is by far the most frequent injury after “rolling an ankle”, making up two-thirds of all cases. With increased amounts of inversion force there is injury to the CFL followed by the PTFL, which are involved in about 20% of cases [2]. However, as with almost all complaints that come into the ED, a focused history and physical exam is the most important initial step to assess and correctly diagnose an ankle injury. The exam should start with assessments of neurovascular status with pulses, sensation, and capillary refill. The ankle should also be examined for gross deformity, tenderness, swelling, range of motion (ROM), strength, and associated injuries of the foot or knee.
Assessing for other Injuries
It is also important to recognize that ligamentous injuries often do not happen in isolation. Studies have found the prevalence of concurrent bony injuries in patients with ankle sprains to be 15-21%, with an anterior talofibular avulsion injury being the most common type [3,4]. When trying to decide whether to image these patients with ankle pain and likely sprains to assess for bony injury, many EM physicians may be familiar with the Ottawa rules. The rules and several interactive clinical decision-making tools are available online. For review, if the patient meets any of the following criteria, they require imaging of the ankle to assess for bony injuries.
Tenderness at the distal 6cm of the posterior edge of the fibula or tibia
Tenderness at the tip of either malleolus
Tenderness at the base of the fifth metatarsal or navicular
Inability to take four steps immediately after injury and on initial evaluation in the Emergency Department
A recently conducted review by Beckenkamp et al. revealed these rules to be highly sensitive (99.4%), but poorly specific (35.3%) to rule out visible fractures on plain films [6].
If x-rays are negative for fracture, the patient still may require orthopedic follow-up, surgery, and have a longer recovery if there is concern for a syndesmotic injury, or “high-ankle sprain”. This is the result of an injury to the tibiofibular ligament and is further discussed in a post by Ford et al [7]. Important considerations when there is clinical concern for this injury include looking for bony overlap on the malleolar films and performing specific exam maneuvers such as a “squeeze test”.
Symptom Management
When deciding what analgesic to use, providers should use clinical gestalt. In order to limit the use of opioid pain medications to prevent dependence and other associated side effects, we recommend they are only used in severe injuries where the patient is in obvious, uncontrolled pain or after a trial of non-opioid pain medications has failed. It is also our recommendation that physicians should not hesitate to use NSAIDs for pain management in fractures without other contraindications, as overall there is limited evidence to suggest it impairs bone healing [8,9]. These medications also provide the benefit of reducing inflammation in patients with swelling and/or joint effusion.
Generally accepted principles to promote healing, decrease swelling, and reduce pain are frequently referred to as the acronym “RICE” or “PRICE”. PRICE is now preferred because it includes protection of the affected structures, along with the other classic teachings. The remainder of the useful acronym includes rest of the injured joint, using ice for 20 minutes on, followed by at least one hour off while there is still pain and effusion, wearing a compression sock or stocking to decrease swelling, and elevating the affected joint above the level of the heart when possible [10]. These strategies should be used in conjunction with anti-inflammatory medications as previously mentioned to provide symptomatic relief while the injury is healing, followed by a focused home exercise program or physical therapy, often after an evaluation and referral from their primary care physician.
For a mild ankle sprain, PRICE with encouragement of early weight bearing is the ideal management. Semi-rigid braces such as an ankle stirrup brace may be superior to an ace wrap [11]. For moderate ankle sprains, give the patient crutches and have them avoid weight bearing for 2-3 days after injury, with encouragement to begin crutch walking when they are able to tolerate it [12]. A common error in treatment of mild and moderate sprains is prolonged immobilization which may delay recovery, these patients should be encouraged to perform range of motion exercises at home. For severe ankle sprains, immobilize the patient in a splint and refer them to follow-up closely with Orthopedic surgery [13].
Summary and Recommendation of Steps in Evaluation of Ankle Injuries for the ED Physician:
Expose the joint
Focused history: mechanism, ability to ambulate immediately after injury, co-injuries
Physical examination of the ankle: with a focus on neurovascular status, gross deformity, swelling, point tenderness, ability to ambulate or bear weight, strength, and ROM of the joint
Physical examination of the rest of the extremity: Evaluate the foot, knee and tibia/fibula for associated injuries.
Analgesia: NSAIDs and acetaminophen, adjuncts if needed based on severity of injury and initial pain control
Imaging, if appropriate: recommendation to use tools such as the Ottawa Ankle Rule and Ottawa Foot Rule
Protection: ace wrap, air cast, walking boot up to splint and crutches, if needed
Discharge instructions for acute recovery (“PRICE”) from injury and follow-up appointment
References:
van den Bekerom MP, Kerkhoffs GM, McCollum GA, Calder JD, van Dijk CN. Management of acute lateral ankle ligament injury in the athlete. Knee Surg Sports Traumatol Arthrosc. 2013 Jun;21(6):1390-5. doi: 10.1007/s00167-012-2252-7. Epub 2012 Oct 30. PMID: 23108678.
Brostrom L (1966) Sprained ankles. V. Treatment and prognosis in recent ligament ruptures. Acta Chir Scand 132:537–550
Debieux P, Wajnsztejn A, Mansur NSB. Epidemiology of injuries due to ankle sprain diagnosed in an orthopedic emergency room. Einstein (Sao Paulo). 2019 Sep 23;18:eAO4739. doi: 10.31744/einstein_journal/2020AO4739. PMID: 31553355; PMCID: PMC6905160.
Bachmann LM, Kolb E, Koller MT, Steurer J, Ter Riet G (2003) Accuracy of Ottawa ankle rules to exclude fractures of the ankle and mid-foot: systematic review. BMJ 326:417–423
Stiell IG, McKnight RD, Greenberg GH, McDowell I, Nair RC, Wells GA, et al. Implementation of the Ottawa ankle rules. JAMA. 1994;271(11):827-32.
Beckenkamp PR, Lin CC, Macaskill P, Michaleff ZA, Maher CG, Moseley AM. Diagnostic accuracy of the Ottawa Ankle and Midfoot Rules: a systematic review with meta-analysis. Br J Sports Med. 2017;51(6):504-10. Review.
[Peer-Reviewed, Web Publication] Ford W, Li-Sauerwine S. (2019, May 27). Not All Ankle Sprains are Created Equal. [NUEM Blog. Expert Commentary by Levine M]. Retrieved from http://www.nuemblog.com/blog/high-ankle-sprain.
1. Adolphson, P., Abbaszadegan, H., Jonsson, U., Dalen, N., Sjoberg, H.E., Kalen, S. No effects of piroxicam on osteopenia and recovery after Colles’ fracture: A randomized, double-blind, placebo-controlled prospective trial. Archives of Orthopaedic and Trauma Surgery, 1993; 112: 127-130.
[Peer-Reviewed, Web Publication] Farcas A, Bode, J. (2020, April 6). Clinical Question: are we impeding our patients’ fracture healing by giving them NSAIDs? [NUEM Blog. Expert Commentary by Levine, M]. Retrieved from http://www.nuemblog.com/blog/fx-nsaids
Ivins D. Acute ankle sprain: an update. Am Fam Physician. 2006 Nov 15;74(10):1714-20. PMID: 17137000.
Lardenoye S, Theunissen E, Cleffken B, Brink PR, de Bie RA, Poeze M. The effect of taping versus semi-rigid bracing on patient outcome and satisfaction in ankle sprains: a prospective, randomized controlled trial. BMC Musculoskelet Disord. 2012;13:81.
Birrer RB, Fani-Salek MH, Totten VY, Herman LM, Polit V. Managing ankle injuries in the emergency department. J Emerg Med. 1999;17(4):651-660.
Expert Commentary
This is a great review of ankle sprain injuries. Ankle sprains are one of the most common musculoskeletal injuries to present to the Emergency Department. From an emergency perspective, these injuries do not often require extensive intervention and are usually treated as discussed above with PRICE therapy. However, there are some important pitfalls to mention in regard to more serious injuries that can often be missed. The ankle joint is complex. It has multiple directions of motion and receives and distributes a lot of force and weight. It is the connection point between the lower leg and the foot, with multiple muscles and tendons originating in the lower leg, passing through the ankle and attaching to insertions on the foot. As a result of this anatomy, it is essential to not only evaluate the ankle, but to also pay attention to the foot and lower leg when evaluating an ankle sprain.
As pointed out, the most important first step in evaluating an ankle injury is to assess for neurovascular compromise and deformity. Dislocations or fractures causing neurovascular compromise require immediate reduction. Next, identifying the amount of swelling and ecchymosis is important. The more swollen and ecchymotic the ankle is, the more likely there is to be a severe injury. Palpation of the ankle is essential to guide further workup. Examining and palpating the base of the 5th metatarsal is important to evaluate for potential fractures to that bone. In addition, palpation of the entire fibula is important as well. External rotation injuries of the ankle can lead to syndesmotic sprains and a fracture of the proximal fibula called a Maisonneuve fracture. This will not be readily apparent on isolated ankle radiographs. In addition, I have a low threshold to image ankle injuries. Often when patients are in acute pain, it can be difficult to narrow down areas of tenderness. In addition, these patients will get x-rays if they follow up in an orthopedic clinic regardless.
My treatment of ankle sprains involves protecting the ankle, usually with an ace wrap and a stirrup ankle brace. I will provide crutches for non-weight bearing for the first 24 hours, after which I encourage patients to weight bear as tolerated. I also give instructions on ankle exercises to be done at home to prevent stiffness. For severe swelling or for high ankle sprains (discussed in a separate blog post), I will place the patient in a high rise controlled ankle movement (CAM) walking boot. Intermittent ice application for the first forty-eight hours definitely helps with swelling and pain, as does elevating the ankle when sitting. Compression stockings can be used, but are often painful. Hence, I prefer using an ace wrap for localized compression. Avoiding activities more intense than walking can worsen the injury and delay healing, so I typically tell patients to avoid running and returning to sports for a week or until reassessed, depending on the extent of injury. Reevaluation after a week with a sports medicine or orthopedic provider is beneficial to assess for healing, determine if further imaging, such as an MRI, is required, and begin rehab therapy.

Jacob Stelter, MD CAQ-SM
Division of Emergency Medicine
NorthShore Orthopaedic Institute
NorthShore University HealthSystem
How To Cite This Post:
[Peer-Reviewed, Web Publication] Power, E. Cohen, B. (2021, Nov 8). Ankle Injuries. [NUEM Blog. Expert Commentary by Stelter, J]. Retrieved from http://www.nuemblog.com/blog/ankle-injuries.
Other Posts You May Enjoy


Knee Dislocation

Written by: Andrew Rogers, MD, MBA (NUEM ‘22) Edited by: Amanda Randolph, MD (NUEM ‘21) Expert Commentary by: Matt Levine, MD
Introduction
Tibiofemoral dislocations are a relatively uncommon injury with high risk of morbidity to patients, and therefore represent an injury that the Emergency Physician should familiar with diagnosing and treating. The incidence of knee dislocation is quite low, representing approximately 0.02% of all orthopedic injuries. [1] Morbidity is high, with rates of vascular injury of 7-40%, neurologic injury of 5-40%, and amputation rates of around 12%. [2,3] Delays in identifying vascular injury >8 hours can result in higher rate of amputation approaching 86%. [3,4] Timely identification, treatment, and disposition directly impacts patient’s lives and limbs.
Anatomic Review
The knee is stabilized by ligaments, tendons, muscles, menisci, and cartilage. Figure 1 highlights key anatomic structures that stabilize the knee joint, including the major ligaments of the ACL, PCL, MCL, and LCL. These ligaments, in various combinations, are disrupted in knee dislocations.
The neurovascular anatomy is also important to review and understand (Figure 2). The popliteal artery courses posterior to the joint and is tethered both proximally (at the tendinous hiatus of the adductor magnus) and distally (at the tendinous arch of the soleus muscle), making it susceptible to injury. [2] The sciatic nerve divides into the tibial and common peroneal nerves proximal to the popliteal fossa, with the common peroneal nerve tethered about the fibular neck. This attachment similarly increases the risk of common peroneal nerve injury. [2]
![Figure 1: Structural Anatomy of the Knee [5]](https://images.squarespace-cdn.com/content/v1/549b0d5fe4b031a76584e558/1613997183287-ADV18WC2TENS07IAKW85/Picture1.png)
Figure 1: Structural Anatomy of the Knee [5]
![Figure 2: Neurovascular Anatomy of the Knee [6]](https://images.squarespace-cdn.com/content/v1/549b0d5fe4b031a76584e558/1613997188684-EJ3N1PMXE529KLK8HF5X/Picture2.png)
Figure 2: Neurovascular Anatomy of the Knee [6]
Mechanism of injury
The mechanism of a knee dislocation can be high-energy, low-energy, or ultra-low energy. [2]
High energy: MVCs, falls from heights, crush injuries – ~50% of knee dislocations
Low energy: Sports injuries – ~33% of knee dislocations
Low energy: Falls from standing - ~10% of knee dislocations
Ultra-low energy: ADLs in morbidly obese (BMI >40) population [7, 8]
Classifications of Knee Dislocations
Two main classifications are used to categorize knee dislocations. [2] The Kennedy Classification defines the injury based on the direction of displacement of the tibia relative to the femur (Figure 3) The Schenck Classification is based on the pattern of ligamentous injury, with the Wascher modifications specifying lateral ligaments ruptured (Figure 4).
![Figure 3: Kennedy Classification of knee dislocations with example illustrations [9]](https://images.squarespace-cdn.com/content/v1/549b0d5fe4b031a76584e558/1613997416760-QW0N1ML3ECI1MOFL10CA/Picture3.gif)
Figure 3: Kennedy Classification of knee dislocations with example illustrations [9]
![Figure 4: Schenck Classification System with Wascher Modification [2]](https://images.squarespace-cdn.com/content/v1/549b0d5fe4b031a76584e558/1613997441216-A4W0T4WFTEFRW9QKNGF3/Picture4.png)
Figure 4: Schenck Classification System with Wascher Modification [2]
ED Evaluation
Approximately 50% of knee dislocations spontaneously reduce so the Emergency Physician should maintain spontaneously reduced knee dislocation on their differential in all patients presenting with knee pain, especially for the obese patient with an ultra-low energy mechanism. [2, 3] Figure 5 is a summary diagram from Gottlieb, et al summarizing the algorithm for evaluation and management of knee dislocations.
![Figure 5: Algorithm for the evaluation and management of knee dislocations in the Emergency Department [10]](https://images.squarespace-cdn.com/content/v1/549b0d5fe4b031a76584e558/1613997537110-D0IQVUWEETPIQY53O7BZ/Picture5.png)
Figure 5: Algorithm for the evaluation and management of knee dislocations in the Emergency Department [10]
History
Some historical details to inquire about include:
Mechanism of injury
Sensation of instability
Deformity at any point in time
History of injury or surgery to the joint
Timing of injury
Initial Physical Exam
As 50% of dislocations spontaneously reduce or due to an obese patient population, there may not be an obvious physical deformity. Key points to include (and document) on the physical exam include: [3, 10]
Gross deformity
Vascular exam
Assess for presence of dorsalis pedis and posterior tibialis pulses
Look for hard signs of vascular injury: pallor, coolness, pulsatile hematoma, pulsatile hemorrhage, palpable thrill, audible bruit, absent or diminished pulses
Neurologic exam
Sensory and motor deficits
Signs of common peroneal nerve injury:
Sensory deficit to lateral leg and dorsal foot
Inability or weakness in eversion and dorsiflexion of foot
Skin exam
Look for pinched, discolored, tented, or threatened skin
Assess for open dislocation or fracture
Bruising without effusion suggests capsule disruption – may hint toward dislocation [11]
Ligamentous laxity
May be limited by pain, effusion, or deformity
Compartments exam
In high-energy mechanisms, consider other injuries as a knee dislocation may be distracting, or consider careful examination of the knee if other injuries limit history (for example a head injury sustained in an MVC).
Initial imaging
AP and lateral radiographs of the knee
Recommended to also obtain radiographs of femur, tibia and fibula, as well as ankle and hip joints, although additional radiographs should not delay closed reduction if indicated, and may be obtained after reduction of the knee [11]
If patient cannot tolerate plain films, can consider urgent CT
Assess for dislocation and fractures (Figure 6)
Some subtle signs of spontaneously reduced knee dislocation include: [11]
Widening of medial joint space on AP film
Segond fracture – avulsion fracture of lateral tibial plateau which is frequently associated with ACL disruption (Figure 7)
Fibular head avulsion fracture (AKA arcuate fracture) – avulsion of LCL or arcuate ligament complex (Figure 7)
![Figure 6: Lateral knee dislocation [12]](https://images.squarespace-cdn.com/content/v1/549b0d5fe4b031a76584e558/1613998385205-AVMREK6NR6X9OK4U3NE3/Picture6.jpg)
Figure 6: Lateral knee dislocation [12]
![Figure 6: Posterior knee dislocation [13]](https://images.squarespace-cdn.com/content/v1/549b0d5fe4b031a76584e558/1613998412027-J92I2QTYDUU7MMPFLGWZ/Picture7.jpg)
Figure 6: Posterior knee dislocation [13]
![Figure 7: Segond fracture with red circle showing lateral tibial plateau avulsion fracture [14]](https://images.squarespace-cdn.com/content/v1/549b0d5fe4b031a76584e558/1613998585798-OB51SEXPTLTH98ZZHJDT/Picture8.jpg)
Figure 7: Segond fracture with red circle showing lateral tibial plateau avulsion fracture [14]
![FIgure 7: Fibular head avulsion fracture with white arrow showing avulsed fragment [15]](https://images.squarespace-cdn.com/content/v1/549b0d5fe4b031a76584e558/1613998622903-ZZWVB1KHKD3VLOPTOSDD/Picture9.jpg)
FIgure 7: Fibular head avulsion fracture with white arrow showing avulsed fragment [15]
Reduction
Once the diagnosis of knee dislocation is made, reduction should be attempted in the Emergency Department under adequate analgesia and conscious sedation. Early orthopedics consultation is recommended. Reduction technique requires at least two team members to perform, and involves reversing the mechanism of injury (Figure 8). [3, 10] One team member stabilizes the distal femur while the other team member provides in-line traction on the lower leg. If this is unsuccessful, then apply anterior or posterior pressure to the proximal tibia and/or distal femur with in-line traction still applied to facilitate relocation. Avoid applying pressure to the popliteal fossa, which may cause or worsen neurovascular injury. Some knee dislocations may not be reducible in the Emergency Department and may require open reduction by orthopedics in the operating room.
![Figure 8: Technique for reduction of knee dislocation [20]](https://images.squarespace-cdn.com/content/v1/549b0d5fe4b031a76584e558/1613998715615-OCFRYK6BGVNV5R1IX9FK/Picture10.jpg)
Figure 8: Technique for reduction of knee dislocation [20]
Post reduction
After successful reduction, splint in 20 degrees of flexion and/or use a knee immobilizer to stabilize the joint. [3, 10] Cut out windows in the splint to perform regular neurovascular checks. Prior to splint placement, consider full ligamentous examination while the patient is under conscious sedation prior to splinting to assess ligamentous injury.
Repeat evaluation of neurovascular status is imperative. Evaluation of peripheral pulses is key, but normal pulses may not rule out vascular injury due to collateral flow about the knee. [16, 17] An Ankle-Brachial Index (ABI) should be obtained in all patients (Figure 9). An ABI is <0.9 has been shown to be 100% sensitive for vascular injury requiring operative repair. [3] Patients with an ABI >0.9 still require close monitoring and repeat exams.
![Figure 9: Ankle brachial Index [18]](https://images.squarespace-cdn.com/content/v1/549b0d5fe4b031a76584e558/1613998836971-HGC56BHGLWIPTADPOLTU/Picture11.png)
Figure 9: Ankle brachial Index [18]
Some authors advocate for angiography in all knee dislocations while others advocate for angiography only in those with an abnormal ABI. [3, 17, 19] Given the time-sensitivity of a vascular injury threatening the limb, early consultation with vascular surgery in patients with concern for vascular injury is recommended. Vessel imaging should never delay operative intervention if indicated. [3]
Options for vessel imaging include:
CTA – quick and readily available in the ED with high sensitivity (95-100%) and specificity (99.7-100%) [10]
Direct or selective angiography – considered standard of care but is invasive and introduces risks of vessel cannulation.
Duplex ultrasonography – has good sensitivity (95-100%) and specificity (97-100%) but is operator dependent, may miss small intimal injuries, and availability may be limited. [10]
Disposition
Emergency surgery is indicated for:
Open dislocation
Irreducible dislocation
Ischemic limb
Vascular injury
Compartment syndrome
All patients not taken to the operating room for emergent exploration should be admitted for at least 24 hours of neurovascular and compartment checks. [3,10] The knee should be immobilized as described above, with the leg made non-weight bearing. If evidence of common peroneal nerve injury, will need ankle-foot orthotics and physical therapy. Nearly all knee dislocations will require eventual reconstruction 2-3 weeks post-injury with nerve exploration and repair as indicated at that time. [19]
Summary and Key Points
Knee dislocations are rare but significant injuries that require time-sensitive diagnosis and management.
There is high morbidity, with up to 40% vascular and/or nerve injury, and up to 10% leading to amputation.
Consider early consultation with orthopedic surgery and vascular surgery, as appropriate
Early closed reduction in the Emergency Department is key, with appropriate post-reduction immobilization
The neurovascular exam is critical, both pre- and post-reduction
All patients should have an ABI check post-reduction, regardless of the presence of a pulse, with vessel imaging pursued in those with abnormal ABI
All patients require admission for neurovascular and compartment checks
Expert Commentary
Thank you, Dr. Rogers, for providing an excellent comprehensive review of knee dislocations. Over the course of my career in the last 20+ years, imaging workup for knee dislocations has evolved substantially. It used to be dogma that all knee dislocations get traditional IR angiography. This was based on reports of undiagnosed popliteal artery thrombosis, where patients presented with a clinically and radiographically reduced knee and a palpable dorsalis pedis pulse that progressed to ischemic compartment syndrome and amputation. This paradigm has shifted because:
More recent studies indicate that the true incidence of popliteal artery injury is 7.5-14%. This is lower than initial older data suggested. [1, 2, 3]
The vast majority of intimal tears do not progress
CT angiography has emerged as a less invasive and highly sensitive option.
Emerging data have shown that observation periods for serial pulse checks and ABIs are highly sensitive for detecting clinically significant vascular lesions.
Remember that the first priorities in knee dislocations are rapid diagnosis and reduction. Reduction can restore absent pulses. Remember the algorithm provided by Dr. Rogers depends on what the vascular exam is AFTER reduction, not before.
Time sensitivity for those cases with vascular deficits cannot be emphasized enough. Delay dramatically affects outcome. Residual amputation rates post-surgery are 10%. [1] In cases of delay exceeding 8 hours, amputation rates have been reported to reach as high as 86%. [4] If required, on-table angiography in the operating theatre, rather than in radiology, has been reported to save 3 hours. [5, 6] So patients with ischemia/pulselessness after reduction need to be taken emergently to the OR, not to the CT suite.
Magnetic resonance (MR) angiography has been proposed as an alternative to define the vascular anatomy and diagnose asymptomatic vascular lesions, particularly as all these patients are likely to have MRI at some point to define the extent of ligamentous injury. In a small series of knee dislocations, findings were comparable to traditional angiography. Consider advocating for this when your consultant suggests CTA for patients with normal vascular exams and ABIs.
References:
Boisrenoult P, Lustig S, Bonneviale P, et al. Vascular lesions associated with bicruciate and knee dislocation ligamentous injury Rev Chir Orthop Traumatol, 9 (2009), 621-626.
Harner CD, Waltrip RL, Bennett CH, et al. Surgical management of knee dislocations J Bone Joint Surg Am, 86 (2004), 262-273.
Rios A, Villa A, Fahandezh H, et al. Results after treatment of traumatic knee dislocations: a report of 26 cases J Trauma, 5 (2003), 489-494.
Green NE, Allen BL. Vascular injuries associated with dislocation of the knee J Bone Joint Surg Am, 5 (1977), 236-239.
Lim LT, Michuda MS, Flanigan DP, Pankovich A. Popliteal artery trauma 31 consecutive cases without amputation Arch Surg, 11 (1980), 1307-1313.
Ottolenghi CE. Vascular complications in injuries about the knee joint Clin Orthop Relat Res (1982), 148-156.

Matthew R Levine, MD
Associate Professor of Emergency Medicine
Northwestern Memorial Hospital
How To Cite This Post:
[Peer-Reviewed, Web Publication] Rogers, A. Randolph, A. (2021, Feb 22). Knee Dislocation. [NUEM Blog. Expert Commentary by Levine, M]. Retrieved from http://www.nuemblog.com/blog/knee-dislocation.
Other Posts You May Enjoy
References
Rihn, et al. “The acutely dislocated knee: Evaluation and management.” Journal of the American Academy of Orthopaedic Surgeons. 2004;12(5):334-346
Medina, et al. “Vascular and Nerve Injury After Knee Dislocation: A Systematic Review.” Clinical Orthopaedics and Related Research. September 2014. 472 (9): 2621-2629.
Boyce, et al. “Acute Management of Traumatic Knee Dislocations for the Generalist.” Journal of the American Academy of Orthopaedic Surgeons.” December 2015. 23(12):761-768
Patterson et al. “LEAP Study Group: Knee dislocations with vascular injury: Outcomes in the Lower Extremity Assessment Project (LEAP) Study.” Journal of Trauma 2007;63(4):855-858
“Knee Diagram.” Wikimedia Commons. https://commons.wikimedia.org/wiki/File:Knee_diagram.svg
Morcos, et al. “Popliteal lymph node dissection for metastatic squamous cell carcinoma: A case report of an uncommon procedure for an uncommon presentation.” World Journal of surgical Oncology. October 2011. 9(1):130
Azar, et al. “Ultra-Low Velocity Knee Dislocations.” American Journal of Sports Medicine. October 2011. 29(10):2170-4.
Vaidya, et al. “Low-Velocity Knee Dislocations in Obese and Morbidly Obese Patients” Orthopaedic Journal of Sports Medicine. April 2015. 3(4).
Lasanianos, et al. “Knee Dislocations”. Trauma and Orthopaedic Classifications. Springer-Verlag London 2015. pp339-341.
Gottleib et al. “Evaluation and Management of Knee Dislocation in the Emergency Department.” The Journal of Emergency Medicine. November 2019. 58(1) 34-42.
Lachman, et al. “Traumatic Knee Dislocations: Evaluation, Management, and Surgical Treatment.” Orthopedic Clinics of North America. October 2015. 46{(4):479-93
Murphy, Andrew. “Lateral Knee Dislocation”. Wikimedia Commons. 20 May 2017. https://commons.wikimedia.org/wiki/File:Lateral-knee-dislocation-1.jpg
Duprey K and Lin M. “Posterior Knee Dislocation”. Wikimedia Commons. 2 February 2010. https://commons.wikimedia.org/wiki/File:PosteriorKneeDIsclocation.jpg
Ellisbjohns “Segond Fracture”. Wikimedia Commons. 2 November 2009. https://commons.wikimedia.org/wiki/File:SegondFracture.JPG
Thrush, et al. “Fractures Associated with Knee Ligamentous Injury.” Complex Knee Ligament Injuries, pp149-159. January 2019.
McDonough, E. and Wojtys E. “Multiligamentous injuries of the knee and associated vascular injuries”. American Journal of Sports Medicine. January 2009, 37 (1):156-9
Barnes et al. “Does the pulse examination in patients with traumatic knee dislocation predict a surgical arterial injury? A meta-analysis.” Journal of Trauma; Injury, Infection, and Critical Care. December 2002. 53(6):1109-14.
Jmarchn. “Ankle-Brachial Index” Wikimedia Commons. 14 February 2014.https://commons.wikimedia.org/wiki/File:Pad_abi_ENG.svg
Fanelli, Gregory C. “”Knee Dislocation and Multiple Ligament Injuries of the Knee.” Sports Medicine and Arthroscopy Review. December 2018. Issue: Volume 26(4), p150-152.
Henretig, et al. “Textbook of Pediatric Emergency Procedures. Philadelphia, PA: Williams & Wilkins. 1997. P1098. https://aneskey.com/knee-dislocation-and-reduction/
Is Fracture Healing Impaired by NSAIDs?
Written by: Andra Farcas, MD (PGY-3) Edited by: Jessica Bode, MD (NUEM ‘19) Expert Commentary by: Matthew Levine, MD
Clinical Question:
Are we impeding our patients’ fracture healing by giving them NSAIDs?
Why is this important?
Broken bones hurt. A lot. And we want to do something about that to make our patients feel better. In the context of the current opioid crisis and the controversy of prescribing opioids, we need good non-opioid alternatives. Enter NSAIDs. Multiple studies have investigated whether nonsteroidal anti-inflammatory drugs (NSAIDs) are efficient pain relievers in multiple scenarios, including fractures, and the consensus seems to lean towards yes. However, this is not a discussion about their effectiveness but rather an attempt to finally answer the question that emergency docs seem to have different answers to: will giving patients NSAIDs for their fracture-related pain actually lead to worse outcomes in terms of fracture healing?
Mechanism of action
NSAIDs work by inhibiting the COX enzyme that catalyzes the conversion of arachidonic acid into prostaglandins. In turn, prostaglandins work as inflammatory response mediators. When a bone is fractured, the healing process involves an inflammatory response. Giving NSAIDs alters that inflammatory response by decreasing prostaglandin production. This is why it’s been proposed that giving NSAIDs to patients with bone fractures will affect their healing.

Additionally, prostaglandins also modify the expression of bone morphogenic proteins (BMPs), which are involved in the bone healing process. This is another mechanism by which NSAIDs may affect fracture healing.
What the Research Shows
There have been a multitude of animal and human studies investigating the effect of NSAIDs on bone fracture healing, mostly in the orthopedic surgery community. The chart below has short summaries of some of the ones that are most relevant to emergency medicine.
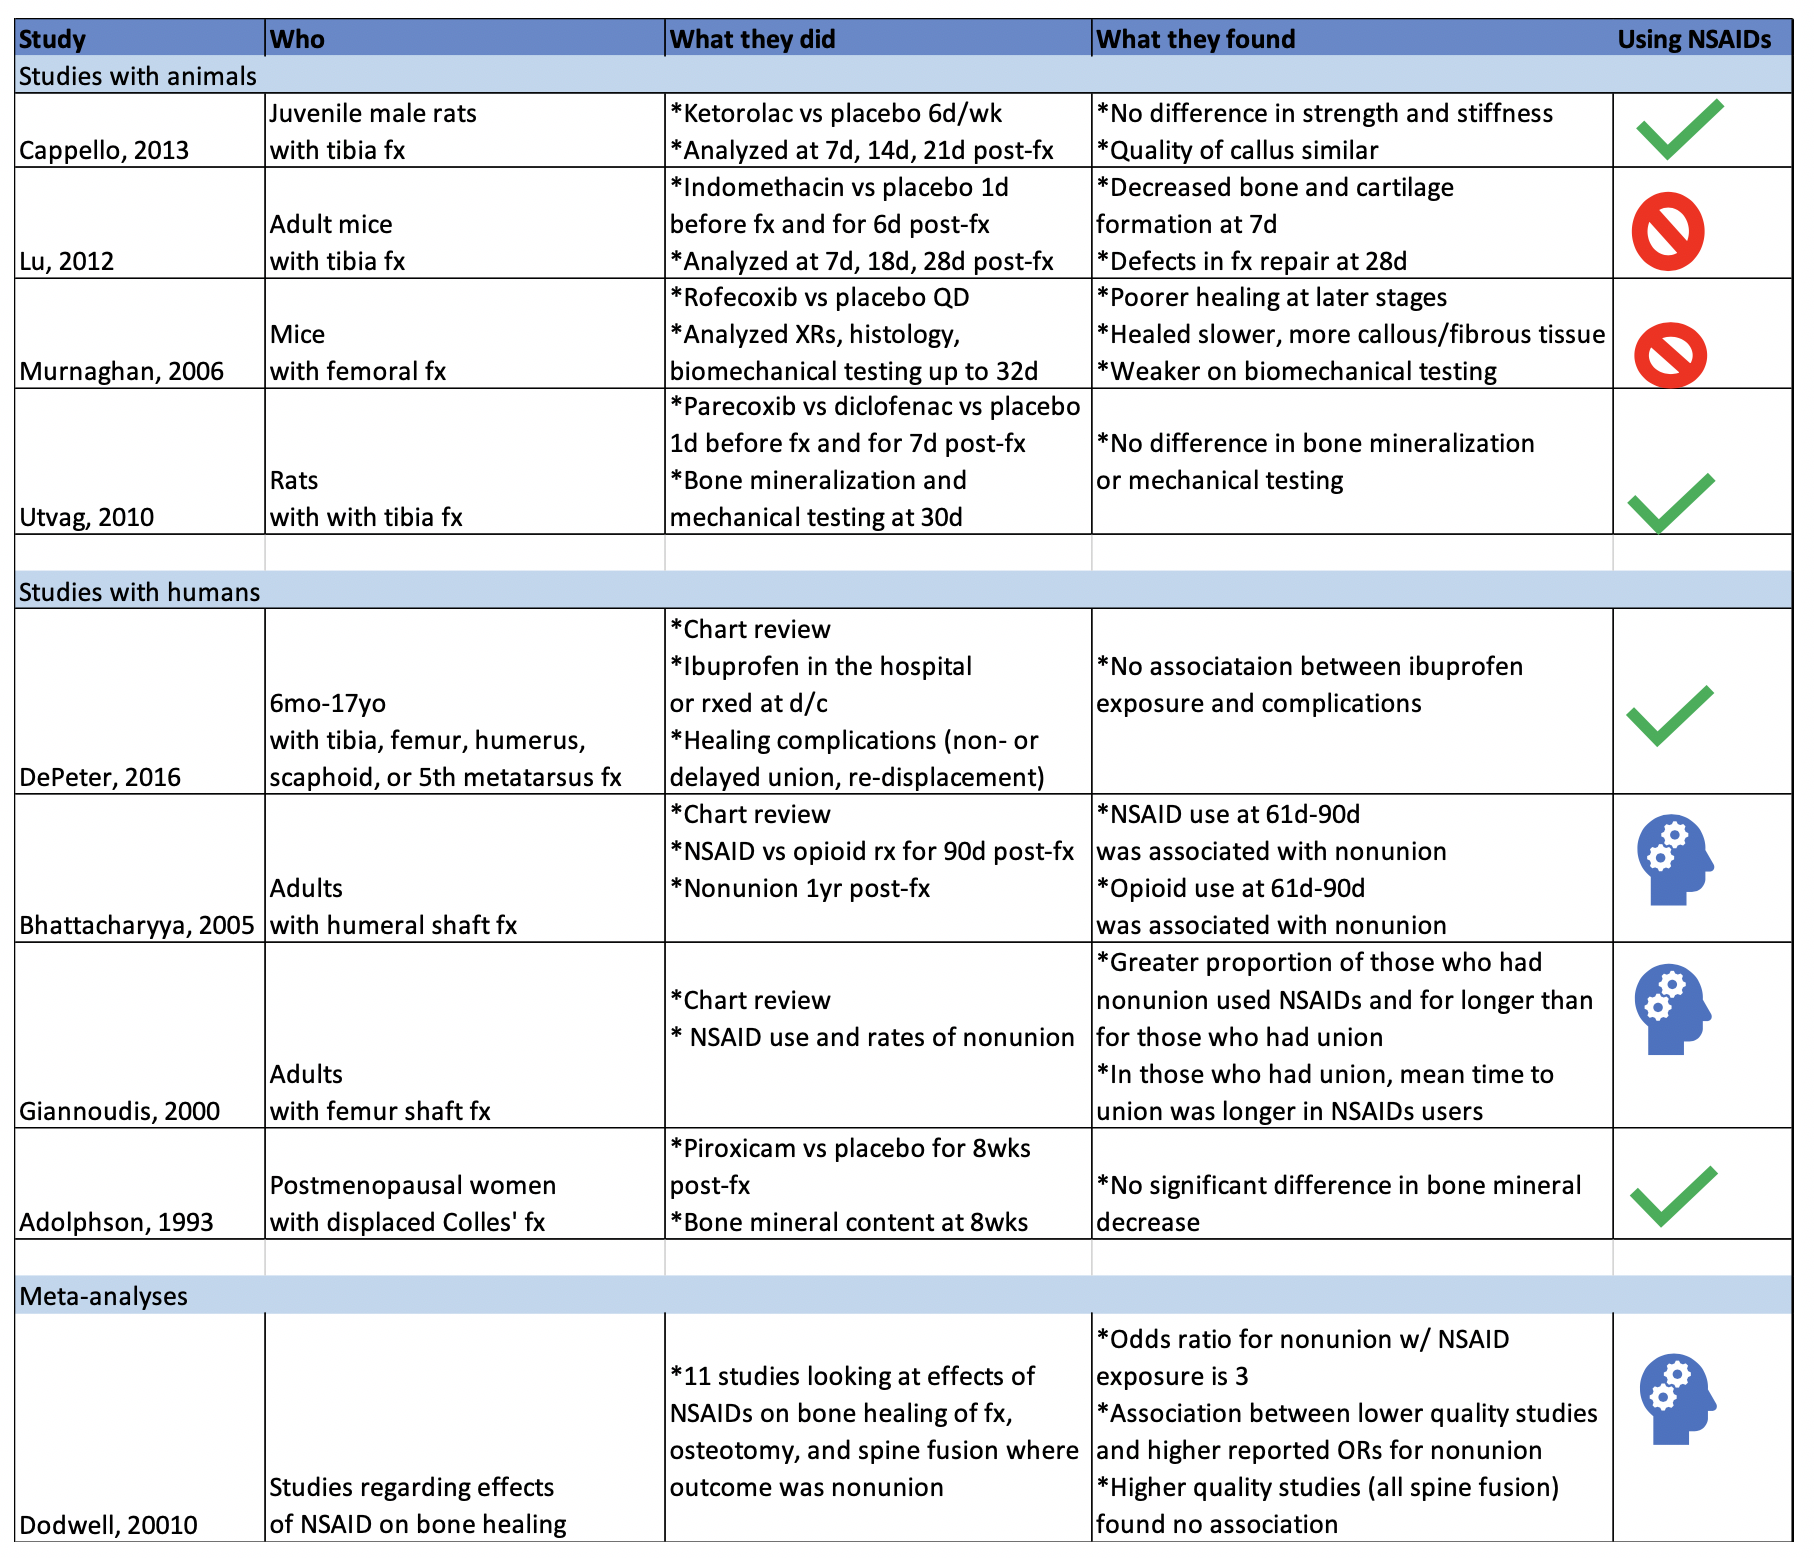
Studies with Animals
Animal studies in general tend to use mice or rats with induced long bone fractures. The animals are exposed to NSAIDs or placebo and various bone characteristics are measured at various time frames. Capello, 2013 and Utvag, 2010 showed that Ketorolac, Parecoxib, and Diclofenac had no effect on strength, stiffness, or bone mineralization in rats with tibia fractures. On the other hand, Lu, 2012 and Murnaghan, 2006 showed that Indomethacin was associated with decreased bone and cartilage formation and that Rofecoxib was associated with slower and poorer healing in mice with tibia and femoral fractures, respectively.
Studies with Humans
While studies with animals have a lot of advantages, we’re often more interested in clinical outcomes than physiological nuances. DePeter 2016 in a retrospective chart review showed no association between ibuprofen exposure in kids with various fractures and healing complications like nonunion, delayed union, or re-displacement. However, there was no specification of the timeframe of treatment, and some patients received ibuprofen in the ED while others were sent home with it without a clear defined use period. Adolphson, 1993 showed there was no significant difference in bone mineral decrease in postmenopausal women with displaced Colles’ fractures that used Piroxicam for 8 weeks after the fracture compared to women who used a placebo. Giannoudis, 2000 found greater proportion of NSAID use in patients with nonunion of a femur shaft fracture compared to those who had union and found that in patients who had union, those who used NSAIDs took longer to achieve it. Bhattacharyya 2005 found that NSAID use at 61-90 days post fracture was associated with nonunion. However, an important thing to point out is that association does not equal causation. Is it that the NSAID use caused the poor outcome? Or is it that the poor outcome was more painful and thus those patients used pain medication for longer. To that point, Bhattacharyya, 2005 also found that there was an association between opioid use at 61-90 days and nonunion.
The Conclusion
The evidence isn’t slam-dunk in either direction on whether using NSAIDs impedes the fracture healing process. There aren’t many randomized control trials to explore causation (versus association) of NSAID use with fracture healing outcome. The one RCT I could find (Adolphson, 1993) leans towards no difference in outcome between NSAID users and placebo users. My takeaway: if my patients have no other contraindications to using NSAIDs and if their pain is well-controlled with said medication, then I’m going to advise they can use it for a short term and advise them to seek medical attention if they’re still needing to use NSADs regularly a few weeks out.
Expert Commentary
As is frequently the case in medicine, confounding factors make seemingly simple questions have not-so-simple answers.
Some animal studies suggested that NSAIDS can do harm to healing fractures. Others did not. The benefit of the animal study approach is that more variables can be controlled - the site of fracture, NSAID type, dose, frequency, duration of therapy. These animals were also surely more compliant with medications and follow up than our patients. However, animal studies do not necessarily translate to human outcomes. And these animal studies were less than definitive anyway.
The human studies were also less than definitive. Human studies are difficult for many reasons. Do NSAIDS affect pediatric, adult, elderly bone healing outcomes the same? Does it matter which NSAID, how often it is taken, the dose, the duration of use, which bone is fractured? When taking all these factors into consideration, it becomes more clear just how unclear the answer to this question is.
So at the end of the day, we do what we do time and time again in medical decision making – a risk-benefit analysis:
Option 1: Give NSAIDS. Risk causing an uncertain NSAID-related complication such as poor bone healing or a known NSAID complication such as a cardiovascular/GI/renal issue. Avoid narcotics.
Option 2: Give acetaminophen. Little downside as long as the patient can follow the directions you give them or on the bottle to avoid overdosing. Avoid NSAIDS and narcotics.
Option 3: Give narcotics. Avoid complications of NSAIDS. Expose to complications of narcotics. I don’t need to list these.
Option 4: Some combination of options 1, 2, and 3 because your gestalt is telling you that acetaminophen or NSAIDS alone won’t cut it for some cases.
I have different patients that end up falling into each of those options. This also raises another question - how do NSAIDS, acetaminophen, and opiates compare to each other for control of fracture pain? These scenarios and questions again demonstrate that medicine is often not a robotic one-size-fits-all, one-answer-to-every-question field, or else Dr. Google would replace us. Until more definitive RCTs come along, you will be required to use your judgment, or as I like to call it, expertise.

Matthew Levine, MD
Associate Professor
Department of Emergency Medicine
Northwestern University
How to Cite This Post
[Peer-Reviewed, Web Publication] Farcas A, Bode, J. (2020, April 6). Clinical Question: are we impeding our patients’ fracture healing by giving them NSAIDs? [NUEM Blog. Expert Commentary by Levine, M]. Retrieved from http://www.nuemblog.com/blog/fx-nsaids
Other Posts You Might Enjoy…
References
1. Adolphson, P., Abbaszadegan, H., Jonsson, U., Dalen, N., Sjoberg, H.E., Kalen, S. No effects of piroxicam on osteopenia and recovery after Colles’ fracture: A randomized, double-blind, placebo-controlled prospective trial. Archives of Orthopaedic and Trauma Surgery, 1993; 112: 127-130.
2. Bhattacharyya, T., Levin, R., Vrahas, M.S., Solomon, D.H. Nonsteroidal Antiinflammatory Drugs and Nonunion of Humeral Shaft Fractures. Arthritis & Rheumatism (Arthritis Care & Research), 2005; 53(3): 364-367.
3. Cappello, T., Nuelle, J.A.V., Katsantonis, N., Nauer, R.K., Lauing, K.L., Jagodzinski, J.E., Callaci, J.J. Ketorolac Administration Does Not Delay Early Fracture Healing in a Juvenile Rat Model: A Pilot Study. Journal of Pediatric Orthopaedics, 2013; 33(4): 415-421.
4. DePeter, K.C., Blumberg, S.M., Becker, S.D., Meltzer, J.A. Does the use of ibuprofen in children with extremity fractures increase their risk for bone healing complications? The Journal of Emergency Medicine, 2017; 52(4): 426-432.
5. Dodwell, E.R., Latorre, J.G., Parsini, E., Zwettler, E., Chandra, D., Mulpuri, K., Snyder, B. NSAID Exposure and Risk of Nonunion: A Meta-Analysis of Case-Control and Cohort studies. Calcific Tissue International, 2010; 87: 193-202.
6. Giannoudis, P.V., MacDonald, D.A., Matthews, S.J., Smith, R.M., Furlong, A.J., De Boer, P. Nonunion of the femoral diaphysis: the influence of reaming and non-steroidal anti-inflammatory drugs. The Journal of Bone & Joint Surgery, 2000; 82-B(5): 655-658.
7. Lu, C., Xing, Z., Wang, X., Mao, J., Marcucio, R.S., Miclau, T. Anti-inflammatory treatment increases angiogenesis during early fracture healing. Artchives of Orthopaedic and Trauma Surgery, 2012; 132: 1205-1213.
8. Murnaghan, M., Li, G., Marsh, D.R. Nonsteroidal Anti-Inflammatory Drug-Induced Fracture Nonunion: An Inhibition of Angiogenesis? The Journal of Bone and Joint Surgery, 2006; 88-A(3): 140-147.
9. Utvag, S.E., Fuskevag, O.M., Shegarfi, H., Reikeras, O. Short-Term Treatment with COX-2 Inhibitors Does Not Impair Fracture Healing. Journal of Investigative Surgery, 2010; 23: 257-261.
10. Yates, J.E., Shah, S.H., Blackwell, J.C. Do NSAIDs impede fracture healing? The Journal of Family Practice, 2011; 60(1):41-42.
Can't Miss Hand and Wrist Fractures in the ED

Written by: Justine Ko, MD (NUEM PGY-3) Edited by: Spenser Lang MD (NUEM Alum ‘18 ) Expert commentary by: Matt Levine, MD
“Can’t Miss” Hand and Wrist Injuries in the ED
In the emergency department, orthopedic complaints make up a large percentage of presentations, up to 50% in the pediatric population and close to 33% in the adolescent and young adult population. Many of these injuries are uncomplicated, but an astute clinician can diagnose subtle and uncommon injury patterns. Three less common injuries are reviewed here. If found, these injuries can alter the management and disposition of the patient. Each of these injuries should be carefully assessed for on physical exam and imaging.
DISTAL RADIOULNAR JOINT (DRUJ) INJURIES
What exactly is the distal radioulnar joint and why is it important?
The distal radioulnar joint (DRUJ) consists of both the bony radioulnar articulation as well as the soft tissue components, including ligaments. It has significant contributions to the axial load-bearing capabilities of the forearm. The injury can be an isolated injury or associated with forearm fractures and should be tested for with every forearm injury as its presence can alter the disposition and even functionality of the patient.

When does it occur?
A DRUJ injury may occur, although rarely, in isolation. This is usually related to a fall on outstretched hand (FOOSH). A DRUJ injury is more often associated with a fracture. Common associations include:
Distal radial fracture (DRF)
DRF + DRUJ = Galeazzi fracture (pictured to the right)
Ulnar styloid fracture
How should I assess for a possible DRUJ injury?

Routine AP and lateral views are poor for determining a DRUJ injury. This is largely a CLINICAL DIAGNOSIS.
Piano Key Sign: with the patient’s hand in pronation, push on the dorsal aspect of the ulnar head. Depression and rebound of the ulnar head suggest DRUJ instability
Table Top Test: have patient place hands on a table and apply force. A DRUJ injury will show dorsal depression of the ulna
Grind Test: hyperextend the wrist and axial load the forearm. A positive sign elicits pain over the joint
How does this alter management?
When associated with a fracture, operative management is often indicated and consultation with our orthopedist is warranted. When missed, a DRUJ injury will result in instability of the joint and arthrosis.
PERILUNATE AND LUNATE DISLOCATIONS
It has been reported that these injuries are missed in up to 25% of ED presentations.
How do these injuries occur?
In perilunate and lunate dislocations, the mechanism is usually hyperextension in the setting of trauma. Patients presents with hand and wrist pain/swelling.
How do I distinguish perilunate from lunate dislocations?

Lunate and perilunate dislocations can be easily confused or mistaken for each other. The key to distinguishing these injuries on imaging is the alignment between the metacarpal, carpal, and the radius/ulna bones.
In a normal lateral x-ray, these bones should all align (Figure 1, far left). In a lunate dislocation, the lunate itself is physically removed or out of line with the rest of these bones (Figure 1, far right), resulting in the classic “spilled teacup” appearance on x-ray. In a perilunate dislocation, the lunate sits in line with the radius/ulna, however the capitate/metatarsal bones are dislocated dorsally.
On an AP film, a break in Gilula’s arc/lines may be used to assess for a perilunate or lunate dislocation (Figure 2).
How Are These Injuries Treated?
In the ED, closed reduction can be attempted. If successful, definitive treatment can occur up to 7 days later. If unsuccessful, operative management is indicated. Definitive treatment involves open reduction and internal fixation.
How Would I Reduce These Injuries in the ED?
Usually, the assistance of our orthopaedic colleagues is warranted. Finger traps can be used for traction. The wrist should be extended while placing palmar pressure on the lunate. Then, with continued traction, the wrist should be gradually flexed so that the capitate falls back into place within the concavity of the lunate. Once the lunocapitate joint is reduced, the wrist can be extended in traction again for full reduction.
SCAPHOLUNATE DISSOCIATION
What is a scapholunate dissociation?
Scapholunate dissociation is caused by injury to the scapholunate ligament. Injury to this ligament can occur with acute FOOSH injury or be caused by degenerative rupture of the ligament.

How do I diagnosis it?
These patients present with radial wrist pain. On imaging, the following signs can aid in diagnosis.

Terry Thomas sign: This is seen on an AP wrist film and is indicated by a gap >3mm between the scaphoid and lunate bones
Cortical Ring sign: occurs when the scaphoid is in a flexed position, making the scaphoid tubercle more prominent. A measure distance less than 7mm between the end of the cortical ring and the proximal end of the scaphoid suggests scapholunate dissociation and instability.
How do I manage it?
In the ED, patients should be placed in a thumb spica cast for stabilization and referred to orthopaedics for follow up. Operative indication includes injury within 3 weeks and associated imaging and physical exam findings. During this time frame, the SL ligament is still viable for repair.
Expert Commentary
Great choice by Dr. Ko to highlight these injuries that are often subtle, yet important because of the comorbidities associated with missing the diagnosis.
The Galeazzi fracture is a classic EM boards question, because it is important! It was termed by Campbell as the “fracture of necessity” (modern day translation = “this needs surgery!”) in 1942 because nonoperative management was observed to be associated with recurrent ulna styloid dislocations. Hughston confirmed this is 1957, reporting that 35/38 cases treated nonoperatively had unsatisfactory outcomes.
There’s a saying in orthopedics that “the most commonly missed injury is the second injury”. The radial shaft fracture is usually obvious and can distract the clinician from the less dramatic DRUJ injury. DRUJ injury is radiographically diagnosed by:
Fracture at the BASE of the ulna styloid process (not the tip)
A widened DRUJ (a comparison x ray may be necessary), or
>5mm of shortening of the radius relative to the distal ulna.
A subtle clinical finding often associated with the Galeazzi fracture is anterior interosseus nerve injury. It is a branch of the median nerve and is purely motor, so there will be no sensory deficit or paresthesia! It manifests as loss of pinch strength between the thumb and index finger. So have the patient make the OK sign and resist as you try to open it!
Mayfield, Johnson and Kilcoyne described a pattern of carpal injury caused by wrist hyperextension, ulnar deviation and intercarpal supination in 1980. In their original research on cadavers, progressive hyperextension force was applied and resulted in a consistent, sequential, progressively more unstable intercarpal injury pattern known as the four stages of carpal instability:
Scapholunate dissociation
Perilunate dislocation
Perilunate and triquetral dislocation
Lunate dislocation
Acute scapholunate dissociation is the most common pattern of carpal instability. It occurs secondary to a tear of the scapholunate interosseus ligament. Scapholunate dissociation can also be chronic secondary to arthritic changes when there is no history of recent trauma.
X rays in lunate and perilunate dislocations are often not as clear and obvious as the diagrams used to teach these injuries. The key to realizing that there is a carpal bone dislocation is recognizing that the carpal arcs are disrupted on the AP view. The distal and proximal carpal rows should never overlap on this view. If you recognize this, you will heighten your suspicion and won’t miss these injuries, even if you cannot immediately tell the exact diagnosis.
The name perilunate dislocation has always been a pet peeve of mine. There is no perilunate bone, so this nomenclature just introduces confusion. It should simply be called a capitate dislocation, because that it what it really is.
All of these injuries, and more, are further detailed in our Ortho Teaching Files!

Matthew R. Levine, MD
Assistant Professor
Department of Emergency Medicine
Northwestern University
How to Cite this Post
[Peer-Reviewed, Web Publication] Ko J, Lang S. (2019, Aug 19). Can't Miss Hand and Wrist Fractures in the ED. [NUEM Blog. Expert Commentary by Levine M]. Retrieved from http://www.nuemblog.com/blog/cant-miss-hand-and-wrist-fractures-in-the-ed/.
Other Posts You Might Enjoy
To learn more about the diagnosis and management of orthopedic injuries from head to toe, check out our Ortho Teaching Files!
References
Bowen WT, Slaven EM. 2014. “Evidence-based management of acute hand injuries in the emergency department.” Emergency Medicine Practice 16 (12):1-28.
“Distal Radial Ulnar Joint (DRUJ) Injuries - Trauma - Orthobullets.” n.d. Accessed March 7, 2018. https://www.orthobullets.com/trauma/1028/distal-radial-ulnar-joint-druj-injuries.
Kardashian G, CHristoforou DC, Lee SK. 2011. “Perilunate dislocations.” Bulletin of the NYU Hospital for Joint Diseases 69 (1):87-96.
“Lunate Dislocation (Perilunate Dissociation) - Hand - Orthobullets.” n.d. Accessed March 2, 2018. https://www.orthobullets.com/hand/6045/lunate-dislocation-perilunate-dissociation.
Pappou, Ioannis P., Jennifer Basel, and D. Nicole Deal. 2013. “Scapholunate Ligament Injuries: A Review of Current Concepts.” Hand (New York, N.Y.) 8 (2): 146–56. https://doi.org/10.1007/s11552-013-9499-4.
Reisler T, Therattil PJ, Lee ES. 2015 “Perilunate Dislocation.” Eplasty.
Rodner CM, Weiss APC. “Acute scapholunate and lunotriquetral dissociation.” American Society for Surgery of the Hand. 155-171.
Scalcione LR, Gimber LH, Ho AM, Johnston SS, Sheppard JE, Taijanovic MS. 2014. “Spectrum of carpal dislocations and fracture-dislocations: imaging and management.” AJR 203: 541-550.
Thomas, Binu P, and Raveendran Sreekanth. 2012. “Distal Radioulnar Joint Injuries.” Indian Journal of Orthopaedics 46 (5): 493–504. https://doi.org/10.4103/0019-5413.101031.
Not All Ankle Sprains are Created Equal

Written by: William Ford, MD, MBA (NUEM PGY-4) Edited by: Simiao Li-Sauerwine, MD (NUEM ‘18) Expert commentary by: Matthew Levine, MD
Introduction
Ankle injuries are commonly seen in emergency medicine, and serious injuries can be found in the setting of a negative X-ray. The “high ankle sprain” involves the structure of the ankle called the syndesmosis. Isolated ligamentous disruption to the syndesmosis is uncommon, though when it occurs, it is frequently missed. This can lead to serious consequences, including long-term ankle dysfunction and the need for surgery [1]. Identifying these injuries in the ED can improve recovery and facilitate prompt follow-up.
What is the Syndesmosis?
The syndesmosis is the distal articulation of the tibia and the fibula and it keeps the joint stable. For the purposes of this discussion, the focus will be on the ligamentous parts of the syndesmosis not seen on an ankle X-ray.
There are four syndesmotic ligaments: the interosseous ligament (IOL), the anterior inferior tibiofibular ligament (AITFL), the posterior inferior tibiofibular ligament (PITFL), and the inferior transverse tibiofibular ligament (ITTFL) [2].

How Does Syndesmotic Injury Occur?
The motion often involved in syndesmotic injury is external rotation of the foot. Commonly, it is a combination of external rotation of the foot and excessive dorsiflexion of the ankle [3-6]. This is frequently encountered in high-speed collisions, uneven terrain, and cutting and jumping sports [1]. In most cases, syndesmotic injury will occur concurrently with a fracture, but sometimes, ligamentous injury may occur in isolation [7-8].
How Can I Diagnose Syndesmotic Injury?
Since this diagnosis is difficult to make without an MRI, providers must rely on a high index of suspicion. First, ask yourself if the mechanism of injury is consistent with syndesmosis disruption. Localizing the areas of tenderness on physical exam can also be helpful. Anterolateral or posteromedial ankle tenderness, as opposed to direct lateral or medial pain inferior to the malleoli, can suggest syndesmotic involvement. Finally, in accordance with the name “high ankle sprain”, more proximal pain may be indicative of a syndesmotic injury [1].
There are a few provocative tests described for diagnosing syndesmotic injuries. None are slam-dunk maneuvers, but a constellation of positive findings can be helpful in making the diagnosis.
Squeeze test: With the patient sitting at the edge of the bed and knee bent at 90 degrees, a strong compressive force is applied to the tibia and fibula proximal to the mid-calf. Pain indicates a positive finding.
External rotation stress test: If the pain is reproduced with manual external rotation of the foot and ankle relative to the tibia, this test is positive. It is important to make sure the tibia is stabilized while performing this test.
Cotton test: This test is performed by attempting to translate the talus laterally under the tibia. Increased translation compared to the contralateral side or increased pain with this maneuver is a positive finding.
Fibular translation test: Stabilize the tibiotalar joint with one hand, translate the fibula anteriorly and posteriorly with the other hand. Increased pain and translation compared to the contralateral side equals a positive test.
X-ray diagnosis can also be difficult, except in the presence of frank tibiofibular diastasis [1].
Summary
Not all ankle sprains are created equal. High ankle sprains involving the syndesmosis can mean triple the recovery time of a regular sprain, chronic instability, or definitive treatment with surgery. Increased awareness and knowledge of how to diagnose these injuries is important to ensure quality care for patients.
Expert Commentary
Ankle injuries are the most common orthopedic complaint we see in the ED. While most of these presentations are simple sprains, there are other more severe injuries that will resemble uncomplicated sprains. Given the sheer volume of ankle injuries we see, we undoubtedly have all missed some of these more complicated injuries. A high ankle sprain is one of these injuries. Another classic injury that resembles an ankle sprain is the Snowboarder’s fracture. This is a fracture of the lateral process of the talus that occurs from ankle inversion and dorsiflexion. Snowboarder’s fractures clinically resemble ankle sprains and x rays miss up to 40% of these fractures! I have seen radiology miss some of these and then found the fracture by going back and magnifying the area of the lateral talus distal to the lateral malleolus on the AP and mortise views.
Regardless, plain films will not detect all Snowboarder’s fractures or high ankle sprains. It is tempting to quickly wrap and discharge all ankle “sprains” after a negative x ray. It is important, however, to discuss with these patients what is a normal healing progression and timeline. Emphasize that if 10 days go by and there is still significant pain, functional impairment, or reliance on the crutches or air cast, they need to follow up with orthopedics. Provide them with the means to arrange this follow up. It is not realistic to be able to diagnose every ankle sprain mimic in the ED, but it is our duty to provide every patient (not just ankle sprain patients) with the proper instructions for follow up in case we have missed something.

Matthew Levine, MD
Assistant Professor of Emergency Medicine
Northwestern Medicine
How To Cite This Post
[Peer-Reviewed, Web Publication] Ford W, Li-Sauerwine S. (2019, May 27). Not All Ankle Sprains are Created Equal. [NUEM Blog. Expert Commentary by Levine M]. Retrieved from http://www.nuemblog.com/blog/high-ankle-sprain.
Other Posts You May Enjoy
References
Hunt KJ, Phisitkul P, Pirolo J, et al. High Ankle Sprains and Syndesmotic Injuries in
Athletes. Journal of the American Academy of Orthopaedic Surgeons. 2015;23(11): 661-73.Fibular translation test: Stabilize the tibiotalar joint with one hand, translate the fibula anteriorly and posteriorly with the other hand. Increased pain and translation compared to the contralateral side equals a positive test.
Ogilvie-Harris DJ, Reed SC, Hedman TP. Disruption of the Ankle Syndesmosis: Biomechanical Study of the Ligamentous Restraints. Arthroscopy: The Journal of Arthroscopic & Related Surgery. 1994;10(5): 558-60.
Lin C-F, Gross MT, Weinhold P. Ankle Syndesmosis Injuries: Anatomy, Biomechanics, Mechanism of Injury, and Intervention. J. Orthop. Sport. Phys. Ther. 2006;36(6): 372–384. doi:10.2519/jospt.2006.2195.
Dattani R, Patnaik S, Kantak A, et al. Injuries to the tibiofibular syndesmosis. J. Bone Jt. Surg. 2008;90–B(4): 405–410. doi:10.1302/0301-620X.90B4.19750.
Brosky T, Nyland J, Nitz A, et al. The Ankle Ligaments: Consideration of Syndesmotic Injury and Implications for Rehabilitation. J. Orthop. Sport. Phys. Ther. 1995;21(4).
Hopkinson WJ, Pierre P St., Ryan JB, et al. Syndesmosis Sprains of the Ankle. Foot Ankle. 1990;10(6): 325–330.
Miller CD, Shelton WR, Barrett GR, et al. Deltoid and Syndesmosis Ligament of the Ankle without Fracture Injury. Am. J. Sports Med. 1995;23(6): 746–750.
Hunt KJ. Syndesmosis injuries. Curr. Rev. Musculoskelet. Med. 2013;6: 304–312. doi:10.1007/s12178-013-9184-9.
Visual Guide to Splinting

Written by: Danielle Miller, MD (NUEM PGY-4) Edited by: John Sarwark, MD (NUEM ‘16) Expert commentary by: Matthew Pirotte, MD

Expert Commentary
Great work by the authors to create such a handy guide to splinting. Like so many procedures in the emergency department, splinting is like snowboarding – easy to learn difficult to master! My love for emergency ortho has led me to really work on my own splinting techniques and to have a healthy respect for this skill.
The only quibbles that I would have for the otherwise excellent chart (and they are minor) are the following:
1. Mid-shaft humerus: Rare will the patient be who can manage this with just a sling. There is tons of painful fracture movement to deal with here. The appropriate splint (a coaptation splint) is extremely challenging to place but worth it for the patient with such a painful fracture
2. Distal radius fractures: After reduction I really like a double sugar-tong splint as opposed to a single. I worry about elbow extension (even involuntary at night) degrading the integrity of my splint and therefore my reduction.
My biggest teaching point with respect to splinting in the ED is the under-appreciated art of molding splints. Getting the plaster or fiberglass correctly placed, padded, and wrapped is really the easy part. The emergency provider must grasp the critical orthopedic concept that “crooked splints make straight bones.” Your splint needs to be working for you not just sitting there observing! If you have made a reduction your splint generally needs to be keeping in in place. This sounds more complicated than it is, follow my 3-step plan to learn how to make and mold splints:
Step 1: understand the concept of a 3-point mold.
The concept of the 3-point mold creates a fulcrum proximal to the fracture site and bends the splint to keep the reduction from falling away. The 3-point mold looks like this.
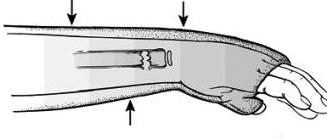
Credit: Orthobullets
Sharp-eyed readers might have noted that this is a pediatric fracture but have no fear, the splinting and molding is very similar to that of an adult. As you can see above the splint needs to be pushed and molded while it dries to keep that distal fragment from falling back. Start going into rooms with ortho residents and you’ll grasp this concept very quickly.
Step 2: start doing your own distal radius fracture reductions and splinting

Quentin Reuter MD (NUEM ’18) splinting a DRF
Unless there is nerve entrapment or some other complicating factor there is rarely a need to consult on DRF fractures in the emergency department. I basically taught myself to splint by really learning how to manage distal radius fractures. There are any number of high-quality videos out there. This is a good one that demonstrates my favorite molding technique as well. The nice thing about a DRF is that with a good hematoma block you can take the time to get it right. A pair of finger traps thrown in your shift bag is a good trick, they are a high-theft item so watch out for prowling residents. The nice thing about reducing DRFs is that you end up needing to place and mold a relatively complex splint. I like a double sugar tong followed by a good mold incorporating 3-points along with some mild flexion and ulnar deviation at the wrist. You also need to pay attention to what is going on at the elbow. Putting in all together for your mold you must manage the position of the elbow, wrist flexion, and wrist ulnar deviation all while putting good pressure on your mold points., It takes a bit of time to get right but your patients (and consultants) will thank you!
Step 3: build on what you’ve learned and apply it to other common fractures
Once you understand the principles of reduction, splinting, and molding you are ready to tackle a host of other fractures. Bimalleolar/trimalleolar ankle fractures, both bone midshaft forearm fractures in school aged kids, and boxer’s fractures are all great places to start. This is a fun and rewarding part of our practice that any emergency provider can do with a bit of practice.
Always remember to check and document your nerve function after splint placement!

Matthew Pirotte, MD
Assistant Program Director, Northwestern Emergency Medicine
How To Cite This Post
[Peer-Reviewed, Web Publication] Miller D, Sarwark J. (2019, April 1). Visual Guide to Splinting [NUEM Blog. Expert Commentary by Pirotte M]. Retrieved from http://www.nuemblog.com/blog/splinting
Other Posts You May Enjoy
Flexor Tenosynovitis

Written by: Kevin Dyer, MD (NUEM PGY-3) Edited by: Adnan Hussain (NUEM Alum ‘17) Expert commentary by: Aviram Giladi, MD
Case Presentation
A 29 year old right-handed male with no significant past medical history presents to the ED with left hand pain for the past 4 days. He reports that the pain started in the MCP joint of his left 2nd digit and was just “achy” at first, a mild 3/10. He noted associated swelling and erythema over the joint as well. Symptoms slowly became worse and he went to an urgent care facility yesterday where he was diagnosed with gout and sent home with NSAIDs and Norco. Overnight the pain became markedly worse, 8/10, and he began having subjective fevers. He denied any trauma to the area, no history of gout, no immune compromising diseases or medications, and no IV drug use. In the ED his vitals were stable and he was afebrile. He appeared uncomfortable. His left 2nd digit had fusiform swelling, pain with passive extension, tenderness to percussion along the flexor sheath, and was held in slight flexion at rest. The MCP was noted to be erythematous with the erythema extending to the palmar surface of the hand.
Background
This patient’s exam was concerning for flexor tenosynovitis (FTS), an infection of the flexor tendon and its synovial sheath that can result in deformity, tendon necrosis and adhesions leading to loss of function, or loss of limb, especially if treatment is delayed [1]. The flexor tendon sheath consists of visceral and parietal layers and functions to provide a gliding surface and nutrition to the extrinsic tendons of the digits. Once bacteria are inoculated into the space between the two layers, the synovial fluid becomes a medium for bacterial growth and the closed nature of the sheath limits the host’s immune response to fight infection [2].
Most patients with FTS will endorse a traumatic injury occurring 2-5 days prior to ED presentation [2]. Pang et al noted that 57 of their 75 patients (76%) with flexor tenosynovitis were caused by a traumatic event [4]. Of these, 81% were caused by a puncture wound. Often times, the inciting injury may have been trivial and patients may not endorse an event. Therefore, it is incredibly important to still consider the diagnosis of FTS even if a traumatic component is missing from the patient’s history.
Patients should be asked about associated symptoms such as fever, chills, anorexia, and malaise. Additionally, questions assessing the patient’s handedness, immune status, proximal extent of the pain, and other sites of pain should also be asked.
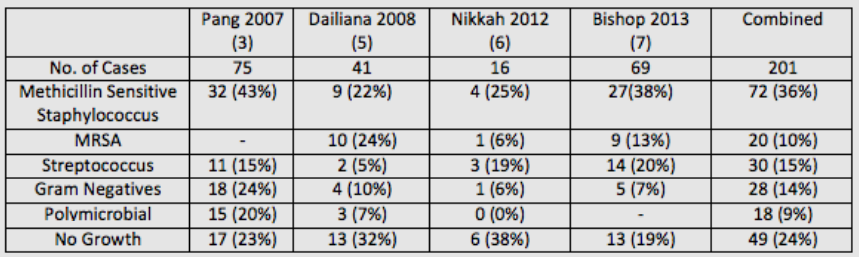
Microbiology
The most likely causative bacteria for FTS are skin flora. A review of four studies published within the past 10 years showed that out of 201 cases, 92 (46%) were caused by Staphylococcus with 20 (10%) being methicillin-resistant Staphylococcus aureus(MRSA). Streptococcus species were the cause of 30 cases (15%), gram negative bacteria were the cause of 28 cases (14%), and 18 (9%) were olymicrobial. Interestingly, 49 (24%) cases of confirmed FTS were culture negative, which has been attributed to early use of intravenous antibiotics or an aggressive immune response [4].
Diagnosis
The clinical diagnosis of FTS is based on the work of Dr. Allen B. Kanavel who described the four cardinal signs as:
Fusiform swelling.
Pain with passive extension of the digit.
Tenderness over the flexor sheath.
The digit held in slight flexion at rest.
No published study has validated the sensitivity and specificity of Kanavel’s signs, nor has there been a study validating inter-observer reliability. However, several studies have looked at the presence of the individual signs in patients diagnosed with the condition. Studies published by Pang et al and Nikkah et al had a combined 91 patients [3,6]. The most common sign was fusiform swelling and was present in 89 of 91 patients (98%). The second most common was pain on passive extension (73%), followed by tenderness over the flexor sheath (67%), and finger held in slight flexion (67%). Dailiana et al reported that only 54% of their 41 patients exhibited all four of Kanavel’s signs [5]. However, all of their patients displayed tenderness over the flexor sheath, which has been described by several authors as the most important sign when distinguishing FTS from other infections of the hand [4,5,8,9].

Image from EM in 5, used with permission from Anna Pickens, MD (10).
Work up for patients with suspected FTS should include plain films to rule out a retained foreign body and fractures [2]. Laboratory studies should include white blood count (WBC), C-reactive protein (CRP), and erythrocyte sedimentation rate (ESR). Bishop et al studied 71 patients with clinically diagnosed FTS, 69 of which were confirmed by operative findings or positive intraoperative cultures [7]. All 69 patients had elevation of at least one of the three inflammatory markers, a positive predictive value of 100%. They reported negative predictive values for WBC, ESR and CRP as 4%, 3%, and 13%, respectively. The two patients without FTS were diagnosed with calcific tendinitis, both patients had normal inflammatory markers. These results suggest that a positive inflammatory marker when FTS is suspected makes the likelihood of infection extremely high. However, normal inflammatory markers cannot reliably rule out an infection.
Treatment
The two cornerstones for treating FTS are prompt administration of IV antibiotics and emergent hand surgery consultation. Antibiotic treatment should be guided by local antibiotic susceptibilities as well as the mechanism of infection. As discussed above, Staphylococcus, including MRSA, and Streptococcus species account for 61% of FTS cases whereas an additional 23% of cases are caused by gram negatives or are polymicrobial. Therefore, broad spectrum antibiotics are required. A common approach is to use vancomycin with piperacillin/tazobactam [2]. Consultation with an infectious disease specialist or a clinical pharmacist should be considered for patients with antibiotic allergies, immunocompromise, or chronic infections.
Learning Points
FTS can cause a loss of hand function or a loss of limb if treatment is delayed.
Patients may not endorse a traumatic event and the diagnosis must still be considered despite this.
The clinical diagnosis of FTS is made using Kanavel’s Signs:
Fusiform swelling.
Pain with passive extension of the digit.
Tenderness over the flexor sheath.
The digit held in slight flexion at rest.
Staphylococcus and Streptococcus species account for 61% of infections.
The two cornerstones of treatment are:
Broad antibiotics – Vancomycin and Zosyn is sufficient
Emergent Hand Surgery Consultation
Expert Commentary
Thank you for putting together this nice case report. Hand infections are common, and the challenge for the emergency provider is in deciding which patients are appropriate for a surgical consult (and for the surgery team, deciding which patients need surgery). In the era of strong IV antibiotics, the timing and indications for intervention are shifting. With early intervention using strict extremity elevation (hanging from the ceiling if possible) and IV antibiotics, we are avoiding surgery for some patients. This includes some with early FTS, before all of the Kanaval ’cardinal signs’ are evident. IV antibiotics have made it so that some patients with FTS, a condition traditionally considered to require surgery, are able to avoid surgery altogether. Maintaining a high index of suspicion for these problems is important in seizing these opportunities.
When specifically thinking about FTS, the notable challenge is that most patients (around 50% or more, as highlighted in the Dailiana article review) will present with only one or two ‘cardinal’ findings. Identifying any potential inciting event – whether small puncture, cut, or even working in the garden – helps to increase your index of suspicion. As the case highlights, many patients have a red joint, hand pain, or other presenting complaints that muddy the picture. The obvious FTS patients are relatively easy to identify, but the other 50% or more can be very challenging to diagnose.
Many infection, gout, arthritis flare, “hand that’s swollen and red”, etc. patients have such pain that a good exam is difficult. But, deciding on one of the four types of hand infection surgical emergencies – abscess, septic arthritis, purulent FTS, or necrotizing fasciitis – is critical. If the patient will not tolerate passive extension of the finger, my preferred way to evaluate for FTS without being unnecessary cruel is by manually compressing the tendons in the distal 1/3 of the volar forearm. You can try this on yourself – let your arm relax and then squeeze your forearm at the junction between the middle and distal 1/3 (where flexor tendons start to become distinct from muscles) and you can make your fingers flex; relax on the forearm and they will return to resting posture. If that maneuver creates focal pain in the swollen finger, my concern for FTS goes up.
Overall, high index of suspicion is critical. Rule FTS out, not in – convince yourself the patient doesn’t have a potential surgical problem by doing whatever evaluation and early treatment you think is appropriate and following the course, rather than delaying intervention until the presentation is more obvious. And, whenever in doubt, keep the patient NPO and consult a specialist so that a treatment plan can be put together without unnecessary delay or risk.

Aviram Giladi, MD, MS
The Curtis National Hand Center, MedStar Union Memorial Hospital
How to Cite this Post
[Peer-Reviewed, Web Publication] Dyer K, Hussain A (2019, January 28). Flexor Tenosynovitis [NUEM Blog. Expert Commentary by Giladi A]. Retrieved from http://www.nuemblog.com/blog/flexor-tenosynovitis.
Other Posts You May Enjoy
References
Kennedy CD, Huang JI, Hanel DP. In brief: Kanavel’s signs and pyogenic flexor tenosynovitis.ClinOrthopRelat Res 2016;474:280–4.
Hyatt MT, Bagg MR. Flexor Tenosynovitis.OrthopClin N Am 2017;48:217-27
Pang HN, Teoh LC, Yam AK, et al. Factors affecting the prognosis of pyogenic flexor tenosynovitis. J Bone Joint Surg Am 2007; 89:1742.
Draeger RW, Bynum DK Jr. Flexor tendon sheath infections of the hand. J Am AcadOrthopSurg 2012;20:373–82.
Dailiana ZH, Rigopoulos N, Varitimidis S, et al. Purulent flexor tenosynovitis: factors influencing the functional outcome. J Hand SurgEurVol 2008;33:280–5.
Nikkhah D, Rodrigues J, Osman K, Dejager L. Pyogenic flexor tenosynovitis: one year’s experience at a UK hand unit and a review of the current literature. Hand Surg 2012; 17:199.
Bishop GB, Born T, Kakar S, et al. The diagnostic accuracy of inflammatory blood markers for purulent flexor tenosynovitis. J Hand Surg Am 2013;38:2208–11.
Boles SD, Schmidt CC. Pyogenic flexor tenosynovitis.Hand Clin 1998;14:567–78.
Pollen AG. Acute infection of the tendon sheaths. Hand 1974;6:21–5.
Pickens, Anna. "Flexor Tenosynovitis." EM in 5. N.p., 20 Apr. 2014. Web. 10 May 2017.
Must Not Miss Fractures in the ED

Written by: M. Terese Whipple , MD (NUEM PGY-3) Edited by: Ashley Amick, MD (NUEM alum '18) Expert commentary by: Matthew Pirrotte, MD
Undiagnosed fractures occur frequently in the Emergency Department setting, with a total miss rate of 1-3%. These missed fractures not only lead to poor patient outcomes, but also account for the second highest cost of litigation against EM docs, behind only MI.1,2 This may not seem relevant if you are lucky enough to have access to a Radiologist 24-7, however there are several injuries that will be missed if they are not included in the differential diagnosis, because even the best radiologist can’t read a film if it wasn’t ordered. This blog post will cover three ‘must not miss’ injuries to keep in mind when assessing your run-of-the-mill orthopedic injuries namely: the Maissoneuve fracture, Lisfranc injury, and Galeazzi/Montaggia fracture-dislocations. Finding these tricky injuries require additional radiographic views beyond those standardly ordered, but keeping them in your differential will mean better outcomes for you and your patients.
Massonieuve Fracture:
What is it and how will it present?
A Massonieuve Fracture (which can be as difficult to pronounce as it is to miss) is a spiral fracture of the proximal 1/3 of the fibula with a disruption of the distal tibiofibular syndesmosis, which occurs in 5% of ankle injuries3. The injury occurs with pronation and external rotational forces are applied to a fixed foot, with damage propagating from the stressed tibial bone or deltoid ligament up through the interosseus membrane, causing a fracture to the proximal fibula.4 A twisted ankle in high heels is a classic mechanism for his injury. In some cases the only apparent deformity is soft tissue swelling, pain, or ecchymosis at the ankle. Patients may complain only of ankle pain, and because they are unable to bear weight they don’t load the damaged fibula, and therefore do not complain of lateral leg pain.
Exam:
The patient will likely have pain with palpation over the ankle fracture/injured ligaments. Evaluate the ankle syndesmosis with compression and dorsiflexion eversion testing (will simulating a “high ankle” syndesmotic injury). In addition, make sure to palpate the proximal fibula both directly along the proximal shaft and head, and with gentle squeezing of the proximal leg just below the knee joint (a squeeze test). Pain with these maneuvers should prompt additional radiographs. Finally, test peroneal nerve function with ankle dorsiflexion and dorsal foot sensation. It is subject to injury in fibular fracture.
Radiologic Findings:
View you may not think of: Tib-fib or knee XR
Ankle AP:
Look for fractures of the medial malleolus or posterior margin of the tibia. Also look for avulsion fractures indicating interosseus ligament disruption, such as in this case, with both a fracture of the lateral malleolus and a chip fracture indicated by the white arrow [3,5]. There is obvious widening of the syndesmosis.
Look for joint space widening (white arrow) or widening of the syndesmosis (black arrow) [6]. If patient can’t stand, you may have to perform manual stress of the joint while the radiographs are taken (as indicated in this AP).
Knee or Tib/fib:
Proximal fibular fracture {3}
Management and why it matters:
This fracture is considered by many to be among the most unstable ankle injuries [4]. If there is an intact mortise with no joint space widening, the patient can be casted and follow up with orthopedics. If there is joint-space widening at the ankle mortise, surgical intervention is likely required. If undiagnosed, a patient with a Massonieuve fracture may incur a host of bad outcomes including delayed orthopedic intervention, chronic pain, arthritis, and impaired mobility.
Lisfranc Fracture-Dislocation
What is it and how will it present?
Lisfranc injury broadly refers to disruption of the metatarsals from the tarsus, with emphasis on the second tarsometa-tarsal joint and Lisfranc ligament [7]. The Lisfranc ligament runs obliquely from the medial cuneiform to the base of the second metatarsal (see below image for a refresher on normal foot anatomy). Injuries run the spectrum from sprain to an unstable fracture/dislocation. A dislocation of the tarsometatarsal (Lisfranc) joint is often associated with fractures, most commonly at the base of the second metatarsal or cuboid bone. It is estimated that 20-40% of Lisfranc injuries are missed on initial presentation. It can be caused by diverse mechanisms of injury including direct, high-energy trauma, such as MVCs (45% of injuries), or indirect mechanisms including [8]:
Forced flexion of the forefoot with a fixed hind foot (a horseback rider falling with a foot caught in a stirrup)
Forced supination/pronation on a plantar flexed foot (a soccer player having their forefoot stepped on and subsequently falling)
Axial load on a flexed foot (a drunken cubs fan celebrating the World Series win by jumping from Harry Caray’s statue onto a plantar flexed foot)
Physical Exam:
Pain localizes to the midfoot. The exam may be subtle, or there may be significant swelling and deformity present. The patient can be ambulatory or unable to bear weight. Test the joint by stabilizing the hindfoot, any twisting of the forefoot may cause pain. Compression across the forefoot will stress the space between the first and second metatarsals, causing a pain or a palpable click if a Lisfranc injury is present. The Piano-key test is preformed by stabilizing the hindfood, grasping the metatarsals, and preforming passive dorsiflexion and plantar flexion at the tarsometatarsal joint, looking for pain or subluxation.9 Rarely they can have associated dorsalis Pedis injury as it courses near the joint, so make sure to check pulses. The tibialis anterior nerve can also become interposed and cause the big toe to point upwards, called the “Toe Up Sign.”
Radiologic Findings:
If a Lisfranc injury is suspected, foot radiographs with additional views including WEIGHT BEARING AP, lateral, and oblique are essential.
First a normal foot:
The lateral margin of the 1st metatarsal should be aligned with the lateral margin of the medial cuneiform.
The medial aspect of the base of the 2nd metatarsal should align with the medial border of the middle cuneiform.
The medial margins of the 4th metatarsal and cuboid should be aligned [10].
Findings suggesting injury:
AP: Diastasis of >2 mm between the base of the 1st and 2nd metatarsals indicates Lisfranc injury. 90% have associated avulsion fracture of the base of the second metatarsal or medial cuneiform, known as Fleck Sign (pictured at left). The pictured radiograph also demonstrates lateral displacement of all 5 metatarsals [11,12].
Lateral: Allows for identification of any dorsal or plantar dislocation [12].
Oblique: Allows for evaluation of the alignment of the 3rd and 4th metatarsals with the cuboid and cuneiform [12].
Management and why it matters:
If there is no evidence of widening of the Lisfranc joint space, the patient can be splinted and follow up with orthopedics, however they MUST BE non-weightbearing. Any evidence of fracture-dislocation >2 mm requires orthopedic consultation in the ED for likely operative fixation. Fractures found later have worse outcomes. Delayed ORIF after late recognition is better than no intervention, however most patients still require shoe modification or orthoses [12].
Galeazzi and Monteggia Fracture Dislocations
The radius and ulna are joined by an interosseus membrane. When one is injured the other is likely to be affected as well (just like the tibia/fibula).
Management and why it matters:
If either fracture is suspected, consult hand surgery/orthopedics for reduction and definitive management. Both almost always require ORIF or other surgical treatment. Chronic pain and limitation of supination and pronation can occur if not properly treated [13].
Expert Commentary
Drs. Whipple and Amick do a nice job of highlighting several eponymous fractures which can be tricky to diagnose. In general I find that missed extra-axial orthopedic injuries in the emergency department are the result of several factors
Failure to “film what hurts.” If a patient feels that their injury was sufficiently serious to warrant a visit to the emergency department, the prudent practitioner maintains a low threshold for imaging. Clinical decision rules for judicious imaging are clearly valid but need to be applied judiciously. When in doubt, get the film.
Failure to review films directly. Radiologists, while skilled and vital partners, rarely have the detailed information gleaned from simply pressing on patient’s bones and figuring out where they hurt. Correlation with point tenderness is a critical part of radiographic assessment. Scrutiny of radiographic bony anatomy near the sites of tenderness can lead to discovery of subtle fractures.
Failure to consider mechanism. Given the frequency with which we in the ED see serious trauma, it is easy to fall into a trap of being unimpressed with mechanisms that are actually quite severe. Every experienced acute care practitioner has had the chance to be absolutely flabbergasted by the severe polytrauma that can result from “low impact’ mechanisms such as stair falls, falls from standing, and pedestrians struck by vehicles at low speed.
The ramifications of a missed fracture can be significant. A recent analysis of closed legal claims in emergency medicine found that three of the top ten diagnoses in medical malpractice lawsuits were related to fracture care(vertebral, radius/ulna, tibia/fibula) [14]. A similar analysis of pediatric cases demonstrated that in children over the age of 3, fractures remain the most common source of medical malpractice claims [15]. This is to say nothing of the obvious morbidity and potential disability that may result from a missed injury.
The interesting thing about the fractures that discussed by Drs. Whipple and Amick is that, at least in the case of the Maisonneuve and forearm fractures, what tends to be missed is the severity and operative nature of these injuries rather than the fractures themselves.A clinician seeing a patient with an eponymous forearm fracture will likely not misdiagnose them as an elbow sprain. Similarly, few people would interpret the ankle films of a patient with Maisonneuve fracture to be normal, the problem comes in missing the fibular injury. Lisfranc’s fracture is a different entity; it is not uncommon for these patients to be misdiagnosed several times as having a “foot sprain” before the proper diagnosis is made.
One thing you can take to the bank in emergency orthopedics is that if the fracture is named after someone the injury involved can usually find a way to trick even a savvy clinician. Bennett, Rolando, Jefferson, Smith, and Sagond are also names that will you will encounter in your career. As yet no one has attached their name to the nondisplaced fracture of the distal phalanx of the small toe, but one never knows.

Matthew Pirrotte, MD
Assistant Professor of Emergency Medicine, NUEM
How to cite this post
[Peer-Reviewed, Web Publication] Whipple M, Amick A (2018, August 6). Can't Miss Fractures in the ED. [NUEM Blog. Expert Commentary by Pirotte M]. Retrieved from http://www.nuemblog.com/blog/missed-fractures
Posts you may also enjoy
References:
Schwartz, D. Ten Most Commonly Missed Radiographic Findings in the ED. Boston Scientific Assembly. Thursday, October 8, 2009. Boston Convention & Exhibition Center.
Hallas P and T Ellingsen. Errors in fracture diagnoses in the emergency department – characteristics of patients and diurnal variation. BMC Emergency Medicine. 2006. 6(4). doi:10.1186/1471-227X-6-4.
Millen JC and D Lindberg. Maissoneuve Fracture. The Journal of Emergency Medicine. 2011. 41(1): 77–78.
Charopoulos I, Kokoroghiannis C, Karagiannis S, Lyritis GP, Papaioannou N. Maisonneuve fracture without deltoid ligament disruption: a rare pattern of injury. The Journal of foot and ankle surgery : official publication of the American College of Foot and Ankle Surgeons. 49(1):86.e11-7
Sports Medicine for the Emergency Physician: A Practical Handbook. Ed. A. Waterbrook. Cambridge University Press: NY, NY. 2016. 75-77, 130-131, 248-249, 273.
Taweel NR et al. The proximal fibula should be examined in all patients with ankle injury: A case series of missed Maisonneuve fractures. The Journal of Emergency Medicine. 2013. 44(2): 251-255.
Wynter S, Grigg C. Lisfranc injuries. Aust Fam Physician. 2017 Mar;46(3):116-119.
Desmond EA, Chou LB. Current concepts review: Lisfranc injuries. Foot Ankle Int 2006;27(8):653–60.
Seybold JD, Coetzee JC. Lisfranc injuries: When to observe, fix, or fuse. Clin Sports Med 2015;34(4):705–23.
Sherief TI, Mucci B, Greiss M. Lisfranc injury: How frequently does it get missed? And how can we improve? Injury, Int. J. Care Injured. 2007. 38: 856—860.
Gupta, RT et al. Lisfranc injury: Imaging findings for this important, but often missed diagnosis. Curr Probl Diagn Radiol. 2008 May/June. 115-126.
van Rijn J et al. Missing the Lisfranc Fracture: A case report and review of the literature. The Journal of Foot & Ankle Surgery. 2012. 51: 270-274.
Perron, A et al. Orthopedic pitfalls in the ED: Galeazzi and Monteggia Fracture-Dislocation. Am J Em Med. 2001 May. 19(3): 225-228.
Brown, T. W., McCarthy, M. L., Kelen, G. D. and Levy, F. (2010), An Epidemiologic Study of Closed Emergency Department Malpractice Claims in a National Database of Physician Malpractice Insurers. Academic Emergency Medicine, 17: 553–560
Selbst SM, Friedman MJ, Singh SB. Epidemiology and etiology of malpractice lawsuits involving children in US emergency departments and urgent care centers. Pediatr Emerg Care. 2005 Mar; 21 (3): 165-169
A Recipe for Reduction: Five alternative approaches for reducing an anterior shoulder dislocation

Written by: Abiye Ibiebele, MD (NUEM PGY-1) Edited by: Jacob Stelter, MD, (NUEM PGY-3) Expert commentary by: Andrew Ketterer, MD
“With great power comes great responsibility.”
“That’s one small step for man, one giant leap for mankind.”
“Every emergency medicine physician should know three ways to reduce a shoulder, not including traction-countertraction.”
Now that last one may be not as well known as the other quotes, but it was a pearl passed along to me during my Sports Medicine rotation by my attending. The traction-countertraction method is often used due to physician familiarity and is considered the standard technique due to a high success rate [1,7] However, due to need for adequate sedation and the amount of force generated during the reduction, below we will examine five alternative methods of reduction for anterior shoulder dislocations.
Stimson Method
Figure 1: Stimson maneuver of shoulder reduction Image credit: http://img.medscapestatic.com/pi/meds/ckb/20/25520.png
- Have the patient lay prone on an elevated stretcher with the injured extremity hanging off the edge of the stretcher. [1]
- Apply traction by suspending 5 to 10 lbs of weight from the wrist. [1]
- Have the patient maintain this position for 20-30 mins. [1]
- If needed, manual traction can be added with external rotation to aid in reduction. [1]
- Success rate for the Stimson technique alone is about 28%. [3,4]
- Success rate improves when combined with scapular manipulation.
- Reasons for failure include discomfort in prolonged prone position and discontinuing the reduction with prolonged times which can reach over 20 mins. [4]
- Moderately painful, ~5.3 out of 10 on pain scale. [3]
Scapular Manipulation Method
Figure 2: Scapular Manipulation Technique. Adapted from Horn, A., & Ufberg, J. (2013), Management of Common Dislocations. In: Roberts and Hedges' Clinical Procedures in Emergency Medicine (6th ed.). Philadelphia, PA: Elsevier/Saunders.
- Place the patient in a prone position with the shoulder in 90 degrees of forward flexion and slight external rotation. [1,2]
- Apply traction to the shoulder as mentioned in the Stimson technique above. [1,2]
- As patient begins to relax, stabilize the superior aspect of the scapula with one hand, with the thumb on lateral border of scapula. [1,2]
- With other hand, push the inferior tip of scapula medially towards spine, while rotating superior aspect laterally with the first hand. [1,2]
- Some dorsal displacement of the tip of the scapula (lifting it) may be necessary as medial displacement is maximized. [1,2]
Variation: This technique can also be done in a seated position, with an assistant assisting applying traction on the affected arm and countertraction on ipsilateral clavicle. This is actually the preferred method by many, however this is a technically more difficult reduction [1].
- Success rate for the Stimson technique has ranged from ~90-97%. [2,3]
- Fast reduction, takes less than 5 minutes to perform. [2,3]
- Noted to be one of the least painful methods of reduction: a recent systematic review describes pain ~1.5 out of 10 during reduction. [3]
- There have not been any reported complications of this technique. [2,3]
External Rotation Method
Figure 3: External Rotation Technique. Adapted from Horn, A., & Ufberg, J. (2013), Management of Common Dislocations. In: Roberts and Hedges' Clinical Procedures in Emergency Medicine (6th ed.). Philadelphia, PA: Elsevier/Saunders.
- Have the patient lie supine on a stretcher and position yourself on the side of the affected arm. [1,5]
- Fully adduct the affected arm and flex the elbow to 90 degrees. [1,5]
- Place one hand on the wrist and another hand on the patient’s elbow. [1,5]
- Using the grasped wrist as a guide, slowly begin to externally rotate the patient’s arm. [1,5]
- Stop movement any time patient feels pain to allow the muscles to relax before resuming. [1,5]
- Reduction typically occurs between 70 and 110 degrees of external rotation. [6]
- If dislocation persists after full external rotation, you can apply steady gentle traction at the elbow, or slowly bring the arm back into internal rotation which can lead to reduction [1,6}.
- You can also proceed to the Milch technique from full external rotation (see below). [8]
- Success rate ranges from 81-91%. [3,6]
- Average time to reduction is around 3 mins but it can take up to 10 mins to perform. [3,6]
- Well tolerated by patients, ~ 3 out of 10 on pain scale. [3]
- No reported complications of this technique. [3,6]
Milch Technique
- Have the patient lie on a stretcher; the patient can be either supine or prone based on his or her comfort. [1,4,6]
- Have the patient abduct the affected arm to place their hand behind their head, if they are able, and then straighten the arm at the elbow. [1,6]
- If the patient cannot do this unassisted, then grab patient’s arm at either the elbow or the wrist and guide arm into full abduction. [1,4,6]
- With the arm fully abducted, apply gentle longitudinal traction and gentle external rotation to achieve reduction. [1,4,6]
- If reduction does not occur quickly, apply gentle cephalad pressure to the humeral head while continuing to hold traction. [1,4,6]
- If external rotation has already been attempted (see external rotation technique above), you can proceed to the Milch technique by abducting the arm in a wide arc from full external rotation, while applying gentle traction throughout. [8]
Figure 4: Milch Technique. Adapted from Horn, A., & Ufberg, J. (2013), Management of Common Dislocations. In Roberts and Hedges' Clinical Procedures in Emergency Medicine (6th ed.). Philadelphia, PA: Elsevier/Saunders.
- Success rate ranges from 70-95%. [1,6]
- On average, takes about 4-5 mins to perform. [3,4]
- Moderately painful, ~ 5.3 out of 10 on pain scale. [3,4]
- No reported complications of this technique. [3,4]
FARES Method (“FAst, REliable, Safe)
- Have the patient lie supine on the stretcher and stand on the affected side. [9]
- Apply gentle longitudinal traction on the arm and begin to bring the arm into abduction. [9]
- While abducting arm, oscillate the arm in an up and down fashion
- Oscillations should be brief (2-3 full cycles per second) and short (about 5 cm above/below midline). [9]
- After 90 degrees of abduction, continue oscillations and add gentle external rotation. [9]
- Reduction is usually achieved around 120 degrees of abduction. Afterwards gently internally rotate the arm to bring the forearm to lie across the patient’s chest. [9]
- A helpful demonstration video can be viewed here
- Success rate ranges from 88-95%. [9, 10]
- Reduction time: ~2-3 mins. [3,9,10]
- Well tolerated, pain 1-2 out of 10 on VAS scale. [3,9]
- No reported complication of this technique. [3.9]
So, the next time an anterior shoulder dislocation walks into the ER, go ahead and give one of these reduction techniques a try. No single reduction method is 100% successful, so it’s good to be facile in a variety of methods. Remember to obtain pre- and post-reduction films and assess neurovascular status before and after reduction [1]. Time to reduce some shoulders!
Expert Commentary
This is a very nice overview of some less brutal approaches to a common and sometimes difficult problem. The classic traction-countertraction techniques (e.g. the Hippocratic method, wherein the physician places a foot in the axilla of the patient’s affected arm and applies distal traction) tend to have higher complication rates, including axillary nerve injury, humeral neck and shaft fractures, and glenohumeral capsular damage. They also tend to be quite painful, usually necessitating procedural sedation, which of course carries its own risks.
In addition to the above, one method I have had great success with is the Cunningham technique: The patient is placed in a sitting position, with the affected arm completely adducted and the elbow flexed to 90 degrees. The physician supports the patient’s forearm with their own forearm, with the hand on the patient’s elbow, and applies very gentle downward traction – the weight supplied by the physician’s forearm is usually adequate. The physician sequentially massages the patient’s trapezius, deltoid, and biceps muscles until the humeral head reduces. This technique won’t usually cause a satisfying “clunk,” so you’ll need to check periodically to see whether the shoulder has been reduced. Resolution of the lateral shoulder step-off might be the only immediately visible sign of successful reduction.
[Video of Cunningham technique]
Often, I will combine this technique with the FARES method by oscillating the patient’s forearm up and down as I externally rotate their shoulder. This usually results in quick and nearly painless reduction and has an exceptionally low complication risk. In order for these techniques to work, the patient must be relaxed – as soon as you hit resistance or cause pain their muscles will tense up, so if this happens you need to pause and wait for them to feel better before continuing. A whiff of opioids can do wonders here, accomplishing both pain relief and anxiolysis.
The reasoning behind the various shoulder reduction techniques is that spasm of the biceps, trapezius, and deltoid muscles is keeping the humeral head out of the glenoid fossa. Fatiguing these muscles with traction or distracting the patient will allow you to mobilize the humeral head and get it back into the glenoid fossa. It’s worth noting that muscle spasm becomes increasingly hard to overcome the longer a patient is dislocated. This means that the FARES method and other distraction techniques are less likely to work if the patient has been dislocated for too long, and more painful fatigue techniques such as Stimson, Milch, or good old traction-countertraction may become necessary. Still, it’s good to have a number of tricks up your sleeve, and if one doesn’t work, you have plenty of others to choose from.

Andrew Ketterer, MD
Medical Education Fellow, Beth Israel Deaconess Emergency Medicine
[Peer-Reviewed, Web Publication] Ibiebele A, Stelter J (2018, May 21 ). A Recipe for Reduction: Five alternative approaches for reducing an anterior shoulder dislocation. [NUEM Blog. Expert Commentary by Ketterer, A]. Retrieved from http://www.nuemblog.com/blog/shoulder-reduction
References
1. Horn, A., & Ufberg, J. (2013), Management of Common Dislocations.In Roberts and Hedges' Clinical Procedures in Emergency Medicine (6th ed.). Philadelphia, PA: Elsevier/Saunders.
2. Anderson, D., Zvirbulis, R., & Ciullo, J. (1982). Scapular manipulation for reduction of anterior shoulder dislocations. Clinical orthopaedics and related research, 164, 181-183.
3. Alkaduhimi, H., van der Linde, J. A., Willigenburg, N. W., van Deurzen, D. F. P., & van den Bekerom, M. P. J. (2017). A systematic comparison of the closed shoulder reduction techniques. Archives of orthopaedic and trauma surgery, 137(5), 589-599.
4. Amar, E., Maman, E., Khashan, M., Kauffman, E., Rath, E., & Chechik, O. (2012). Milch versus Stimson technique for nonsedated reduction of anterior shoulder dislocation: a prospective randomized trial and analysis of factors affecting success. Journal of shoulder and elbow surgery, 21(11), 1443-1449.
5. Eachempati, K. K., Dua, A., Malhotra, R., Bhan, S., & Bera, J. R. (2004). The external rotation method for reduction of acute anterior dislocations and fracture-dislocations of the shoulder. JBJS, 86(11), 2431-2434.
6. Ufberg, J. W., Vilke, G. M., Chan, T. C., & Harrigan, R. A. (2004). Anterior shoulder dislocations: beyond traction-countertraction. The Journal of emergency medicine, 27(3), 301-306.
7. Ghane, M. R., Hoseini, S. H., Javadzadeh, H. R., Mahmoudi, S., & Saburi, A. (2014). Comparison between traction-countertraction and modified scapular manipulation for reduction of shoulder dislocation. Chinese Journal of Traumatology, 17(2), 93-98.
8. Hendey, G. W. (2016). Managing anterior shoulder dislocation. Annals of emergency medicine, 67(1), 76-80.
9. Sayegh, F. E., Kenanidis, E. I., Papavasiliou, K. A., Potoupnis, M. E., Kirkos, J. M., & Kapetanos, G. A. (2009). Reduction of acute anterior dislocations: a prospective randomized study comparing a new technique with the Hippocratic and Kocher methods. JBJS, 91(12), 2775-2782.
10. Maity, A., Roy, D. S., & Mondal, B. C. (2012). A prospective randomised clinical trial comparing FARES method with the Eachempati external rotation method for reduction of acute anterior dislocation of shoulder. Injury, 43(7), 1066-1070.
A Visual Guide to Upper Extremity Joint Aspirations

Written by: Will Ford, MD (NUEM PGY-3), Amy Ford, MD (Loyola Orthopedic Surgery PGY-3) Edited by: Keith Hemmert, MD, (NUEM PGY-4) Expert commentary by: Lucas Rosiere, MD
What follows is an overview of joint aspiration techniques in the upper extremity. We will be covering the shoulder, elbow, and wrist.
THE SHOULDER
Coracoid
Identify your landmarks. In this setting, the skin marker is your friend. See the following pictures.
1. Find the coracoid. Mark it with a circle.
2. Find the notch where the acromion and the clavicle meet. Mark it with a point.
3. Find the anterolateral and posterolateral corners of the acromion. Mark each with a point. These two points should make an equilateral triangle with your point from #2.
From L to R: Anterolateral corner of acromion, meeting between the acromion, posterolateral corner of the acromion
4. Roll your marker off the lateral edge of the acromion. Mark this line.
5. Draw out the borders of the clavicle and the scapular spine.
Two common sites of entry are the posterior and anterior approaches. You will find that some patients have better landmarks posteriorly or anteriorly – this can vary depending on patient habitus and positioning.
Posterior approach
The posterior approach traditionally begins approximately 2cm medial and inferior from the posterolateral corner of the acromion. You should feel a soft spot here. In a patient without a septic joint, you can move the humeral head anteriorly and posteriorly and feel the joint from this spot. When aspirating from the posterior approach, go in through the soft spot and point your needle toward the coracoid circle you marked previously.
The anterior approach uses your coracoid landmark to protect yourself from injuring important neurovascular structures. Never go medial to the coracoid. Your insertion spot will be just lateral to the coracoid. Aim directly posterior and slightly superior.
Anterior approach
When dealing with shoulder injections with distorted anatomy (for example, in the shoulder dislocation), it can still be helpful to draw out the anatomy and imagine where it will be easiest to enter the joint. For instance, in an anterior shoulder dislocation, you may be able to palpate the humeral head anteriorly and easily enter the joint space around the humeral head.
The Elbow
Identify your landmarks. Again, the skin marker can be helpful to visualize your entry point.
- With the elbow at 45-90° flexion, mark the lateral epicondyle of the humerus with a point.
2. Mark the radial head with a point. You can identify this by pronating and supinating the forearm and feeling the rotation of the radial head.
3. Mark the tip of the olecranon with a point. The three points should make something close to an equilateral triangle.
Your entry point will be in the center of the triangle. Again, you should feel a soft spot here. When directing your needle, orient it perpendicular to the skin and go straight in.
The Wrist
Identify your landmarks:
- Find Lister’s tubercle (tubercle on the dorsal distal tip of the radius). Your entry point will be approximately 1cm distal to this tubercle.
- Find the extensor tendons of the thumb and index finger (extensor pollicis longus and extensor digitorum communis/extensor indicis proprius). Your entry point will be between these tendons.
You should feel a soft spot at the wrist joint between these landmarks. It may be helpful to flex the wrist slightly (15-30°) and to point your needle proximally (30-45°) to respect the slope of the distal radius. Another helpful trick is to have an assistant grab the patient’s forearm with one hand and the patient’s index and middle fingers with the other hand, and distract across the joint to open up the space. Alternatively, you could hang the arm up in finger-traps for the same effect.
"Arthrocentesis & Injections: Wrist (Radiocarpal)." RheumaKnowledgy Arthrocentesis Injections Wrist Radiocarpal Comments. N.p., 15 Oct. 2014. Web. 14 May 2017.
General tips for joint aspiration:
- To produce greater suction power needed to aspirate viscous fluid, use a larger bore needle and a smaller syringe.
- If there is any question about length of needle needed to reach the joint, use a spinal needle to avoid multiple attempts. However, in smaller joints, a shorter needle is preferable because it will improve your proprioceptive senses.
- If you enter and hit bone, don’t panic, just try to visualize the anatomy and redirect your needle gently.
- If anesthetizing the skin/subcutaneous tissue prior to aspiration, be careful to stay subcutaneous, as injecting lidocaine into the joint space would jeopardize the accuracy of your cell count results.
- Lab tests to order on synovial fluid:
- Culture + gram stain (most important)
- Cell count
- Crystals
General indications for joint aspiration:
- The most absolute indication for aspiration is concern for septic arthritis, as evidenced by:
- Extreme apprehension from the patient to move the joint, such that only passive motion is possible
- Very limited motion due to pain
- Painful throughout entire arc of motion (i.e. no painless arcs of motion)
- Presence of effusion
- Aspiration may be done to obtain crystals for a diagnosis of gout.
- Therapeutic aspiration of a hemarthrosis should not be done routinely, and should only be used as a last resort if noninvasive measures (immobilization, compression, ice, analgesics) have failed.
General contraindications for joint aspiration:
- Aspiration through cellulitis should generally be avoided due to the risk of seeding an uninfected joint.
- Aspiration of prosthetic joints should not be performed by the Emergency Medicine provider for the same reason as above, and the decision on whether or not to do so should be deferred to Orthopaedic Surgery.
- Anticoagulation is not a contraindication for aspiration.
Expert Commentary
Thanks Dr. Ford and Dr. Hemmert for this procedure guide.
A thorough understanding of these techniques is essential to the general emergency physician. Outside of an academic center, you will be the one aspirating joints in the ED (with the exception of the hip). Rare is the day you'll have your orthopedist in the department for help with this diagnostic part of the work-up. So it is imperative we can safely and efficiently get this done.
This review focuses a lot on anatomy and skin markers. Rightly so. Much like a lumbar puncture, the more time you spend on accurate positioning and palpation, the fewer times you'll poke, the less pain you'll cause, and the more likely you are to produce an atraumatic aspiration.
I urge you to feel these bony landmarks on yourself. If you don't do this every day, this can be difficult. Even on the most slender of people (and few patients fit that description), feeling a coracoid process or radial head may be difficult.
Whether I can feel the landmarks perfectly or not, I love to spend 60 seconds and use ultrasound. It can find bones deep in the soft tissues of the obese, it can find surprising locations of joint spaces and can also give you a better idea of the trajectory your needle ought to pass. Great for patient satisfaction. Very simple. Just use the linear probe and place it across the expected joint line so you can see bone on left, bone on right, space in the middle. Then mark the skin. No need to use it during the aspiration itself, just while marking the skin.
Regarding the specific techniques listed here, the descriptions are fantastic. I can only add that, for the wrist, you will also like to avoid puncturing the extensor carpi radialis brevis tendon. If you have the patient actively extend the wrist a little (may be painful), you should feel the tendon between the tendons of the extensor digitorum and extensor pollicus longus. I'd go just ulnar to that.

Lucas Rosiere, MD
NUEM Graduate 2012, Physician Central DuPage Hospital
How to cite this post
[Peer-Reviewed, Web Publication] Ford W, Hemmert K (2018, May 7 ). A visual guide to upper extremity joint aspirations. [NUEM Blog. Expert Commentary by Rosiere, L ]. Retrieved from http://www.nuemblog.com/blog/joint-aspiration
Posts you may also enjoy
Demystifying the Hand Exam

Written by: Terese Whipple, MD (NUEM PGY-2) Edited by: Victor Gappmaier, MD, (NUEM PGY-4) Expert commentary by: Aviram Gialdi, MD, MS
The human hand is a fascinatingly intricate arrangement of pulleys, tendons, muscles, and nerves that work together in a complex system to perform daily tasks. It is often difficult to visualize the various paths that the tendons and muscles take. It can also make a thorough hand exam difficult to perform with proficiency. This post will review the clinically relevant anatomy of the hand, and apply it to both a screening exam and detailed exam with maneuvers used in the diagnosis of common hand injuries.
This screening exam can be used in the case of a fracture/dislocation at or proximal to the wrist, or in a general trauma to ensure that there has not been a nerve injury – from the cervical spine, through the brachial plexus, and into the extremity.
Basic Screening Exam:
Vascular
To examine the vascular supply of the hand the examiner should palpate the radial pulse and check digital capillary refill. Using a finger pulse oximeter is a useful adjunct for evaluating perfusion; anything below 95 in a traumatized limb/digit raises concern.
Neuro
The radial, median, and ulnar nerves each have sensory and motor functions that should be evaluated.
Radial (C5-C8):
Img 1. Sensory innervation of hand
- Motor: Extend the wrist. If too painful due to injury, then extension of the thumb IP joint may be substituted.
- Sensory: Test the dorsal webspace between the thumb and index finger
Median (C5-T1):
- Motor:
- Recurrent motor branch of the median nerve: Have the patient attempt opposition (bringing the thumb tip across to the small finger tip)
- Anterior interosseus branch of the median nerve: Make an OK sign by having the patient touch the tip of the thumb to the tip of the index finger
Img 2. Correct OK Sign
Img 3. Incorrect OK Sign
- Sensory: Palmar surface of the index finger or thumb
Ulnar (C8-T1):
- Motor: Test by having patient spread fingers against resistance
- Sensory: Palmar aspect of the little finger
Check the individual digital sensory nerves to any finger by testing the radial and ulnar sides of each digit
If the patient can perform each of the above functions and has intact sensation, as well as good cap refill and pulses, they have passed the basic screening exam and are “neurovascularly intact.”
Now for a more detailed exam, which should be used when a patient comes in with a specific hand complaint or if there is concern for muscle or tendon injury.
A thorough musculoskeletal (MSK) exam should include:
- Inspection
- Palpation
- Range of Motion (ROM)
- Nerve/Vascular assessment
- Muscle/tendon exam
- Specific maneuvers
Detailed Hand Exam:
Inspection
Inspect the hand for evidence of:
Img 3. Mallet finger
- Asymmetry
- Lacerations/abrasions: Any skin break over a joint (eg : fight bite) may look innocent, but actually provides a route for inoculation of the joint with infection and can be serious.
- Inflammation: Can be acute from recent injury/infection or chronic from inflammatory states such as RA.
- Atrophy: Think critically about the location of the atrophy, is it diffuse or does it fit one nerve distribution? For example, carpal tunnel syndrome may produce atrophy in the thenar muscles supplied by the median nerve. Ulnar nerve entrapment at the elbow (Cubital tunnel syndrome) could cause hypothenar muscle wasting and intrinsic wasting (most visible at first dorsal interosseous, along dorsal radial border of the index metacarpal).
- Any evidence of traumatic deformity such as unusual angulation or rotation. You should always check alignment of the fingers in flexion and extension. Sometimes abnormal rotation will only be visible when making a fist, when one finger crosses over/under the next
- Any alteration to the normal cascade of the fingers (one finger that is not flexed/extended to match the position of the others) may represent a tendon injury
- Mallet finger: A flexed DIP with inability to actively extend due to rupture of the terminal extensor tendon of the digit. (Img. 3)
- Boxer’s fracture: May have a “dropped knuckle sign” where the fracture of the metacarpal shaft causes a “disappearance” of the metacarpal head (Img. 4)
Img 4. Dropped knuckle sign
Palpation
Img 5. Scaphoid Tubercle
It can be difficult to visualize all of the bones in the hand and wrist in order to palpate them correctly. However, there are a few that emergency medical providers should know in order to catch the most common and consequential injuries.
The scaphoid is technically part of the wrist, however it is usually part of a screening hand exam for anyone with a fall onto a hand. It can be palpated in 3 places:
Img 6. Anatomic snuffbox
- Scaphoid tubercle
- The waist of the scaphoid can be palpated in the anatomic snuffbox
- The proximal scaphoid can be palpated on the dorsal wrist in the soft spot between the tendons of the 3rd and 4th compartment of the wrist, just distal to Lister’s tubercle
Img 7. Lister's Tubercle
Img 8. Proximal Scaphoid
Previous studies have demonstrated that tenderness at the scaphoid tubercle is actually more sensitive than the anatomic snuffbox (95% v. 85%) in diagnosing scaphoid fracture. When palpating the anatomic snuffbox you can maximize the surface area that you are palpating by having the patient move their hand into ulnar deviation and thumb abduction.
Range of Motion
Test range of motion both passively and actively in each joint. Passive ROM gives you information about the joint. You may feel clicking, catching or crepitance. Active ROM provides information about nerve function, muscle strength, joint congruity/stability, and tendon integrity.
[Insert aforementioned neurovascular exam here]
Muscle/tendon exam
A full muscle/tendon exam doesn’t need to be a part of every exam in the Emergency Department, we don’t have the time. However, if there is an injury that makes you concerned about the integrity of deep structures in the hand, wrist, or forearm, knowing the course and function of each muscle and tendon is useful. Theoretical cases have been included to provide context.
Case 1:
A patient sustained a deep laceration to his right volar forearm from a glass bottle during an altercation at a bar. The sensory exam in the hand is normal, but function is abnormal. In addition to the usual laceration care, you want to ensure all of the underlying tendons from the extrinsic muscles are intact. You need to check the finger and wrist flexors. Most of these are innervated by the median nerve, with the exception being the Flexor Carpi Ulnaris and the Flexor Digitorum Profundus to the small and ring fingers, which are innervated by the ulnar nerve.
Img 9. Flexors of forearm
- Flexor Pollicis Longus (FPL): Test by asking patient to flex thumb at the IP joint (AIN)
- Flexor Digitorum Profundus (FDP): Test by asking patient to flex DIP joint of index or middle finger while stabilizing PIP of the same digit
- Flexor Digitorum Superficialis (FDS): Test by asking patient to flex PIP while examiner holds all the other digits in extension (this blocks FDP and completely isolates the FDS)
- Flexor Carpi Ulnaris and Flexor Carpi Radialis: Test by asking patient to flex the wrist and palpate tendon/muscular contraction
In summary, to test the extrinsic flexors:
- Flex thumb IP joint
- Stabilize PIP and have patient flex each DIP in succession
- Hold remainder of fingers in extension, ask patient to flex each PIP in succession
- Volar flex wrist
Case 2:
The same patient presents again after a bar fight, this time sustaining a deep laceration to his dorsal forearm. You want to ensure all of the underlying tendons from the extrinsic muscles are intact. You need to check the extensors. These muscles are all innervated by the radial nerve and are separated into six compartments.
First Dorsal Wrist Compartment
- Abductor Pollicis Longus and Extensor Pollicis Brevis: Ask the patient to bring their thumb out to the side (abduct) and palpate the tendons along the radial border of the wrist
Img 10. Extensors of forearm
2nd Dorsal Wrist Compartment
- Extensor Carpi Radialis Longus (ECRL) and Extensor Carpi Radialis Brevis (ECRB): Have the patient make a fist and extend against resistance
3rd Dorsal Wrist Compartment
- Extensor Pollicis Longus: Place hand flat on table and lift thumb off the table
4th Dorsal Wrist Compartment (the MCP joint extensors of the fingers)
- Extensor Digitorum Communis and Extensor Indicis Proprius (EIP): Test by straightening individual fingers at the MCP. The EIP can be isolated by extending index finger with the rest of the fingers closed in a fist
Img 11. Extensors of forearm
5th Dorsal Wrist Compartment
- Extensor Digiti Minimi: Extend small finger with the rest of the fingers closed in a fist
6th Dorsal Wrist Compartment
- Extensor Carpi Ulnaris: Extend and ulnar deviate wrist
In summary, to test the finger extensors:
- Abduct the thumb, then place on table and lift thumb off
- Extend fingers against resistance at MCP
- Make fist and extend wrist against resistance
- Ulnar deviate fist
- Extend index finger from closed fist
- Extend small finger from closed fist
Case 3:
The same unfortunate patient returns after yet another bar fight. His other two lacerations are well healed, but now he has sustained a deep laceration to his right palm. This time you need to check the intrinsic muscles and tendons of the hand. These are innervated by the median and ulnar nerves and are also separated into compartments.
Thenar muscles: both median and ulnar nerve innervation
Img 12. Intrinsic muscles of hand
- Abductor Pollicis Brevis, Opponens Pollicis, Flexor Pollicis Brevis (median n.): Ask the patient to touch thumb and small finger tips together so the nails are parallel
- Adductor pollicis (ulnar n.): Have the patient hold paper between thumb base and radial side of 1st finger. Try to pull the paper away and see if they can hold it. When the adductor muscle is weak the thumb flexes at the IP joint to grab the paper (Froment’s sign)
Interosseus and Lumbrical: ulnar nerve innervation
Interosseus testing
- Lumbricals: Flex MCP and straighten IP
- Interosseus: Adduct and abduct the fingers. Place the hand flat on table to eliminate interference by extrinsic extensors, hyperextend middle MCP, and move finger from side to side.
Hypothenar muscles: ulnar nerve innervation (difficult to isolate, especially in an injured patient)
- Abductor Digiti Minimi: Test by abducting small finger
- Opponens Digiti Minimi: Function to bring small finger towards thumb
In summary, to test the intrinsic muscles of the hand:
- Touch small finger to the thumb so the nails are parallel
- Pinch paper between thumb and radial side of index finger in the first webspace
- Flex MCP and straighten PIP
- Place hand flat on table, hyperextend at MCP, adduct and abduct each finger
- Spread fingers against resistance, (also abducts the 5th finger and tests the hypothenar muscles)
-------------------------------------------------------------------------------------------------------------------
Special tests:
There are several tests that can be used to examine for common and important injuries.
Case 4
You are working at a ski clinic in Lake Tahoe as part of an elective rotation. A patient presents after a fall backwards onto his R hand while holding his ski pole. He has pain in his thumb, especially on the ulnar aspect of the MCP joint.
- Most likely diagnosis: Skier’s thumb/Gamekeeper's thumb, a rupture of the ulnar collateral ligament (UCL)
- Evaluation: Test UCL integrity. Hold thumb metacarpal with one hand, and fully extend thumb MCP and apply gentle radial deviation force to see if there is laxity or pain. Test again at 30 degrees of MCP flexion. Test other thumb as a reference (people vary widely in baseline joint laxity).
Case 5
A patient reports that he was playing pickup basketball, got a finger snagged on the opposing player’s shirt, and felt pain when the player pulled away suddenly. Now he has difficulty flexing the fingertip.
- Most likely diagnosis: Jersey finger, a rupture of the FDP tendon from the distal phalanx.
- Special test: Hold the patient's MCP and PIP in full extension and ask patient to flex at the DIP. If the FDP is intact the patient will be able to flex at the DIP. The PIP must be held in full extension to isolate FDP function.
Case 6
The same patient presents 6 months later, again playing pickup basketball, but this time he got his finger jammed on the ball going up for a rebound. Now he cannot fully extend it at the tip.
- Most likely diagnosis: Mallet finger, an avulsion of the extensor digitorum from the distal phalanx.
- Special test: Hold the middle phalanx of affected finger to isolate DIP and ask patient to actively straighten DIP. If the patient cannot, then the test is positive for Extensor Digitorum injury. You can also passively extend the tip and see if patient is able to hold it there or if it returns to the flexed position.
Case 7
A patient presents with a deep laceration to the dorsum of his 3rd finger, over the middle phalanx. He appears to be able to extend and flex the finger easily, however as an astute ED physician, you are concerned about occult tendon injury.

- Most likely diagnosis: Central slip injury, a rupture of the central band of the extensor mechanism causes the lateral bands to slide ventrally, preventing extension of the PIP and extension of the DIP.
- Special Test: Elston’s test. Passively flex the PIP to 90 degrees to relax the lateral bands. Have patient try to extend the finger and provide counter force on middle phalanx. When the patient tries to extend the PIP test the tension at the DIP: If DIP is floppy the central slip is intact, but if the DIP becomes taut then central slip is injured.
Expert Commentary
Evaluating hand trauma requires understanding the anatomy and the functions associated with that anatomy. Having a systematic approach helps, as pain, bleeding, intoxication, and fear can affect the upper extremity exam. It is good practice to start by evaluating for deformity, color change, and wounds. Ask the patient to make a fist and then open it, which can help direct you to the problem area. Test wrist flexion and extension. Evaluate extension of each finger. Evaluate flexion and extension of the thumb IP. Evaluate FDP and FDS of each finger. Test OK sign, fingers crossed (index and middle), spread fingers wide and hold them out against resistance. Test gross sensation in each fingertip, and on the back of the hand. If you do this every time, you are unlikely to miss a substantial injury. From the findings of the general hand exam you can then focally test any trouble areas.
Determining adequate perfusion, often via clinical exam (color, temperature, turgor, etc) is critical. Using a pulse oximeter on an injured finger can help identify threatened digits before the clinical ischemia or venous congestion becomes obvious. Doppler exam of each digital vessel is another useful evaluation tool.
Always consider the proximal to distal nature of the anatomy, and tailor the focal exam based on the level of injury. For example, if a patient presents with an injury at the wrist, testing finger flexion will not give any information about the median nerve. The level of injury helps guide what additional components of the exam you need to perform to get the full picture, as laid out in the different discussions between cases 1 and 3 above.
The sensory exam is often challenging, especially in traumatized fingers. Pain can be distracting, and edema can cause sensory changes. Gentle sharp sensation (pin-prick) testing is a useful adjunct to the digital sensory exam, especially if only one side is injured and you are trying to clarify whether the digital nerve is intact. Also, if a patient had a tourniquet placed in the field, they may present with an abnormal sensory exam (or even functional exam, depending on duration of ischemia) even if all structures are intact.
And, although this may be an obvious reminder, always document a thorough sensory exam before ever administering local anesthesia.

Aviram Giladi, MD, MS
The Curtis National Hand Center, MedStar Union Memorial Hospital
How to cite this post
[Peer-Reviewed, Web Publication] Whipple T, Gappmeier V (2018, April 16). Demystifying the Hand Exam. [NUEM Blog. Expert Commentary by Giladi A ]. Retrieved from http://www.nuemblog.com/blog/hand-exam
Posts you may also enjoy
References
• Ghane, MR et al. How trustworthy are clinical examinations and plain radiographs for diagnosis of scaphoid fractures. Trauma Mon Nov 2016. 21(5): e23345.
• Giuglae, J et al. The palpable scaphoid surface area in various wrist positions. Journal of Hand Surgery. 1 Oct 2015. 40(1): 2039-2044.
• Netters Orthopedic Clinical Exam. Ed: Cleland, Joshua A., PT, DPT, PhD; Koppenhaver, Shane, PT, PhD; Su, Jonathan, PT, DPT, LMT. Third Edition. Copyright 2017
• Lin, M. Quick Tip: Elston’s Test for the Finger. Jul 29 2013. ALiEM.
• Bookman, A. A., von Schroeder, H. P., & Pham, A. G. (2010). The Wrist and Hand. In Fam’s Muskuloskeletal Exam and Joint Injection Techniques (pp. 29–43). Mosby.
• Seiler, JG. (2002). Essentials of Hand Surgery (pp 23-48). Lippincott Williams & Wilkins.
Approach to Nail Trauma

Written by: Gabby Alzadeh, MD (NUEM PGY-3) Edited by: Jim Kenny, MD, (NUEM PGY-4) Expert commentary by: Matt Levine, MD
Why nails are important
- Nail injuries may have significant associated functional and cosmetic morbidity
- The nail bed provides adherence and support for the nail

Nail Anatomy
- Nail bed: overlies the cortex of the distal phalanx and lies directly beneath the nail plate
- Eponychium: the skin that covers the proximal end
- Hyponychium: the skin edge at the distal nail margin
- Cuticle: an outgrowth of the eponychium that provides a seal between the proximal nail fold and nail plate
- Germinal matrix: the proximal portion of the nail bed responsible for nail formation and begins 7 to 8 mm under the eponychium; the distal end of the germinal matrix is the lunula
Subungual Hematoma
- A simple subungual hematoma is not an indication to remove the nail. Trephination is not indicated if the hematoma encompasses only 25%, there is no significant pain, or if injury was over 24 hours ago, as the blood likely clotted and will not flow out.
- Blood under the cuticle proximal to the nail is a clue that there is a deeper injury and usually the nail should be removed if there is significant pain.
- There is controversy regarding treatment of subungual hematomas and whether simple trephination is enough or whether inspection of the nail bed for injury is required.
- It was suggested that for subungual hematomas involving more than 50% of the nail bed, the nail should be removed given the risk of nail bed laceration.
- This was based on an initial study in 1987 that found that 16/27 patients with hematomas >50% had associated nail bed lacerations that required repair
- This study did not follow up with patients and did not have a control group, so long term outcomes are unknown.
- However, subsequent studies have shown that if there is no other significant finger tip injury, treatment by trephinating alone provides a similar good cosmetic and functional result.
- If you don’t have a trephinator, what else can you use?
- Heated paper clip
- 23-gauge 1-inch needle: Hold the needle over the hematoma, avoiding the lunula, twist and rotate the needle back and forth like a drill; no pressure needed.
- Number 11 scalpel (slower, more painful, larger hole and better drainage)
- Insulin syringe needle (29-gauge)
- What if there is a fracture underneath?
- Though there is a risk of turning the fracture into an open fracture, consider still performing the procedure if the injury is painful.
- You can consider antibiotics if trephination is pursued, though there is no data.
- It is always important to obtain an x-ray with any traumatic injury.
Nail Bed Repair
Suture the nail bed if a large subungual hematoma is associated with an unstable or avulsed nail. Good outcome depends on maintaining the space under the cuticle where the new nail will grow out from (the germinal matrix). If this area scars down a new nail will not grow.
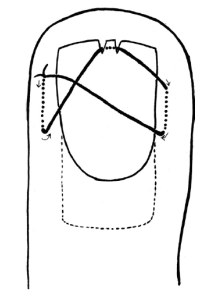
Figure 1
- If the nail is only partially avulsed or loose, especially at the base, lift the nail slightly to assess the nail bed.
- If the nail is completely transected, it is best to remove the entire nail to suture the nail bed. In this case, suture the proximal and lateral nail folds first for better approximation prior to repairing the actual nail bed.
- A sturdy needle (3-0 or 4-0) is needed to suture the nail back in place. Before replacing the nail and suturing it back in place, you can poke a hole through so the needle and suture can pass more easily.
- A study in 2008 used dermabond for nail bed laceration repair showed similar follow up cosmetic and functional outcomes; using dermabond took about 1/3 of the time. It was a small study with only 40 patients and repair was done by orthopedic residents, but definitely a consideration
- The key to success is achieving hemostasis and making sure you have a dry field before dermabond application
- Another method to secure the nail in place is the figure 8 stitch (Figure 1, 2) proposed by hand surgeons
Figure 2
Protecting the exposed nail bed is essential, which can be done with the nail itself (wash well beforehand with normal saline), with the sterile aluminum foil from the suture pack, or with a piece of vaseline gauze. The nail should be reinserted under the eponychium to protect the open space for nail growth. Consider a hand surgeon consult if the nail bed is extensively lacerated or if part of the nail bed is lost, as the patient my need a matrix graft.
Discharge Instructions:
- Tell the patient to return for a wound check 3-5 days post repair. Replace any non-adherent material that was inserted into the proximal nail fold. Afterwards, the patient should perform dressing changes every 3-5 days.
- Sutures that were used to reattach the nail should be removed in 2 weeks.
- Nails grow at a rate of 0.1 mm/day and it takes approximately 6 months for a new nail to grow.
- Instruct the patient to avoid any trauma or chemical irritants to the healing nail.
Tips:
Figure 3
- Always use absorbable suture to repair the nail
- Use a large suture and sturdy needle when suturing the nail back in place; consider dermabond as an option
- Use a finger tourniquet to maintain a bloodless field (Figure 3)
- Digital blocks are key
- Clean the nail bed prior to repair; clean the nail very well before replacement
- If possible use the avulsed nail to protect the exposed nail bed and maintain the space for a new nail to grow
- Repair the proximal and lateral nail folds first
Expert Commentary
Dr Ahlzadeh has presented a nice review of the approach to nail trauma and some useful techniques. While there are seldom formal lectures during residency training dedicated to nail trauma, it is something we regularly see and treat in the ED, so it is important that we do this well. It is well within the scope of practice of Emergency Medicine to be the primary providers for most nail injuries.
The subungual hematoma is probably the most common nail injury encountered in Emergency Medicine. Traditional dogma directed the provider to remove the nail to repair underlying injuries in the presence of >25-50% hematoma. This recommendation left many of us scratching our heads. We would go through the elaborate procedure of removing the nail by dissecting the nail away from the underlying nailbed, meticulously repairing a nailbed laceration if required, and then stenting the eponychial fold open, hoping that a normal nail would regrow without deformity despite the trauma from the injury and the procedure itself. It seemed like we were introducing a lot of trauma to the nail bed and eponychial fold for a theoretical (non evidence based) benefit. The more we did this, the more many of us would ask ourselves, “What if we just left this alone?”
Today it seems the tide has turned. It is now well accepted practice to leave a nail in place in the setting of a subungual hematoma as long as the nail is intact and laying flat on the nailbed, regardless of the percentage size of the hematoma. This makes intuitive sense. An anatomically intact nail lying flat upon the nailbed should lead to the flat healing of an underlying laceration. A common practice to ensure that the nail remains flat after discharge is to trephinate nail so that pressure from the underlying hematoma does not elevate the nail off of the nailbed after discharge.
Nail trephination is one of the more rewarding procedures in Emergency Medicine. Patients present with throbbing pressure from the tense subungual hematoma and typically get immediate improvement once the nail is trephinated. Many techniques have been described. Dr Ahlzadeh even refers to a “trephinator”. I am not actually sure what this device even is. Regardless, this procedure should be quick and easy. No anesthesia is necessary. I suggest keeping it simple. Rather than heating a needle or paper clip, use a cautery device. In our ED we have a cordless disposable plastic cautery device that is the size of a magic marker. It has a single button and the tip becomes orange with heat when the button is pressed so you know it is hot and ready to go. Warn the patient that they will feel some heat and possibly see or smell a bit of smoke but it will be brief and not painful (unless you are too forceful, in which case it will be hot and painful!). Pick the location in the center of the hematoma. Repeatedly very lightly touch the hot cautery tip to the nail over the center of the hematoma until you are through the nail. You will know you are through when a drop of blood comes out of the hole you have trephinated. At that point you can stop and gently express whatever blood you can. That’s the whole procedure. It should take mere seconds. When the patient gets over the initial anxiety of the procedure they typically realize they feel better.
Nails that are deformed or elevated off of the nail bed are not good candidates for trephination. These nails should be removed for nailbed repair so that the nailbed heals flat. Don’t even bother unless your digital block is highly effective. We do not have commercial finger tourniquets in our ED so I like to make my own professional looking tourniquet. I get a sterile glove is about the size (or a half size smaller) than would fit the patient. I cut the very tip off the finger of the glove that corresponds with the patient’s injured finger. Then I put the glove on the patient and roll the cut glove finger proximally and voila, you have both a tourniquet and a clean field. Now you are ready to get comfy and repair the nail bed according to Dr Ahlzadeh’s techniques! While a sturdy needle is needed to puncture through a nail, I still find the nail often deforms the needle. So instead of piercing the nail with my needle, I once again use my trusty cautery device to make holes in the nail that my needle will easily pass through without deformity.

Matt Levine, MD
Assistant Professor, Northwestern Emergency Medicine
How to cite this post
[Peer-Reviewed, Web Publication] Alzadeh G, Kenny J (2018, April 8). Nail Trauma. [NUEM Blog. Expert Commentary by Levine M ]. Retrieved from http://www.nuemblog.com/blog/nail-trauma.
References
- Batrick N. Treatment of uncomplicated subungual hematoma. Emerg Med J 2003;20:65.
- Bowen WT, Slaven EM. Evidence-based management of acute hand injuries in the emergency department. Emergency Medicine Practice EB Medicine. 2014;16(12):1-28. http://www.ebmedicine.net/media_library/files/1214%20Hand%20Injuries
- Guthrie, Kane. “Minor Injuries 001.” Life in the Fastlane. <http://lifeinthefastlane.com/minor-injuries-001/>.
- Hedges, Jerris, James Robers. “Methods of Wound Closure.” Clinical Procedures in Emergency Medicine, 6th ed. Philadelphia: Elsevier/Saunders, 2014.
- Roser SE, Gellman H. Comparison of nail bed repair versus nail trephination for subungual hematomas in children. J Hand Surg [Am]1999;24:1166–70.
- Strauss E, Weil W, Jordan C, Paksima N. A prospective, randomized, controlled trial of 2-octylcyanoacrylate versus suture repair for nail bed injuries. J Hand Surg Am. 2008;33(2):250-253.