

Learn tips from the pros for identifying cardiac tamponade without delay
Posts filed under Ultrasound
SonoPro Tips and Tricks for Peripheral IV Access
Learn tips from the pros for ultrasound-guided IV access
Sono Pro Tips and Tricks for Evaluation of Elevated Intracranial Pressure

Written by: Emma Greever (NUEM ’25) Edited by: Maurice Hajjar, MD (NUEM ’22)
Expert Commentary by: John Bailitz, MD
Welcome to the NUEM SonoPro Tips and Tricks Series where Local and National Sono Experts team up to take you scanning from good to great for a particular diagnosis or procedure.
For those new to the probe, we recommend first reviewing the basics in the incredible FOAMed Introduction to Bedside Ultrasound Book, 5 Minute Sono, and POCUS Atlas. Once you’ve got the basics beat, then read on to learn how to start scanning like a Pro!
Did You Know?
Ocular ultrasound is a quick procedure which can be done at the bedside to help differentiate between various ophthalmologic emergencies including retinal detachment, vitreous detachment, vitreous hemorrhage, lens detachment, and presence of foreign bodies. Indications for ocular ultrasound include eye pain, acute changes in vision, eye trauma, and suspicion of elevated intracranial pressure, or if there is swelling of periorbital tissue that inhibits direct visualization of the eye. The one absolute contraindication for ocular ultrasound is any suspicion for globe rupture, as placing any pressure on the globe can worsen extrusion of intraocular contents.
Ocular ultrasound can also be used to evaluate for elevated intracranial pressure (ICP). The optic nerve sheath communicates directly with the subarachnoid space. Cerebrospinal fluid flows between the intracranial space and orbit within the subarachnoid space; therefore, increased intracranial pressure is transmitted to the optic nerve sheath. Elevation of ICP is reflected by dilation of the optic nerve sheath. This can be quantified by measuring optic nerve sheath diameter (ONSD). Dilation of the optic nerve sheath often occurs with anterior bulging of the optic disc, seen as optic disc elevation (ODE) on ultrasound. Bulging of the optic disc is seen as papilledema on fundoscopic exam. Both ONSD and ODE measurements are ways to assess for elevated ICP.
If there is concern for elevated ICP, it is not always possible to do a dilated fundoscopic exam, invasive monitoring, or other imaging such as a CT. Point of care ultrasound (POCUS) allows for quick evaluation. Furthermore, POCUS allows for monitoring dynamic changes in ICP as doing serial fundoscopic exams and CTs is not feasible. It is also less invasive than other intra-cranial monitoring. When comparing ONSD (with a cut-off value of >5 mm) with findings of increased ICP on CT, sensitivity and specificity are 95.6% and 92.3%, respectively.
Beyond the emergency department, where else can a SonoPro scan for increased ICP?:
Aside from patients in the emergency department, POCUS for elevated ICP can be used in critically ill children in the PICU, adults in the Neurocritical ICU, and on the battlefield with handheld ultrasounds in combat medicine. ONSD changes within minutes of ICP changing. Studies have demonstrated that the change in ONSD or ODE is strongly correlated with changes in ICP, implying that POCUS could be used to dynamically detect real-time changes in ICP. In neuro-critically ill children, POCUS cannot replace invasive ICP monitoring but can be used as a screening tool in the ICU for intermittent monitoring of ICP when invasive methods are unavailable. It can allow for accurate dynamic evaluation of ICP, which is important in children with traumatic brain injury as fluctuations are common. Additionally, POCUS can be used in many different environments in which imaging is not readily available, such as on the battlefield or in-flight.
How to scan like a Pro:
Place the head of the bed at 45 degrees.
Apply a large, waterproof transparent film dressing (such as a Tegaderm) over the eye you are going to ultrasound, making sure the eye is closed. Make sure to get as much air out from under the Tegaderm as you can.
Apply a large amount of water-soluble ultrasound gel on top of the dressing.
Using a high-frequency linear probe set to ocular mode, place the probe over the eye with the indicator to the patient’s right. It is important to use very minimal pressure on the eye. To have control over the probe and to be able to make small movements with minimal pressure on the eye, rest the side of your hand on the patient’s cheek or bridge of the nose to stabilize your hand.
Ensure the probe is oriented in the transverse plane.
Tell the patient to look straight forward, to the left or right, up, or down as needed to obtain the best view.
Be sure to scan both eyes when concerned for elevated ICP.
What to Look For:
Identify the following structures: anterior chamber, lens, vitreous, retina, and optic nerve.

Use the rule of 3x5 to measure optic nerve sheath diameter:
Find the posterior aspect of the globe overlying the optic nerve
From that point measure 3 mm posteriorly (point A)
Maximal sheath distension occurs at 3 mm behind the papilla


Measure the diameter of the optic nerve from the second point (point B, 3 mm deep)
Measure from outer wall to outer wall
< 5mm is normal, 5-6 mm is indeterminate, >6 mm is elevated
Assess for papilledema – measure optic disc elevation (ODE)
Measure area between the fundus and dome of the papilla

ODE >0.6 mm predicts presence of fundoscopic optic disc edema (sensitivity 82%, specificity 76%); if using the threshold of 1.00 mm then sensitivity is 73% and specificity 100%
This sign can take a couple days to develop and may not appear at the same time as elevated ocular disc diameter
How to interpret:
Determine if ICP is elevated:
< 5 mm = Likely normal ICP
>6 mm = Indicates elevated ICP
Many causes of this, next steps are to identify what is causing the elevation in ICP
5-6 mm = Indeterminate range
If elevated, further evaluation for etiology of elevated ICP and treatment of cause.
If indeterminate, assessing for papilledema by measuring the ODE can help in the indeterminate range, although absence of papilledema does not indicate normal ICP.
It is important to note that there is significant variation from person to person regarding ONSD. In other words, >6 mm does not necessarily indicate increased diameter and <5mm does not necessarily mean normal. The SonoPro must use clinical judgement while assessing the ONSD.

Where to Learn More (References)
Where to Learn More (Hyperlinked References):
https://coreem.net/core/ocular-ultrasound/
https://www.coreultrasound.com/onsd/
https://emcrit.org/pulmcrit/pulmcrit-algorithm-diagnosing-icp-elevation-ocular-sonography/
1. Lin JJ, Chen AE, Lin EE, Hsia SH, Chiang MC, Lin KL. Point-of-care ultrasound of optic nerve sheath diameter to detect intracranial pressure in neurocritically ill children - A narrative review. Biomed J. 2020;43(3):231-239. doi:10.1016/j.bj.2020.04.006
2. Richards E, Mathew D. Optic Nerve Sheath Ultrasound. [Updated 2021 Jul 31]. In: StatPearls [Internet]. Treasure Island (FL): StatPearls Publishing; 2022 Jan. Available from: https://www.ncbi.nlm.nih.gov/books/NBK554479/
3. Teismann N, Lenaghan P, Nolan R, Stein J, Green A. Point-of-care ocular ultrasound to detect optic disc swelling. Acad Emerg Med. 2013 Sep;20(9):920-5. doi: 10.1111/acem.12206. PMID: 24050798.
Expert Commentary
Thank you for providing this outstanding NUEM Blog Post! Ocular ultrasound for ICP has been a hot topic for over a decade in the EM, PEM, and ICU POCUS literature.
For a full review of my approach to ocular ultrasound, please refer to our 2018 Post - Ocular Ultrasound: From Floaters to Fogginess!
Since that post ,additional literature has been posted questioning the need for Tegaderms over the eye for the reasons we discussed in 2018. Bottomline, if the patient is reliable and can keep their eyes closed for five minutes, then you can skip the Tegaderm. But when the patient is less reliable, then the extra step may still make sense. When locating and measuring the Optic Nerve Sheath (ONS), be absolutely sure to stabilize your hand on the patient's face or forehead particularly when you are over-caffeinated or tired. Then be careful to rock the probe about 15 degrees laterally (illustrated here) to visualize the ONS parallel to the probe’s center US beams, and thereby avoid any edge artifact from visualizing at an angle. Even with the best technique, our local teaching, clinical use, and pilot research has consistently confirmed the need for obtaining multiple measurements of the small optic nerve sheath. Then averaging the best three to obtain the most accurate measurement.
Thank You Dr. Greever (NUEM ’25) and Dr. Hajjar, MD (NUEM ’22) for helping to improve patient care and MedEd through POCUS! Happy scanning everyone.

John Bailitz, MD
Vice Chair for Academics, Department of Emergency Medicine
Professor of Emergency Medicine, Feinberg School of Medicine
Northwestern Memorial Hospital
How To Cite This Post:
[Peer-Reviewed, Web Publication] Greever, E. Hajjar, M. (2024, Sep 11). Sono Pro Tips and Tricks for Evaluation of Elevated Intracranial Pressure. [NUEM Blog. Expert Commentary by Bailitz, J]. Retrieved from http://www.nuemblog.com/blog/sonopro-tips-and-tricks-for-evaluation-of-elevated-intracranial-pressure
Other Posts You May Enjoy


Nephrolithiasis: Ultrasonography versus Computed Tomography
Written by: Kishan Ughreja , MD (NUEM ‘23) Edited by: Ade Akhentuamhen, MD (NUEM ‘21)
Expert Commentary by: Tim Loftus, MD, MBA
Journal Club: Ultrasonography versus Computed Tomography for Suspected Nephrolithiasis
A 70-year-old man with BPH s/p TURP, hypertension, hyperlipidemia and stroke presents to the ED with acute onset of intermittent sharp left flank pain radiating into the groin that awoke him from sleep. He endorses nausea without vomiting and denies fever. He also endorses slightly decreased urination with “dribbling.” His urinalysis shows >100 RBC and no signs of infection. Nephrolithiasis is likely high on your differential diagnosis. How do you proceed?
What is your initial imaging test of choice, ultrasound (US) or non-contrast CT, and why?
Would you be satisfied with only US and no follow-up CT?
Would you be confident in a point-of-care-ultrasound evaluation or a formal ultrasound?
Do outcomes for patients with suspected nephrolithiasis differ based on the initial imaging?
Should your medical decision-making change if the patient has a history of nephrolithiasis?
What would you do if the same patient presented again with persistent pain from a previously diagnosed stone?
Pain from suspected nephrolithiasis is a very common complaint in the ED and the incidence of the disease continues to increase. The estimated incidence over the past two decades is up to 340 visits per 100,000 individuals.1 Low-dose non-contrast abdominal CT has become the gold standard for diagnosis as it has become readily available in emergency departments nationwide, with some studies touting sensitivity and specificity of 97% and 95%, respectively.2 However, low dose CT still exposes the patient to radiation and may increase their risk of cancer, as many nephrolithiasis patients often undergo repeat imaging because of recurring pain or urological intervention. Additionally, CT scans prolong average ED lengths of stay. However, with ultrasonography becoming more prevalent in EDs, it may be possible that initial imaging may avoid this radiation risk and still have similar outcomes for patients. Let’s analyze this NEJM article comparing US to CT for the assessment of nephrolithiasis.
Study design: a multicenter, pragmatic, randomized comparative effectiveness trial
Population
N = 2759
ages 18- 76 yo
reported flank or abdominal pain that the treating physician wished to order imaging to establish or rule out a primary diagnosis of nephrolithiasis
not considered at high risk for serious alternative diagnoses e.g. cholecystitis, appendicitis, aortic aneurysm, or bowel disorders
no pregnant patients
no men >129 kg, no women >113 kg
no history of single kidney, renal transplantation, undergoing dialysis
Patient selection

Intervention protocol
patients randomized to 3 groups each using a different initial imaging modality (POCUS vs. Radiology US vs. CT)
patients contacted at 3, 7, 30, 90, and 180 days after randomization to assess study outcomes
Outcome measures
Primary Outcomes
high-risk diagnoses with complications that could be related to missed or delayed diagnoses — within 30 days of ED visit, including:
AAA w/rupture, PNA w/sepsis, appendicitis w/rupture, diverticulitis w/abscess or sepsis, bowel ischemia or perforation, renal infarction, renal stone w/abscess, pyelonephritis w/urosepsis or bacteremia, ovarian torsion w/necrosis, aortic dissection w/ischemia
cumulative radiation exposure from all imaging within 6 months after randomization
total cost (not reported in this study, ongoing analysis)
Secondary Outcomes
serious adverse events (FDA definition)
serious adverse events related to study participation
delayed diagnosis, like acute cholecystitis, appendicitis, bowel obstruction
return ED visits
hospitalizations after being discharged from ED
self-reported pain scores
diagnostic accuracy for nephrolithiasis
by comparing ED diagnosis at discharge to reference standard of confirmed stone by patient’s observation of passage or report of surgical removal
Results
no significant differences among groups in terms of pain scores, medical history, physical exam findings, and ED physician’s assessment of the likelihood of other diagnoses (Table 2)
POCUS and US groups had significantly lower cumulative radiation exposure over 6 months than the CT group (difference attributed to initial ED visit’s imaging choice)
11 patients (0.4%) had high risk diagnoses with complications during first 30 days after randomization, with no significant difference among the 3 groups
no difference when stratified by patients with a history of nephrolithiasis
no significant difference among groups in the number of patients with serious adverse events; total of 466 SAE in 316 patients (91.4% were hospitalizations during f/u period; 26.4% involved surgical treatment of complications of nephrolithiasis)
5 reported deaths (occurred between 38 and 174 days after randomization) — none thought to be related to study participation
the proportion of patients with a confirmed stone diagnosis within 6 months was similar in all 3 groups (POCUS 34.5% vs. US 31.2% vs. 32.7% CT)
diagnostic accuracy based on result of initial imaging modality
POCUS sensitivity 54% [48 - 60]; specificity 71% [67 - 75]
US sensitivity 57% [51 - 64]; specificity 73% [69 - 77]
CT sensitivity 88% [84 - 92]; specificity 58% [55 - 62]


Interpretation
The US group was exposed to less radiation than the CT group and had no significant differences in the incidence of high-risk diagnoses with complications, total serious adverse events, or related serious adverse events.
There also were no significant differences in pain scores, hospitalizations, ED readmissions among the groups.
Many patients in the ultrasound groups did get additional imaging, but this was not the majority.
Patients with a history of nephrolithiasis were less likely to undergo additional imaging with CT if they already had an ultrasound first (31% vs 36%). They did not have poorer outcomes than patients without a history of nephrolithiasis.
Patients only undergoing POCUS and no other testing had a significantly shorter ED stay (1.3 hours)
It is safe to pursue ultrasound as the initial imaging of choice for suspected nephrolithiasis (with additional imaging ordered as necessary at clinical discretion), though it should not necessarily be the only testing performed.
Strengths
large size, diversity in ED settings, randomized design, assessment of clinically important outcomes, a high follow-up rate
Weaknesses
no blinding of investigators, physicians, or patients as this was a pragmatic trial design
independent review was used to characterize serious adverse events related to study participation
strict reference standard for stone diagnosis which was unbiased, but prone to error based on the patient’s memory of self-reporting of stone passage
Internal/external validity
Given the aforementioned strengths of this study and its pragmatic design, these findings appear both internally and externally valid and may be applied to daily clinical practice
Take-Home Points
What is your initial imaging test of choice, ultrasound (US) or non-contrast CT, and why?
Ultrasound is a good choice for initial imaging as most patients do not end up requiring additional imaging during their visit. This leads to reduced cumulative radiation exposure.
Would you be satisfied with only US and no follow-up CT?
In this study, 40.7% of those in the POCUS group and 27% in the formal ultrasound group underwent subsequent CT. Follow up CT should depend on the patient and ultrasound operator. Keep in mind that this study excluded patients with kidney disease, pregnant patients, and obese patients. They also excluded patients who were high risk for other pelvic and abdominal diseases. Lastly the POCUS operators were ED physicians with training “recommended by ACEP.”
Would you be confident in a point-of-care-ultrasound evaluation compared to a formal ultrasound?
Yes. Sensitivity and specificity between these groups were similar.
Do outcomes for patients with suspected nephrolithiasis differ based on the initial imaging?
No. There was no significant difference in subsequent adverse events, pain, return visits or hospitalizations, or delayed diagnoses of other serious conditions.
Should your medical decision-making change if the patient has a history of nephrolithiasis?
In this study, patients with a history of nephrolithiasis were less likely to undergo additional imaging with CT if they already had an ultrasound first. They did not have poorer outcomes than patients without a history of nephrolithiasis. This suggests that it is safe to avoid ordering a CT in patients with recurrent stones.
What would you do if the same patient presented again with persistent pain from a previously diagnosed stone?
The majority of patients with adverse outcomes were due to infectious causes. Consider alternative diagnoses such as pyelonephritis. Additionally, although rare, renal infarct can present with acute flank pain and is diagnosed with a contrast CT.
References
Fwu, C. W., Eggers, P. W., Kimmel, P. L., Kusek, J. W., & Kirkali, Z. (2013). Emergency department visits, use of imaging, and drugs for urolithiasis have increased in the United States. Kidney international, 83(3), 479-486.
Coursey, C. A., Casalino, D. D., Remer, E. M., Arellano, R. S., Bishoff, J. T., Dighe, M., ... & Leyendecker, J. R. (2012). ACR Appropriateness Criteria® acute onset flank pain–suspicion of stone disease. Ultrasound quarterly, 28(3), 227-233.
Smith-Bindman, R., Aubin, C., Bailitz, J., Bengiamin, R. N., Camargo Jr, C. A., Corbo, J., ... & Kang, T. L. (2014). Ultrasonography versus computed tomography for suspected nephrolithiasis. New England Journal of Medicine, 371(12), 1100-1110.
Expert Commentary
Thank you very much to Dr.’s Ughreja and Akhetuamhen for an excellent blog post on a very relevant clinical topic. This is a great summary of the landmark randomized trial published in NEJM in 2014 assessing CT vs two types of US for patients with suspected renal colic in the ED setting. It is worth mentioning that this study was a multicenter study based in the US with representation from ED, Radiology, and Urology. The above study was well summarized and bears repeating that, in this multicenter randomized study assessing CT vs POCUS vs radiology performed US in patients with suspected renal colic in the ED setting, initial US reduced radiation exposure without adversely affecting patient-centered outcomes. It is worth mentioning several additional considerations and placing emphasis on others elucidated from this journal club review.
First, a subsequent systematic review (1) incorporating multispecialty (ED, Radiology, Urology) expert panel consensus recommendations has reiterated that in younger patients without a high suspicion for alternative diagnoses or complicating features of nephroureterolithiasis (such as fever, pyelonephritis, solitary kidney, dialysis, etc), US should be the initial diagnostic imaging modality of choice, if any. It's a great paper, worth reading (and appreciating who the authors are), and worth recalling for bedside teaching to junior learners in the ED.
Additionally, this paper brings to mind my second point, and something that is worth shouting from the hilltops -- a kidney stone is a clinical diagnosis! Now, of course, this is exclusive of those patients with high-risk or complicating features (e.g. pediatrics, pregnancy, solitary kidney, fever, unstable/critically ill, unrelenting pain, atypical features, etc). You don’t need any imaging to tell you the diagnosis in the vast majority of patients. US or CT are helpful in confirming the diagnosis when there is uncertainty or non-trivial pretest probability of alternative diagnoses, excluding alternative diagnoses, and identifying exact stone location and size, which can be used to help counsel patients at the bedside regarding the anticipated clinical course and next steps in management.
Third, for those with proper training, and with some exceptions (see the systematic review paper for case vignettes that highlight these), POCUS is non-inferior to radiology-performed US. And, it's not a “formal” US. I can’t remember the last time I attended a black-tie ultrasonography session, but that's just me.
Fourth, it's worth mentioning that although CT use can lead to the identification of incidental findings more commonly than US, identification of these incidental findings still happens rather often with POCUS (a common example is a renal cyst). Please ensure that you document and discuss with the patient accordingly.
Finally, a burden on us as EM clinicians is training in and awareness of clinical practice guidelines and recommendations from specialties outside of EM. As it relates to the diagnostic evaluation of suspected renal colic in the ED setting, the Choosing Wisely recommendations endorsed by the AUA are worth perusing as are the European/EUA guidelines, both of which suggest US as the initial diagnostic imaging modality of choice, for pediatric (CW) and non-high-risk patients without complicating features (EUA).
The bottom line is that CT is helpful for older patients or those in whom you are less sure about the diagnosis of renal colic. For younger or low-risk patients, suspected renal colic is a clinical diagnosis and often needs no imaging, but ultrasound would be an evidence-based first step. Thanks again toDr.’s Ughreja and Akhetuamhen.
References
1) Moore et al. Imaging in suspected renal colic: a systematic review of the literature and multispecialty consensus. J Urol 2019. 202(3):475-483.

Tim Loftus, MD, MBA
Assistant Professor of Emergency Medicine
Fellowship Director of the Clinical Operations and Administration Fellowship Program, Northwestern Department of Emergency Medicine
Medical Director of Emergency Services Northwestern Lake Forest Hospital and Grayslake Emergency Center
How To Cite This Post:
[Peer-Reviewed, Web Publication] Ughreja, K. Akhentuamhen, A. (2022, May 16). Journal Club: Ultrasonography versus Computed Tomography for Suspected Nephrolithiasis. [NUEM Blog. Expert Commentary by Loftus, T]. Retrieved from http://www.nuemblog.com/blog/nephrolithiasis-ultrasonography-versus-computed-tomography.
Other Posts You May Enjoy


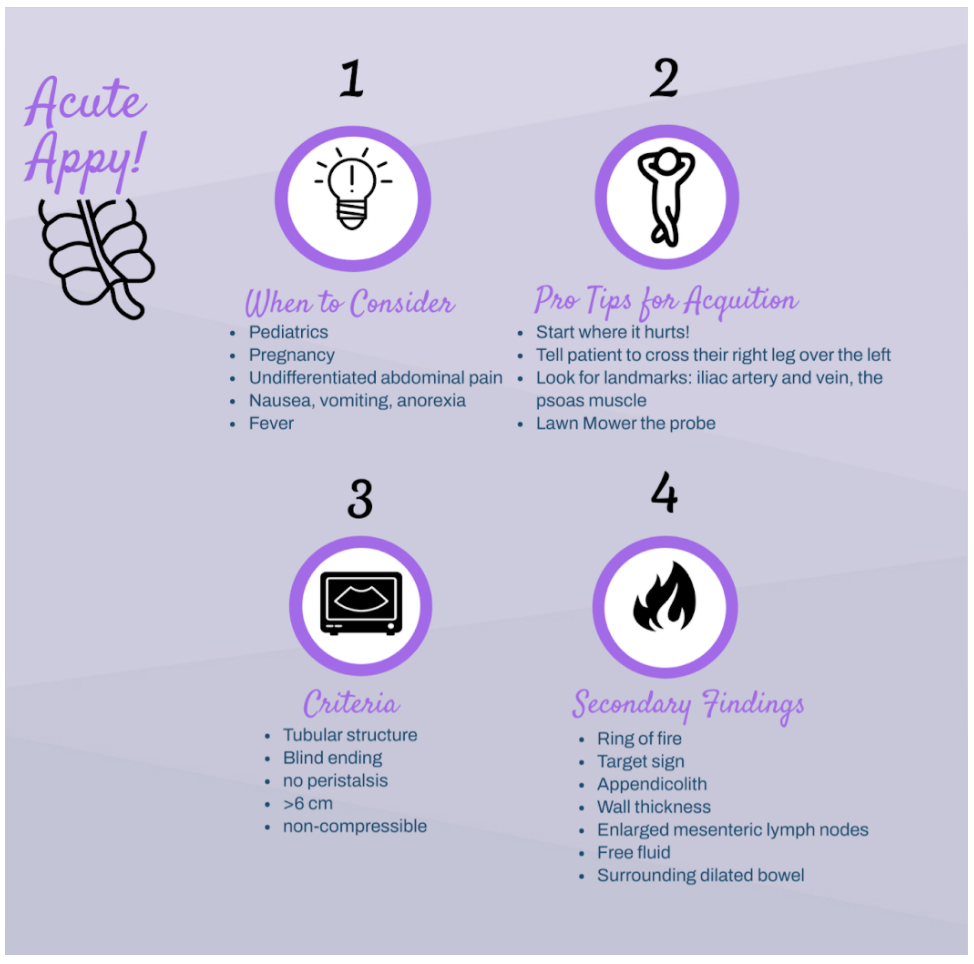
Sono Pro Tips and Tricks for Acute Appendicitis
Written by: Morgan McCarthy, MD (NUEM ‘24) Edited by: David Feiger, MD (NUEM ‘22)
Expert Commentary by: Shawn Luo, MD & John Bailitz, MD
Welcome to the NUEM SonoPro Tips and Tricks Series where Local and National Sono Experts team up to take you scanning from good to great for a particular diagnosis or procedure.
For those new to the probe, we recommend first reviewing the basics in the incredible FOAMed Introduction to Bedside Ultrasound Book, 5 Minute Sono, and POCUS Atlas. Once you’ve got the basics beat, then read on to learn how to start scanning like a Pro!
Did you know, appendicitis is one of the most common surgical emergencies. Despite this, some data suggests that appendicitis is missed in 3.8% to 15% of children and 5.9% to 23.5% of adults in ED visits. Appendicitis is difficult to diagnose due to the early nonspecific generalized symptoms (anorexia, generalized pain, nausea, diarrhea or constipation). We can use point of care ultrasound (POCUS) to help evaluate your differential diagnosis. One study showed that after only a 20-minute training ED physicians at various levels of experience were able to scan for appendicitis with a specificity of 97.9% and a sensitivity to 42.8%.
Beyond the classic pediatric patient, who else does the SonoPro scan?
Pocus use for appendicitis is one of the leading diagnostic tools in pediatrics for acute appendicitis. In the pediatric population limiting radiation is generally thought to be of utmost importance. The lack of exposure to radiation and small habitus makes ultrasound a great alternative in the pediatric patient. These tips and tricks can be useful in other high risk adult patients, like pregnant women. It is well known that in adults there is often a higher chance of pathology and surgeons are managing the ultimate say on whether more imaging is necessary. However, the use of ultrasound for acute appendicitis may save time, expedite care, lead to quicker consultation, and potentially augment patient satisfaction and improve outcomes.
How to scan like a Pro:
There are a few ways to scan for the appendix. To start, we recommend simply asking for the patient to point to where the pain is worst and place the probe directly over that spot.
A simple trick is to have the patient cross their right leg over their left leg; this brings the appendix closer to the abdominal wall.
If neither of these work, start to look for visual landmarks to orient yourself: iliac artery and vein, and the psoas muscle. The psoas muscle will be posterior, the iliac artery will be medial and the iliac crest lateral. Many times the appendix may be on top of the iliac artery. ‘Lawn mowing’ the probe up and down in this area may help it come into view.

What to Look For:
Try to look for a blind ending tubular structure that is not undergoing peristalsis. When you locate this, turn your probe to view the appendix in short axis and measure the anterior to posterior diameter. In a normal appendix this may be shorter than the lateral measurements as a normal appendix is compressible!
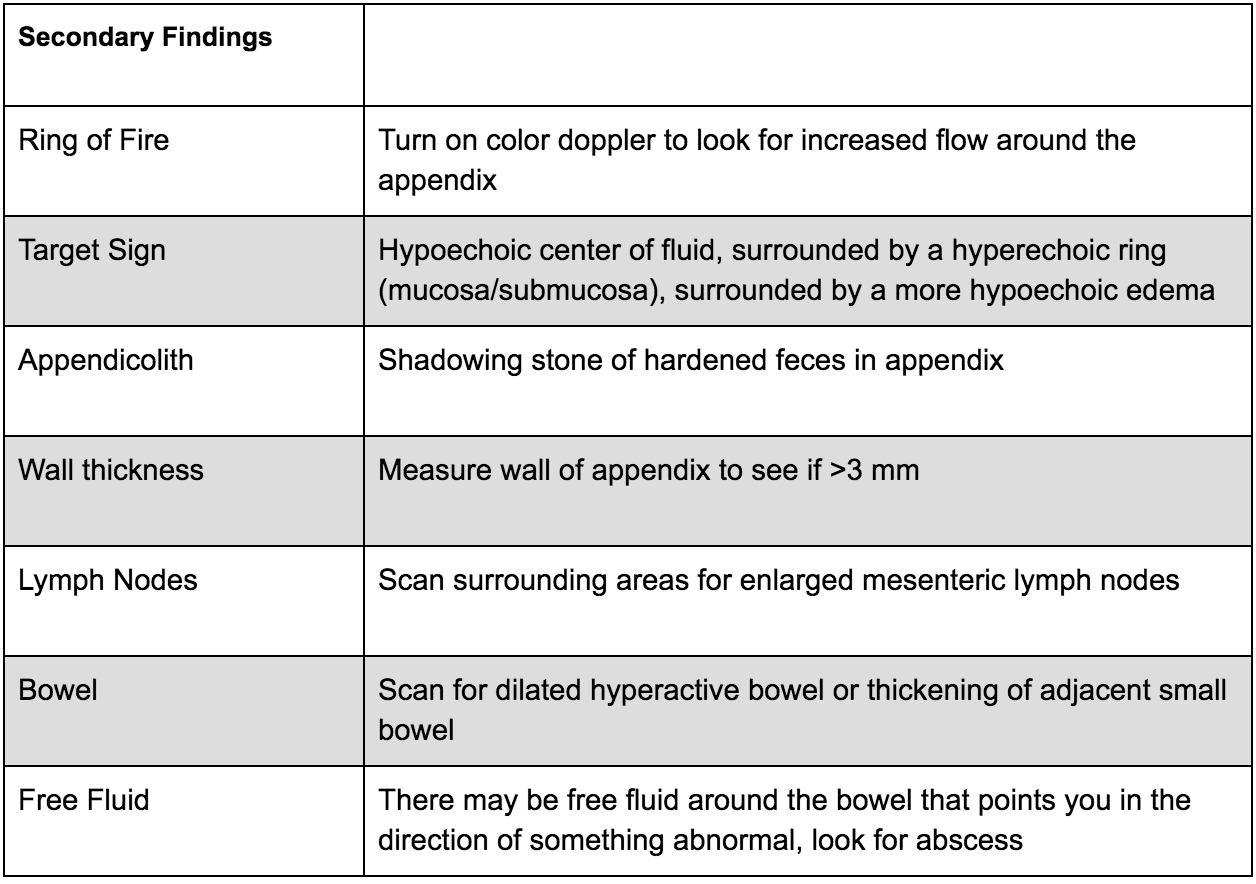
There are two main criteria for diagnosing appendicitis on ultrasound:
> 6mm*
non-compressible
*Note: Make sure to consider your patient’s age; the criteria may not apply to young children as their appendix may be naturally smaller. Appendix growth typically occurs at 3 to 6 years, therefore in this population you may depend more on secondary findings.
There are many secondary findings that many experts believe may be more useful than the measurements of the appendix itself as this can be very difficult to accurately measure:

What to do next:
Ultrasound for appendicitis is very specific, however not very sensitive. If you see a dilated non-compressible blind ending loop of bowel without peristalsis, you may have identified an appendicitis - call your surgeon, follow recommendations and start antibiotics! If you are uncertain, look for secondary signs of appendicitis as above; if they are found you can increase your suspicion of appendicitis. If these findings are not present, more advanced diagnostic imaging may be required with respect to your clinical suspicion. Consider an MRI in a young patient or CT scan with contrast in an adult for further evaluation.
Where to Learn More (References)
Mahajan P, Basu T, Pai C, et al. Factors Associated With Potentially Missed Diagnosis of Appendicitis in the Emergency Department. JAMA Network Open. 2020;3(3):e200612. doi:10.1001/jamanetworkopen.2020.0612.
Ma, John, et al. Ma and Mateer's Emergency Ultrasound. McGraw-Hill Education, 2020.
Macias, Micheal. TPA, The Pocus Atlas.
Availa, Jacob. 5 minute Sono.
Nelson, Chiricolo, Raio, Theodoro, Patel, Johnson. Can Emergency Physicians Positively Predict Acute Appendicitis on Focused Right Lower Quadrant Ultrasound?. Annals of Emergency Medicine, 2005; 46: 27-28
Expert Commentary
Excellent job by Morgan and David on this engaging and informative post summarizing the latest and greatest pro-tips and tricks for POCUS for Appendicitis. POCUS again has been demonstrated to be a helpful adjunct to improve time to diagnosis and treatment when utilized by trained clinicians for appropriate patients. On your next pediatric, pregnant, or otherwise thin “Rule out Appy”, begin the exam by asking the patient to cross their leg to flex the psoas muscle to bring the appendix closer to probe. Have the patient point to the pain to identify where to start. If the appendix is not visualized, then go to McBurney’s point in the axial plane, visualizing the iliac artery & vein to find the nearby appendix. Next, start “lawn mowing” by compressing slowly but with adequate depth to displace bowel gas. Once you see what appears to be an inflamed appendix, trace the structure to verify the blind-ending and hold your probe for a few seconds to confirm the lack of peristalsis. Measure the diameter, then turn on color flow and look for other secondary signs of inflammation. Since the specificity is high, when appendicitis is visualized, call your surgeon, and consider skipping the CT. But remember, since the appendix often “hides” within the bowel the sensitivity is low, so other comprehensive imaging will be needed to reach the correct diagnosis.

John Bailitz, MD
Vice Chair for Academics, Department of Emergency Medicine
Professor of Emergency Medicine, Feinberg School of Medicine
Northwestern Memorial Hospital
Shawn Luo, MD
PGY4 Resident Physician
Northwestern University Emergency Medicine
How To Cite This Post:
[Peer-Reviewed, Web Publication] McCarthy, M. Feiger, D. (2021, Nov 22). Sono Pro Tips and Tricks for Acute Appendicitis. [NUEM Blog. Expert Commentary by Luo, S and Bailitz, J]. Retrieved from http://www.nuemblog.com/blog/sonopro-tips-and-tricks-for-acute-appendicitis
Other Posts You May Enjoy
SonoPro Tips and Tricks for Aortic Aneurysm and Dissection
Written by: John Li, MD (NUEM ‘24) Edited by: Andra Farcas, MD (NUEM ‘21) Expert Commentary by: John Bailitz, MD & Shawn Luo, MD (NUEM ‘22)
SonoPro Tips and Tricks
Welcome to the NUEM Sono Pro Tips and Tricks Series where Sono Experts team up to take you scanning from good to great for a problem or procedure! For those new to the probe, we recommend first reviewing the basics in the incredible FOAMed Introduction to Bedside Ultrasound Book and 5 Minute Sono. Once you’ve got the basics beat, then read on to learn how to start scanning like a Pro!
Aortic ultrasound is a staple in emergency point of care ultrasound. It has incredible sensitivity (97.5-100%) and specificity (94.1-100%) in detecting abdominal aortic aneurysms and can provide a diagnosis for critically ill patients in seconds. [1-4] However, it can often be a technically difficult study for beginner sonographers due to shadowing bowel gas and patient body habitus. Follow along in this installment of our Sono Pro Tips and Tricks Series to become an expert in finding aortas!
Beyond the classic elderly male smoker with abdominal, flank, or back pain, what are other scenarios where you would use aortic ultrasound?
Older patients with limb ischemia - an aortic aneurysm can have atherosclerosis or a mural thrombus which can embolize and cause an arterial occlusion!
“But they fixed my aorta!” Aortic endograft leakage can sometimes present with symptoms that are similar to a AAA rupture, such as back pain, flank pain, or hemodynamic instability.
How to scan like a Pro
Always Start Smart: Aortic ultrasound can be tricky because of factors that seem out of our control, such as bowel gas or patient body habitus.
When scanning for an abdominal aortic aneurysm, start scanning in the epigastric region with a transverse view and apply constant pressure, gently pushing the bowel gas out of the way as you slide the probe down towards the patient’s feet.
Tell your patients to bend their knees! This relaxes the abdominal musculature and can help you move bowel gas or make better contact with the probe.
What if you still can’t see it? Try looking in the right upper quadrant view of the FAST exam!
Start with your probe in the right mix-axillary line and use the liver as your acoustic window. You may need to fan anteriorly or posteriorly depending on the patient’s body habitus and your positioning.
Unfortunately, this view predominantly visualizes the superior aspect of the abdominal aorta, and it can be difficult to visualize the inferior abdominal aorta or the bifurcation.
Here we are looking at a modified RUQ view, where the aorta is visualized on the bottom part of the screen using the liver as an acoustic window. (acep.org)
Pro Pickups!
What’s that weird aneurysm?
Most people are familiar with the classic fusiform aortic aneurysm, but saccular aneurysms can be easily missed because of shadowing bowel gas obstructing parts of the aorta. Saccular aneurysms actually have a higher risk of rupture and repair is recommended for smaller diameters.

Here you can see two images in the longitudinal axis of the different kinds of abdominal aortic aneurysms. On the left is a saccular aneurysm and on the right is a fusiform one. Be sure to pay attention to the mural thrombus in the walls of both of these aortas - they can embolize and cause arterial occlusions! (med.emory.edu)

2. How big is that aorta anyways?
Be sure to always measure the aorta from outside wall to outside wall!
Many aortic aneurysms have a mural thrombus or intraluminal clot, and it can be very easy to mistake these for extra-luminal contents.
Remember the concerning numbers: >5.5cm for men and >5cm for women!
What the Pros Do Next
Abdominal Aortic Aneurysm
If the patient is hemodynamically unstable (defined as BP <90/60, altered mental status, or other signs of end-organ damage), go straight to the OR!
If the patient is hemodynamically stable (defined as the absence of any of the above), then the next step is to obtain further imaging, such as a CT Angiogram, which is the imaging gold standard.
If you are concerned about a large AAA that could be a contained leak but the patient is hemodynamically stable, then we recommend an emergent vascular surgery consult
If you find a small AAA (defined as <5cm in women or <5.5cm in men) that you do not think is actively contributing to the patient’s symptoms, then we recommend outpatient vascular surgery follow up

SonoPro Tips - Where to Learn More
Do you want to review more examples of pathologic images that you may see when you are doing an aortic ultrasound? Be sure to check out The Pocus Atlas by our expert editor Dr. Macias. Aortic pathology is quite rare, and going through these images will help immensely in recognizing this diagnosis in emergent situations. If you’re interested in looking at some of the evidence behind aortic ultrasound, be sure to check out the evidence atlas here as well.
References
Rubano E, Mehta N, Caputo W, Paladino L, Sinert R. Systematic review: emergency department bedside ultrasonography for diagnosing suspected abdominal aortic aneurysm. Acad Emerg Med. 2013 Feb;20(2):128-38. doi: 10.1111/acem.12080. PMID: 23406071.
Hunter-Behrend, Michelle, and Laleh Gharahbaghian. “American College of Emergency Physicians.” ACEP // Home Page, 2016, www.acep.org/how-we-serve/sections/emergency-ultrasound/news/february-2016/tips-and-tricks-big-red---the-aorta-and-how-to-improve-your-image/.
Ma, John, et al. Ma and Mateer's Emergency Ultrasound. McGraw-Hill Education, 2020.
Mallin, Mike, and Matthew Dawson. Introduction to Bedside Ultrasound: Volume 1. Emergency Ultrasound Solutions, 2013.
Macias, Michael. TPA, www.thepocusatlas.com/.
Expert Commentary
Another great Sono Pro Post! Thank you John Li and Andra for helping everyone move from good to great when scanning for Abdominal Aortic Aneurysms. As noted, this application defines Emergency Ultrasound as a fast (pun intended), accurate, and life saving diagnostic tool for every EM physicians tool belt. When consistent probe pressure does not do the trick, consider the RUQ view for a quick look. Since most AAA’s are fusiform, this may quickly confirm your suspicions and prompt the call to get the OR ready. Be sure to visualize the entire abdominal aorta throughout in both short and long axis to identify saccular aneurysms and even the rare aortic occlusion!

John Bailitz, MD
Vice Chair for Academics, Department of Emergency Medicine
Professor of Emergency Medicine, Feinberg School of Medicine
Northwestern Memorial Hospital

Shawn Luo, MD
PGY4 Resident Physician
Northwestern University Emergency Medicine
How To Cite This Post:
[Peer-Reviewed, Web Publication] Li, J. Farcas, A. (2021 Oct 11). SonoPro Tips and Tricks for Aortic Aneurysm. [NUEM Blog. Expert Commentary by Bailitz, J. Shawn, L.]. Retrieved from http://www.nuemblog.com/blog/sonopro-tips-and-tricks-for-aortic-aneurysm
Other Posts You May Enjoy
SonoPro Tips and Tricks for Pulmonary Embolism
Written by: Megan Chenworth, MD (NUEM ‘24) Edited by: Abiye Ibiebele, MD (NUEM ‘21) Expert Commentary by: John Bailitz, MD & Shawn Luo, MD (NUEM ‘22)
SonoPro Tips and Tricks
Welcome to the NUEM Sono Pro Tips and Tricks Series where Sono Experts team up to take you scanning from good to great for a problem or procedure! For those new to the probe, we recommend first reviewing the basics in the incredible FOAMed Introduction to Bedside Ultrasound Book and 5 Minute Sono. Once you’ve got the basics beat, then read on to learn how to start scanning like a Pro!
Did you know that focused transthoracic cardiac ultrasound (FOCUS) can help identify PE in tachycardic or hypotensive patients? (It has been shown to have a sensitivity of 92% for PE in patients with an HR>100 or SBP<90, and approaches 100% sensitivity in patients with an HR>110 [1]). Have a hemodynamically stable patient with PE and wondering how to risk stratify? FOCUS can identify right heart strain better than biomarkers or CT [2].
Who to FOCUS on?
Patients presenting with chest pain or dyspnea without a clear explanation, or with a clinical concern for PE. The classic scenario is a patient with pleuritic chest pain with VTE risk factors such as recent travel or surgery, systemic hormones, unilateral leg swelling, personal or family history of blood clots, or known hypercoagulable state (cancer, pregnancy, rheumatologic conditions).
Patients presenting with unexplained tachycardia or dyspnea with VTE risk factors
Unstable patients with undifferentiated shock
When PE is suspected but CT is not feasible: such as when the patient is too hemodynamically unstable to be moved to the scanner, too morbidly obese to fit on the scanner, or in resource-limited settings where scanners aren’t available
One may argue AKI would be another example of when CT is not feasible (though there is some debate over the risk of true contrast nephropathy - that is a discussion for another blog post!)
How to scan like a Pro
Key is to have the patient as supine as possible - this may be difficult in truly dyspneic patients
If difficulty obtaining views arise, the left lateral decubitus position helps bring the heart closer to the chest wall
FOCUS on these findings
You only need one to indicate the presence of right heart strain (RHS).
Right ventricular dilation
Septal flattening: Highly specific for PE (93%) in patients with tachycardia (HR>100) or hypotension (SBP<90) [1]
Tricuspid valve regurgitation
McConnell’s sign
Definition: Akinesis of mid free wall and hypercontractility of apical wall (example below)
The most specific component of FOCUS: 99% specific for patients with HR>100bpm or SBP<90 [1]
Tricuspid annular plane systolic excursion (TAPSE)
The most sensitive single component of FOCUS: TASPE < 2cm is 88% sensitive for PE in tachycardic and hypotensive patients; 93% sensitive when HR > 110 [1]
Where to FOCUS
Apical 4 Chamber (A4C) view: your best shot at seeing it all
Find the A4C view in the 5th intercostal space in the midclavicular line
Optimize your image by sliding up or down rib spaces, sliding more lateral towards the anterior axillary line until you see the apex with the classic 4 chambers - if the TV and MV are out of the plane, rotate the probe until you can see both openings in the same image; if the apex is not in the middle of the screen, slide the probe until the apex is in the middle of the screen. If you are having difficulty with this view, position the patient in the left lateral decubitus.
Important findings:
RV dilation: the normal RV: LV ratio in diastole is 0.6:1. If the RV > LV, it is abnormal. (see in the image below)
Septal flattening/bowing is best seen in this view
McConnell’s sign: akinesis of the free wall with preserved apical contractility
McConnell’s Sign showing akinesis of the free wall with preserved apical contractility
4. Tricuspid regurgitation can be seen with color flow doppler when positioned over the tricuspid valve
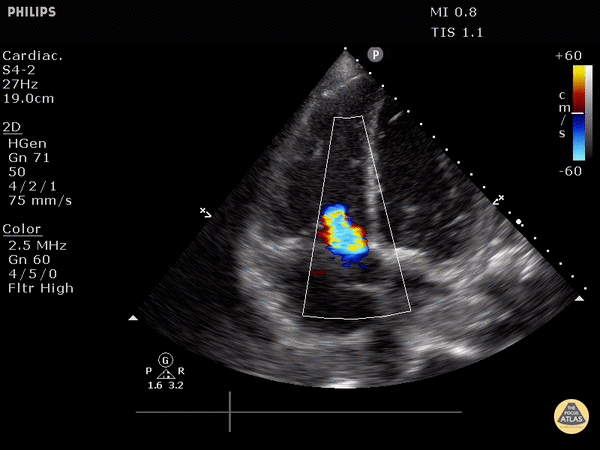
Tricuspid regurgitation seen with color doppler flow
5. TAPSE
Only quantitative measurement in FOCUS, making it the least user-dependent measurement of right heart strain [3]
A quantitative measure of how well the RV is squeezing. RV squeeze normally causes the tricuspid annulus to move towards the apex.
Fan to bring the RV as close to the center of the screen as possible
Using M-mode, position the cursor over the lateral tricuspid annulus (as below)
Activate M-mode, obtaining an image as below
Measure from peak to trough of the tracing of the lateral tricuspid annulus
Normal >2cm

How to measure TAPSE using ultrasound
Parasternal long axis (PSLA) view - a good second option if you can’t get A4C
Find the PSLA view in the 4th intercostal space along the sternal border
Optimize your image by sliding up, down, or move laterally through a rib space, by rocking your probe towards or away from the sternum, and by rotating your probe to get all aspects of the anatomy in the plane. The aortic valve and mitral valve should be in plane with each other.
Important findings:
RV dilation: the RV should be roughly the same size as the aorta and LA in this view with a 1:1:1 ratio. If RV>Ao/LA, this indicates RHS.
Septal flattening/bowing of the septum into the LV (though more likely seen in PSSA or A4C views)

Right heart strain demonstrated by right ventricle dilation
Parasternal Short Axis (PSSA) view: the second half of PSLA
Starting in the PSLA view, rotate your probe clockwise by 90 degrees to get PSSA
Optimize your image by fanning through the heart to find the papillary muscles - both papillary muscles should be in-plane - if they are not, rotate your probe to bring them both into view at the same time
Important findings:
Septal flattening/bowing: in PSSA, it is called the “D-sign”.

“D-sign” seen on parasternal short axis view. The LV looks like a “D” in this view, particularly in diastole.
Subxiphoid view: can add extra info to the FOCUS
Start just below the xiphoid process, pointing the probe up and towards the patient’s left shoulder
Optimize your image by sliding towards the patient’s right, using the liver as an echogenic window; rotate your probe so both MV and TV are in view in the same image
Important findings
Can see plethoric IVC if you fan down to IVC from RA (not part of FOCUS; it is sensitive but not specific to PE)

Plethoric IVC that is sensitive to PE
What to do next?
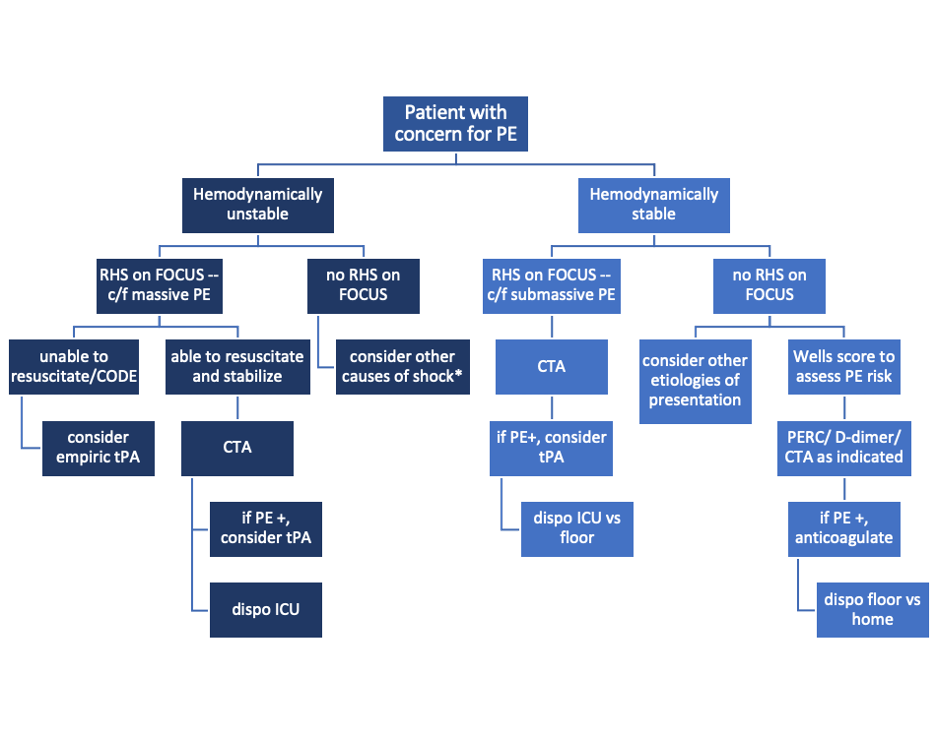
Sample algorithm for using FOCUS to assess patients with possible PE.
*cannot completely rule out PE, but negative FOCUS makes PE less likely
Limitations to keep in mind:
FOCUS is great at finding heart strain, but the lack of right heart strain does not rule out a pulmonary embolism
Systematic review and meta-analysis concluded that the overall sensitivity of FOCUS for PE is 53% (95% CI 45-61%) for all-comers [5]
Total FOCUS exam requires adequate PSLA, PSSA, and A4C views – be careful when interpreting inadequate scans
Can see similar findings in chronic RHS (pHTN, RHF)
Global thickening of RV (>5mm) can help distinguish chronic from acute RHS
McConell’’s sign is also highly specific for acute RHS, whereas chronic RV failure typically appears globally akinetic/hypokinetic

SonoPro Tips - Where to Learn More
Right Heart Strain at 5-Minute Sono: http://5minsono.com/rhs/
Ultrasound GEL for Sono Evidence: https://www.ultrasoundgel.org/posts/EJHu_SYvE4oBT4igNHGBrg, https://www.ultrasoundgel.org/posts/OOWIk1H2dePzf_behpaf-Q
The Pocus Atlas for real examples: https://www.thepocusatlas.com/echocardiography-2
The Evidence Atlas for Sono Evidence: https://www.thepocusatlas.com/ea-echo
References
Daley JI, Dwyer KH, Grunwald Z, Shaw DL, Stone MB, Schick A, Vrablik M, Kennedy Hall M, Hall J, Liteplo AS, Haney RM, Hun N, Liu R, Moore CL. Increased Sensitivity of Focused Cardiac Ultrasound for Pulmonary Embolism in Emergency Department Patients With Abnormal Vital Signs. Acad Emerg Med. 2019 Nov;26(11):1211-1220. doi: 10.1111/acem.13774. Epub 2019 Sep 27. PMID: 31562679.
Weekes AJ, Thacker G, Troha D, Johnson AK, Chanler-Berat J, Norton HJ, Runyon M. Diagnostic Accuracy of Right Ventricular Dysfunction Markers in Normotensive Emergency Department Patients With Acute Pulmonary Embolism. Ann Emerg Med. 2016 Sep;68(3):277-91. doi: 10.1016/j.annemergmed.2016.01.027. Epub 2016 Mar 11. PMID: 26973178.
Kopecna D, Briongos S, Castillo H, Moreno C, Recio M, Navas P, Lobo JL, Alonso-Gomez A, Obieta-Fresnedo I, Fernández-Golfin C, Zamorano JL, Jiménez D; PROTECT investigators. Interobserver reliability of echocardiography for prognostication of normotensive patients with pulmonary embolism. Cardiovasc Ultrasound. 2014 Aug 4;12:29. doi: 10.1186/1476-7120-12-29. PMID: 25092465; PMCID: PMC4126908.
Hugues T, Gibelin PP. Assessment of right ventricular function using echocardiographic speckle tracking of the tricuspid annular motion: comparison with cardiac magnetic resonance. Echocardiography. 2012 Mar;29(3):375; author reply 376. doi: 10.1111/j.1540-8175.2011.01625_1.x. PMID: 22432648.
Fields JM, Davis J, Girson L, et al. Transthoracic echocardiography for diagnosing pulmonary embolism: a systematic review and meta‐analysis. J Am Soc Echocardiogr 2017;30:714–23.e4.
Expert Commentary
RV function is a frequently overlooked area on POCUS. Excellent post by Megan looking specifically at RV to identify hemodynamically significant PEs. We typically center our image around the LV, so pay particular attention to adjust your views so the RV is optimized. This may mean moving the footprint more laterally and angle more to the patient’s right on the A4C view. RV: LV ratio is often the first thing you will notice. When looking for a D-ring sign, make sure your PSSA is actually in the true short axis, as a diagonal cross-section may give you a false D-ring sign. TAPSE is a great surrogate for RV systolic function as RV contracts longitudinally. Many patients with pulmonary HTN or advanced chronic lung disease can have chronic RV failure, lack of global RV thickening. Lastly remember, that a positive McConnell’s sign is a great way to distinguish acute RHS from chronic RV failure.
John Bailitz, MD
Vice Chair for Academics, Department of Emergency Medicine
Professor of Emergency Medicine, Feinberg School of Medicine
Northwestern Memorial Hospital
Shawn Luo, MD
PGY4 Resident Physician
Northwestern University Emergency Medicine
How To Cite This Post:
[Peer-Reviewed, Web Publication] Chenworth, M. Ibiebele, A. (2021 Oct 4). SonoPro Tips and Tricks for Pulmonary Embolism. [NUEM Blog. Expert Commentary by Bailitz, J. Shawn, L.]. Retrieved from http://www.nuemblog.com/blog/sonopro-tips-and-tricks-for-pulmonary-embolism
Other Posts You May Enjoy
SonoPro Tips and Tricks for Pneumothroax
Written by: Morgan McCarthy, MD (NUEM ‘24) Edited by: Jon Hung, MD (NUEM ‘21) Expert Commentary by: John Bailitz, MD & Shawn Luo, MD (NUEM ‘22)
SonoPro Tips and Tricks
Welcome to the NUEM Sono Pro Tips and Tricks Series where Sono Experts team up to take you scanning from good to great for a problem or procedure! For those new to the probe, we recommend first reviewing the basics in the incredible FOAMed Introduction to Bedside Ultrasound Book and 5 Minute Sono. Once you’ve got the basics beat, then read on to learn how to start scanning like a Pro!
Did you know that Lung Ultrasound (LUS) has a higher sensitivity than the traditional upright anteroposterior chest X-ray for the detection of a pneumothorax? (LUS has a reported 90.9 for sensitivity and 98.2 for specificity. CXR were 50.2 for sensitivity and 99.4 for specificity). Busy trauma bay? Ultrasound is faster than calling for X-ray. Critically ill patient? Small pneumothoraces are less likely to be missed with ultrasound. To take your Sono Skills to the next level, read on:
Beyond the classic trauma patient during your E-Fast Exam, who else does the Sono-Pros scan?
Primary spontaneous pneumothorax: the classic scenario is a tall, young adult, with symptoms such as breathlessness, along with potentially those with risk factors of pneumothoraxes such as smoking, male sex, family history of pneumothorax
Secondary spontaneous pneumothorax: those with underlying lung disease including but not limited to COPD, tuberculosis, necrotizing pneumonia, pneumonocystis carini, lung cancer, sarcoma involving the lung, sarcoidosis, endometriosis, cystic fibrosis, acute severe asthma, idiopathic pulmonary fibrosis
Of course, traumatic pneumothorax, especially in penetrating trauma or blunt trauma with broken ribs
Don’t forget iatrogenic causes of pneumothorax including transthoracic needle aspiration, subclavian vessel puncture, thoracentesis, pleural biopsy, and mechanical ventilation
SonoPro Tips - How to scan like a Pro
The key is to have the patient completely supine - air rises! - with the probe in the anterior field in sagittal orientation pointing towards the patient's head.
It is commonly taught to start at the second intercostal space, midclavicular line, and scan down a few lung spaces to at least the 4th intercostal space, however, keep in mind some studies show that trauma supine trauma patients had pneumothoraces seen more commonly in the 5-8 rib spaces.
Important Landmarks
Green = Subcutaneous tissue. Red = Pleural space. Blue = A - lines.
4. Look for lung sliding, improve your image by turning down gain and decrease depth to have lung sliding become clearer

What to Look For:
To Rule-Out a pneumothorax
Lung Sliding - Lung sliding has a negative predictive value of 100% for ruling out a pneumothorax, however only at that interspace
Additional Findings: B-lines and Z lines also help to rule out pneumothorax!

2. To Rule-In a pneumothorax
Lung point - the interface between where lung sliding is happening and where the absence of lung sliding is happening has been shown to have 100% specificity for pneumothorax.
Keep in mind the border of where the heart and lung come in contact and the border where the diaphragm and lung come in contact can cause a false lung point.
The lung point may be hard to find in a larger pneumothorax, and impossible to find in a completely collapsed lung.

3. Next turn on M-mode:

Sandy Beach Shore = Lung sliding (left). Barcode Sign = No lung sliding (right)
What to do next:
Lung sliding = sensitive, Lung point = specific
If you see lung sliding, there is no pneumothorax
If you do not see lung sliding it does not rule in a pneumothorax -> look for a lung point, the interface between where lung sliding is happening and where the absence of lung sliding is happening to rule it in
Always keep in mind other causes that result in lack of lung sliding before management decisions take place!: atelectasis, main-stem intubation, adhesions, contusions, and arrest or apnea. Check out this great table from 5 - Min Sono.

4. If your patient is apneic or has a mainstem intubation look for lung pulse, when the heart beats if the parietal and visceral pleura are touching (no pneumothorax) it will show a pulse at the interfaces of the pleura
5. Sub-Q emphysema - Always look for E - lines. When there is subcutaneous air above the pleural line it creates a false pleural line above the actual pleural. You may also see B-lines obscuring the actual pleural line. This is most likely subcutaneous air and you can not interpret it for a pneumothorax.

SonoPro Tips - Where to Learn More
American College of Emergency Physicians. Emergency ultrasound imaging criteria compendium. Ann Emerg Med. 2006;48(4):487-510.
Ma, John, et al. Ma and Mateer's Emergency Ultrasound. McGraw-Hill Education, 2020.
Macias, Micheal. TPA, The Pocus Atlas.
Availa, Jacob. 5 minute Sono.
Alrajhi K, Woo MY, Vaillancourt C. Test characteristics of ultrasonography for the detection of pneumothorax: a systematic review and meta-analysis. Chest. 2012;141(3):703-708.
Expert Commentary
Morgan went “beyond lung sliding” and dove deep into how to increase your sensitivity & specificity for PTX with POCUS. Supine is ideal to make PTX visible against the anterior chest wall, but if the patient cannot tolerate lying flat, look at the apical pleural superior to the clavicles. First, identify the true pleural line--it should be the bright line just deep to the ribs in your view. SQ emphysema may obscure the view or even mimic the pleura, although its outline is usually more hazy & irregular, a little pressure helps to move the SQ air out of the way can be helpful. Sliding? Great, PTX ruled out. But absent sliding does not automatically mean PTX. Make sure there is no B-line or “lung pulse”, as sometimes pleural adhesion or poor ventilation can cause absent sliding too. Most of the time you don’t need M-mode unless the movement is very subtle and you want to be extra sure. The lung point is pathognomonic for PTX, but don’t waste time digging around for it if the patient is unstable with a good clinical story for PTX > decompress instead!
John Bailitz, MD
Vice Chair for Academics, Department of Emergency Medicine
Professor of Emergency Medicine, Feinberg School of Medicine
Northwestern Memorial Hospital
Shawn Luo, MD
PGY4 Resident Physician
Northwestern University Emergency Medicine
How To Cite This Post:
[Peer-Reviewed, Web Publication] McCarthy, M. Hung J. (2021 Sept 20). SonoPro Tips and Tricks for Pneumothorax. [NUEM Blog. Expert Commentary by Bailitz, J. Shawn, L.]. Retrieved from http://www.nuemblog.com/blog/sonopro-tips-and-tricks-for-pneumothorax
Other Posts You May Enjoy
SonoPro Tips and Tricks for Acute Cholecystitis
Written by: John Li, MD (NUEM ‘24) Edited by: Amanda Randolph (NUEM ‘21) Expert Commentary by: John Bailitz, MD & Mike Macias, MD
SonoPro Tips and Tricks
Welcome to the NUEM Sono Pro Tips and Tricks Series where Sono Experts team up to take you scanning from good to great for a problem or procedure!
For those new to the probe, we recommend first reviewing the basics in the incredible FOAMed Introduction to Bedside Ultrasound Book and 5 Minute Sono. Once you’ve got the basics beat, then read on to learn how to start scanning like a Pro!
Point of care right upper quadrant ultrasound has been shown to be a highly sensitive (82-91%), specific (66-95%), cost effective and efficient modality for emergency medicine physicians to quickly and effectively identify biliary pathology [1-5]. But despite its widespread utility, right upper quadrant ultrasound can often be a technically difficult study for the beginner sonographer, as there are multiple factors that can influence its ease of acquisition ranging from patient body habitus to bowel gas shadowing, and sonographer experience has been shown to influence its efficacy [1, 6-7].
Beyond the classic patient with right upper quadrant pain, what other scenarios do Sono-Pros use right upper quadrant ultrasound?
Epigastric abdominal pain being “diagnosed” and even over treated as GERD. Pick up the probe in the symptomatic patient taking their PPI, EGD negative, or already treated for H. pylori
Unexplained right shoulder or back pain.
Colicky pain in the right flank but no urinary findings of nephrolithiasis.
My gallstones are back! But my gallbladder is gone. Look for choledocholithiasis.
Chronically ill elderly or immunosuppressed patients with unexplained fever or sepsis.
SonoPro Tips - How to scan like a Pro
Always Start Smart: To Fail to Prepare is to Prepare to Fail whether in ED POCUS or ED Thoracotomy.
Start with the patient in either the left lateral decubitus position or supine with the bed at approximately 30 degrees.
Let the patient know “I’ll be asking you throughout this brief exam to take medium to deep breaths and hold for 5 sec, then automatically breathe out.”
Still not not getting great views?
Scan between the ribs to use the liver as an acoustic window and avoid bowel gas. Switch to a small footprint phased array probe if needed.
Not sure which intercostal space to use? Try about 7 centimeters to the right of the patient’s xiphoid process!
Ask the patient to position their arms above their head to open the intercostal space.
Ask the patients to bend their knees to relax the abdominal muscles.
In young, thin patients, the gallbladder may be more anterior and superior-- if you are scanning subcostally, try flattening out the probe even more!
Even a Small Pain in the Neck can be a Big Problem!
Don’t forget the neck. There is a reason the gallbladder was so nicely distended and easy to find. Be sure to scan carefully in two orthogonal planes to pick up subtle stones in the neck of the gallbladder!
If there is a lot of nearby bowel gas, tell your tech to look for these stones if your surgeons require a confirmatory comprehensive radiology ultrasound before operating.
In this GIF, you can see a long-axis view of the gallbladder. When you are initially looking at the body and the fundus of the gallbladder, there are no clear shadowing stones. However, as the sonographer fans to the neck of the gallbladder, they can visualize multiple stones, which are casting shadows posteriorly. Image courtesy of the POCUS Atlas.
SonoPro Tips - Pro Pick Ups!
Is that a stone or is that something else in the gallbladder? Roll the patient and see if the “stone” moves!
If the stone in the fundus or body moves, then it’s more likely a mobile stone.
If it doesn’t move, then consider a polyp or a malignancy. Polyps or malignancies generally are non-shadowing while stones are shadowing!
Impacted, “non-mobile” Neck Stone = Big Problem and likely to progress to acute cholecystitis.
What’s causing that shadow?
Stones shadow posteriorly.
Edges shadow on the sides. Edge artifact results when ultrasound beams scatter passing by a smooth-walled structure, creating an anechoic stripe that could be confused with true shadowing!
What if the entire gallbladder is casting a shadow?
Think about a gallbladder FULL of stones! This will cause only the most anterior stones to show up on ultrasound.
Here, on the right side of the screen you see a cross section of the gallbladder that has a large stone in it-- this is casting a shadow so you do not see the posterior wall of the gallbladder at all. This is called the wall echo sign-- where you will only see the most anterior surface of the stone. Image courtesy of the POCUS Atlas.
4. What are some of those pesky mimics of acute cholecystitis?
Think about hepatic pathologies! Acute hepatitis can cause a clinical Murphy’s sign. You can also have patients who present similarly when they have a congestive hepatopathy from their CHF. Even cirrhotic patients can present with a tender RUQ!
Here, you can see a dilated gallbladder with a thickened anterior wall and a small amount of pericholecystic fluid, all of which are consistent with acute cholecystitis. Image courtesy of the POCUS Atlas.
In this still image, you can see a thickened gallbladder wall (although be sure to measure the anterior wall, as the posterior wall can be thickened due to posterior acoustic enhancement!) and a small amount of pericholecystic fluid. Image courtesy of the POCUS Atlas.
Here, you can see a dilated gallbladder with an obstructing stone in the neck of the gallbladder. Image courtesy of the POCUS Atlas.
SonoPro Tips - What the Pro’s Do Next!
Infographic courtesy of Justin Seltzer, MD
If you see nonshadowing masses in the gallbladder:
Measure it! If the polyp is >1cm, then there’s a ~50% chance that this could be malignant, so be sure to refer these patients for additional imaging and close follow up.
What if you’re hoping to be really thorough and get a beautiful image of the CBD, but despite your best efforts, you cannot find it?
Draw some LFTs! A number of our emergency medicine colleagues, including Becker et. al and Lahham et. al, have done studies on this and it has been shown to be very unlikely that the CBD will be pathologically dilated in the setting of normal LFTs. On the flip side, if the LFTs appear cholestatic in nature, that’s another indication for a right upper quadrant ultrasound! [9-10]
SonoPro Tips - Where to Learn More
Do you want to see more pathologic images that you may see when you are doing a right upper quadrant ultrasound? Be sure to check out The Pocus Atlas by our expert editor Dr. Macias! It’s a great resource that also shows some of the rarer etiologies of gallbladder pathology, such as emphysematous cholecystitis or choledocholithiasis.
If you’re interested in looking at some of the evidence behind the right upper quadrant ultrasound, be sure to check out the evidence atlas here as well!
Expert Commentary
Thank you to NWEM1 John Li for bringing this great idea for a NUEM Blog Series to life. And another thanks to NUEM Blog Founder Mike Macias for his help on both content and graphics!
This new series is intended to push your Sono skills from just good, to really great. We will not rehash the basics. There are already abundant great resources available that we are truly thankful for and utilize everyday. But instead, we will share SonoPro Tips to help you more quickly master challenging POCUS applications and procedures.
And there is no place better to start than Acute Cholecystitis. This is a great differentiator between the average and the expert clinician sonographer. As John outlines, start smart by expanding your indications and positioning your patient properly from the get go. Then breath, not you, the patient. Breath and hold again and again to bring the gallbladder and even difficult to discern pathology into clear view. Go beyond getting stones, and work to pick up, and explain other pathologies, as well as the bile ducts when needed.
Thanks again John and Mike! Looking forward to the next post in this new series...
John Bailitz, MD
Vice Chair for Academics, Department of Emergency Medicine
Professor of Emergency Medicine, Feinberg School of Medicine
Northwestern Memorial Hospital

Michael Macias, MD
Global Ultrasound Director, Emergent Medical Associates
Clinical Ultrasound Director, SoCal MEC Residency Programs
How To Cite This Post:
[Peer-Reviewed, Web Publication] Li, J. Randolph, A. (20201 Mar 22). SonoPro Tips and Tricks for Acute Cholecystitis. [NUEM Blog. Expert Commentary by Bailitz, J. Macias, M]. Retrieved from http://www.nuemblog.com/blog/sonopro-tips-and-tricks-for-acute-cholecystitis
Other Posts You May Enjoy
References
Jain A, Mehta N, Secko M, Schechter J, Papanagnou D, Pandya S, Sinert R. History, Physical Examination, Laboratory Testing, and Emergency Department Ultrasonography for the Diagnosis of Acute Cholecystitis. Acad Emerg Med. 2017 Mar;24(3):281-297. doi: 10.1111/acem.13132. PMID: 27862628.
Miller, Adam H., et al. “ED Ultrasound in Hepatobiliary Disease.” The Journal of Emergency Medicine, vol. 30, no. 1, 2006, pp. 69–74., doi:10.1016/j.jemermed.2005.03.017.
Shekarchi B, Hejripour Rafsanjani SZ, Shekar Riz Fomani N, Chahardoli M. Emergency Department Bedside Ultrasonography for Diagnosis of Acute Cholecystitis; a Diagnostic Accuracy Study. Emerg (Tehran). 2018;6(1):e11. Epub 2018 Jan 20. PMID: 29503836; PMCID: PMC5827043.
American College of Emergency Physicians: Emergency Ultrasound Imaging Criteria Compendium. Oct. 2014, www.acep.org/globalassets/new-pdfs/policy-statements/emergency-ultrasound-imaging-criteria-compendium.pdf.
Hilsden R, Leeper R, Koichopolos J, et al. Point-of-care biliary ultrasound in the emergency department (BUSED): implications for surgical referral and emergency department wait times. Trauma Surg Acute Care Open. 2018;3(1):e000164. Published 2018 Jul 30. doi:10.1136/tsaco-2018-000164
Ma, John, et al. Ma and Mateer's Emergency Ultrasound. McGraw-Hill Education, 2020.
Mallin, Mike, and Matthew Dawson. Introduction to Bedside Ultrasound: Volume 2. Emergency Ultrasound Solutions, 2013.
Macias, Michael. TPA, www.thepocusatlas.com/.
Becker BA, Chin E, Mervis E, Anderson CL, Oshita MH, Fox JC. Emergency biliary sonography: utility of common bile duct measurement in the diagnosis of cholecystitis and choledocholithiasis. J Emerg Med. 2014 Jan;46(1):54-60. doi: 10.1016/j.jemermed.2013.03.024. Epub 2013 Oct 11. PMID: 24126067.
Lahham S, Becker BA, Gari A, Bunch S, Alvarado M, Anderson CL, Viquez E, Spann SC, Fox JC. Utility of common bile duct measurement in ED point of care ultrasound: A prospective study. Am J Emerg Med. 2018 Jun;36(6):962-966. doi: 10.1016/j.ajem.2017.10.064. Epub 2017 Nov 20. PMID: 29162442.
Ultrasound Guidance for Lumbar Puncture
Written by: Maurey Hajjar, MD, MPH (NUEM ‘22) Edited by: Justin Seltzer, MD (NUEM ‘21) Expert Commentary by: Alex Ireland, MD (NUEM '20)

Expert Commentary
Thank you to Dr. Hajjar and Dr. Seltzer for their excellent review of an underutilized ultrasound procedure.
After several challenging lumbar punctures during my residency training, I began to adopt this technique as a supplemental tool to improve first-pass success. When beginning, the patient can be placed in either the lateral decubitus or the upright position. However, I have found that in the patients for whom you are looking for ultrasound guidance, the anatomy due to body habitus is already challenging, and upright positioning offers the best advantage of maintaining midline.
There are several approaches to identifying your target with ultrasound, and my preferred strategy is different than the one mentioned in this post. After palpating the bilateral anterior superior iliac spines and drawing lines inward towards the midline, I start with my probe in the transverse view to identify the spinous processes at L3, L4, and L5. I mark above and below my probe at each process to identify the midline.
I then rotate the probe 90 degrees into a longitudinal view, but I keep my probe in the midline to identify contiguous vertebral spinous processes and the intervertebral or interspinous spaces between them. I place a mark on both sides of my probe with it aligned in the middle of this intervertebral space, which will be the exact insertion point of my needle.


Another key advantage of ultrasound is the ability to measure the anticipated depth of needle insertion. After identifying the spinous processes and intervertebral space in longitudinal view, I increase the depth and the gain to view the mixed echogenicity soft tissue and ligaments, and then see the hypoechoic subarachnoid space underneath the dura mater. I measure the depth of this space and then have an estimate of how far to insert the needle before obtaining cerebrospinal fluid.

Lastly, I would highly recommend attempting this technique on several “easy” patients where you can also readily palpate the anatomy. Similar to using a bougie during difficult intubations, we need to be skilled with our rescue techniques through diligent preparation and repeated practice.
References
Ultrasound Guided Lumbar Puncture. MGH Ultrasound.

Alex Ireland, MD
Emergency Medicine Physician
Vituity Group
Chicago, IL
How To Cite This Post:
[Peer-Reviewed, Web Publication] Hajjar, M. Seltzer, J. (2020, Dec 7). Ultrasound Guidance for Lumbar Puncture. [NUEM Blog. Expert Commentary by Ireland, A]. Retrieved from http://www.nuemblog.com/blog/ultrasound-imaging-for-lumbar-puncture
Other Posts You May Enjoy
A Practical Approach to Abdominal Imaging

Written by: Zach Schmitz MD (PGY-3) Edited by: David Kaltman, MD (PGY-4) Expert commentary by: Samir Abboud, MD
I often find myself in a gray zone when it comes to imaging abdominal pain. Any third year medical student worth their salt can tell you to get the RUQ ultrasound for the fat, fertile, forty year-old female with RUQ abdominal pain, fever, positive Murphy’s sign, and leukocytosis. However, my patients don’t usually fit the textbook, and I’m often thinking about what I might miss or see with test X vs test Y. Below, I’ll touch on a few common dilemmas where the optimal choice of imaging modality isn’t immediately clear by focusing on what you actually gain or lose by ordering one imaging test over another.
Scenario 1: Stone or Appendicitis?
Case: 62 year old female with HTN and HLD presents with RLQ pain. The pain woke her this morning and has been intermittent all day, occurring exclusively when she urinates. It is sharp, non-radiating, and increasing in intensity. She never had a pain like this and can now barely sit still. She has thrown up a few times over the past few hours. Vitals are stable and she is afebrile. She appears uncomfortable with RLQ tenderness but no rebound or guarding. Labs show slight leukocytosis, and urine has no blood.
If I suspect stone over appendicitis, will a CT without contrast miss appendicitis?
CT, MR, and US are well studied in their ability to detect and accurately diagnose appendicitis.[1]
CT with IV contrast is 96-100% sensitive and 91-100% specific. Per the American College of Radiology’s (ACR) appropriateness system, this is the most appropriate initial test for suspected appendicitis in adults.[2]
MR is 96% sensitive and 96% specific.[3]
Ultrasound has a wide range of data, with sensitivity ranging from 21-95.7% and specificity of 71-97%.[2]
CT without oral or IV contrast is nearly as useful for diagnosing appendicitis
A meta-analysis by Xiong et al included seven original studies investigating a total of 845 patients.[4]
Pooled sensitivity - 0.90 (95% CI: 0.86-0.92)
Pooled specificity - 0.94 (95% CI: 0.92-0.97)
Pooled positive likelihood ratio - 12.90 (95% CI: 4.80-34.67)
Pooled negative likelihood ratio - 0.09 (95% CI: 0.04-0.20)
Will a contrast enhanced CT for appendicitis ruin my chance to catch a kidney stone?
Non-contrast CT is the emergency standard in diagnosing nephrolithiasis with good reason - it is 97% sensitive and 95% specific.[5]
Will contrast ruin the ability to detect a stone?
This makes theoretical sense as stones and contrast are both hyper-intense on CT.
Sensitivity is decreased for small stones with contrast enhanced studies.
However, for stones > 3mm, sensitivity remains 95%.[5]
Only about 5% of stones that small ultimately require intervention.
Takeaways: You sacrifice a bit with a non-contrast study looking for appendicitis and a contrast enhanced study looking for stone, but both still work well. The American Urology Association recommends consultation for stones > 10mm.[6] Urology would also need to be involved with signs of sepsis, abscess, deterioration in renal function, intractable symptoms, or a transplant/solitary kidney. It seems I am very likely to see a stone requiring something other than watchful waiting on a CT with contrast. It is worse to miss an appendicitis than a 2mm stone, so contrast might make more sense if it’s close.
Scenario 2: RUQ Ultrasound after Negative CT San
Case: 84 year old male with a history of prostate cancer and hypertension presents from a nursing home with 4 days of diffuse abdominal pain. He has had no vomiting or bowel movements over this time. No urinary symptoms. He is hemodynamically stable, and his abdomen is diffusely tender (maybe worse in the RUQ) and distended but overall not terribly impressive. You order a CT for possible obstruction and it just shows a large stool burden. The gallbladder was visualized and looked normal.
If a CT is negative, should I get a RUQ US to look for cholecystitis?
RUQ Ultrasound
Per ACR, this is the most appropriate initial study for RUQ pain and suspected biliary disease.[7]
A 2012 meta analysis showed a sensitivity of 81% (95% CI 75-87%) and specificity of 88% for acute cholecystitis.[8]
It has the advantage of being dynamic, with a sonographic Murphy sign independently showing an 86% sensitivity and 35% specificity, positive predictive value of 43%, and negative predictive value of 82%.[9]
Computed Tomography (CT)
The same 2012 meta analysis only had one study with CT, but noted a sensitivity of 94% with fairly broad confidence intervals (95% CI 73-99) and a specificity of only 59%.[8]
ACR notes CT’s NPV for acute cholecystitis approaches 90%.[7]
A 2015 study looked at 101 patients who went to the OR and got both a CT and US. For acute cholecystitis, the sensitivities for CT and US were 92% and 79% respectively. For cholilithiasis, sensitivities for CT and US were 60% and 89% respectively.[10,11]
ACR states it is “usually appropriate” to proceed with CT for RUQ pain and suspected biliary disease with a negative or equivocal ultrasound.[7]
Although it lacks a sonographic murphy’s sign equivalent, its advantage is to help in operative planning and seeing complications, such as perforation or gangrene.
MRI has a sensitivity of 85% and a specificity of 81%. It is also considered “usually appropriate” by ACR if ultrasound is negative or equivocal[7]
Cholescintigraphy is the best imaging, showing 97% sensitivity and 90% specificity for acute cholecystitis. It is also the most appropriate study if you suspect acalculous cholecystitis.[7]
Takeaways: There are a few interesting points from this set of data. First, CT seems to have at least as good of ability to pick up cholecystitis compared to ultrasound. However, it is much worse in detecting gallstones themselves, which may be very relevant to a patient with abdominal pain. Second, the sensitivity of both RUQUS or CT isn’t really that great and we are probably missing a few episodes of cholecystitis. If there is a very high index of suspicion but negative imaging, it may be worthwhile to pursue additional workup. Overall, if the CT shows a normal gallbladder, and you are not worried about intractable biliary colic, the ultrasound probably won’t add much.
Scenario 3: Female Pelvic Pain
Case: 33 year old female with a history of chlamydia infection presenting with right sided abdominal pain. The pain has gradually been getting worse for 1 day. She has had a few episodes of vomiting. There is some white vaginal discharge she always has. On exam, she is tachycardic, normotensive, and febrile to 101.5. She has RLQ tenderness with voluntary guarding. On pelvic exam, there is some white vaginal discharge, CMT, R adnexal tenderness that seems less intense than her RLQ tenderness, and no masses noted.
If this patient had a normal appendix and ovaries after a contrast enhanced CT for appendicitis, how useful is an additional transvaginal ultrasound to rule out gynecologic pathologies?
For ovarian torsion:
A retrospective study of 834 patients showed the NPV of a contrast enhanced CT of the pelvis for ovarian torsion is 100%.[12]
A prospective study of 199 patients showed doppler ultrasound has a sensitivity and specificity for torsion of 100 and 97%.[13]
For Tubo-Ovarian Abscess (TOA):
CT is thought to be between 78 and 100% sensitive.[14]
2011 literature review gives a broad range of sensitivity and specificity for US in TOA with a sensitivity of 56-93% and specificity from 89-98%.[15]
Takeaways: ACR appropriates rates ultrasound as the most appropriate test for female pelvic pain.[14] However, it also rates CT with contrast as more appropriate for suspected appendicitis.[2] This patient raises concerns for both, and a CT was done first. CT is good for finding intra abdominal and pelvic abscess. It is more difficult to assess how useful ultrasound is for TOA, as many studies in the literature review were either before year 2000 or used a transabdominal approach. Overall, if someone has a CT scan for appendicitis that shows normal ovaries, the transvaginal ultrasound seems to add little for either torsion or TOA.
One potential dangerous conclusion from this set of data is that we should just CT everyone up front. While CT shows good sensitivities for many of the pathologies in question, simply ordering a CT first ignores the many good reasons - such as cost, radiation dose, speed, improved specificity and comparable sensitivity, resource utilization, sonographic murphy sign - RUQUS and pelvic ultrasound are the most appropriate initial tests for suspect biliary and pelvic pathology. That said, it a patient has an entirely normal CT that was already performed for other indicated reasons, the use of additional imaging may be unnecessary and should be considered carefully. Overall, the question of exactly what imaging test to order when ruling out common, emergent, abdominal pathologies is often a difficult one with shades of gray. By having a better understanding of exactly what type of information we are getting and missing from each test we order, emergency physicians can more quickly, safely, and accurately diagnose and treat our patients.
Expert Commentary
This is a thoughtful, well-reasoned approach to optimizing the imaging strategy in challenging, atypical clinical scenarios. To add a few nuances to some of the points raised:
When considering a contrast-enhanced versus non-contrast CT (both IV and PO) in the clinically ambiguous scenario, it is important to consider your patient’s body habitus. Figure 1 includes representative images from a non-contrast enhanced CT of a patient with a BMI above 25. You can clearly see the inflammatory stranding in the right lower quadrant mesenteric fat (Figure 1a) and portions of an appendicolith (Figure 1 b), in this patient who ultimately proved to have appendicitis. The natural contrast provided by the patient’s mesenteric fat in this scenario helps us work around the absence of IV contrast.
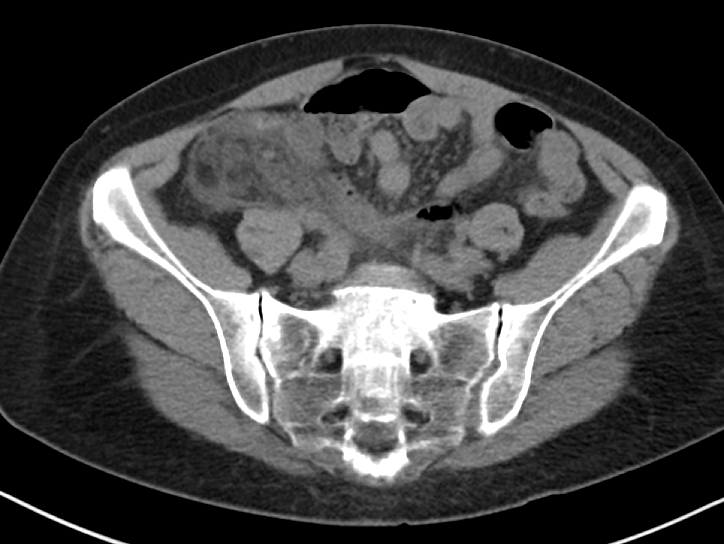
Figure 1a
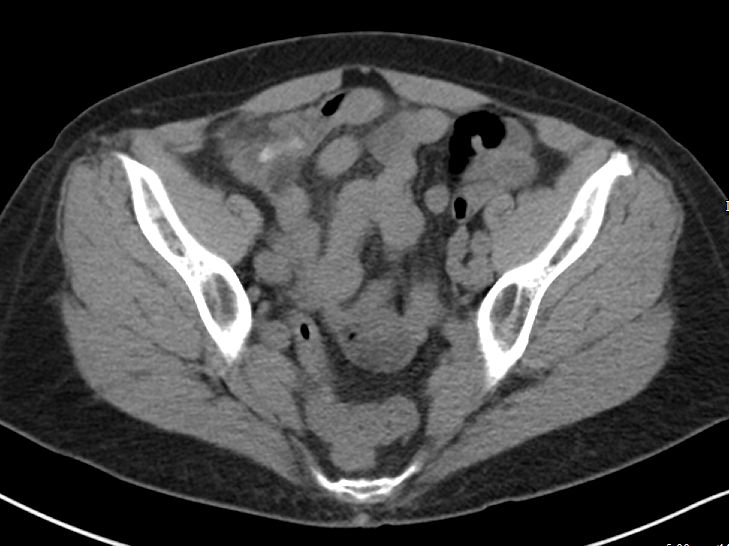
Figure 1b
Figure 2 includes representative images from a contrast enhanced CT of a very thin patient, with a relative paucity of intra-abdominal fat. In this patient, the relative absence of natural contrast would greatly reduce our chances to diagnose appendicitis (or even identify the appendix) in the absence of IV contrast. PO contrast is additionally likely to be most helpful in very thin patients [Alabousi 2015].

Figure 2
The author asks (and answers) a very insightful question with regards to identifying kidney stones on contrast enhanced CT. A few points to add:
Assuming the contrast enhanced study is obtained prior to the excretory phase of imaging (and most routine studies are) ureteral stones should still be largely visible - the stones that will generally be more difficult to identify will be the non-obstructing stones still within the collecting system. Additionally, while there is indeed a small sacrifice in sensitivity for small stones with contrast enhanced studies, the identification of secondary complications is much improved.
Consider Figure 3, which demonstrates a 2 mm stone in the proximal left ureter identified on a contrast enhanced study. Notice the slightly delayed nephrogram on the left relative to the right, which could indicate a component of obstructive uropathy. Similarly, identification of such complications as pyonephrosis, pyelonephritis, and perinephric abscess is much improved with contrast enhanced images. For this reason, I would suggest that in the clinically ambiguous scenario, erring on the side of the contrast enhanced study would be wise.

Figure 3
It is important to note that the CT scanner installed in our emergency department is a dual-energy machine. Many of our other departmental scanners are dual-energy as well. With these scanners, we are able to apply algorithms to deconstruct the elemental composition of stones and provide more information than simply size and location - i.e. uric acid or non-uric acid stone - if requested. We can additionally generate virtual non-contrast images from the contrast-enhanced images, without exposing our patients to additional radiation. While it is tempting to think that we could recapture some of the sensitivity for renal stones using these virtual non-contrast images, this has unfortunately not been borne out in the literature at this time [Vrtiska 2010], though remains an area of continued investigation as imaging technology is further improved.
The advantages of dual-energy imaging are not only limited to the kidneys. With regards to the evaluation of biliary colic, virtual monochromatic images can be generated with resulting increased conspicuity of gallstones, even those that appear isodense to bile on the conventional images [Ratanaprasatporn 2018].
In general, if you find yourself with a high degree of suspicion for any disease process and discordant imaging findings, I would encourage you to call your radiologist. The additional clinical information exchanged during such a call may direct what additional data sets should be generated and what additional imaging studies may be of most benefit. Last, but certainly not least, that “second look” armed with additional clinical information can pick up on subtle findings that are, in isolation, entirely non-specific, but in a certain clinical scenario could clinch the diagnosis you are seeking.
References:
Alabousi A et al. Is Oral Contrast Necessary for Multidetector Computed Tomography Imaging of Patients With Acute Abdominal Pain? Canadian Association of Radiologists Journal. 2015;66(4): 318 - 322
Ratanaprasatporn L et al. Multimodality Imaging, including Dual-Energy CT, in the Evaluation of Gallbladder Disease. Radiographics 2018;38(1): 75-89
Vrtiska TJ et al. Genitourinary Applications of Dual-Energy CT. American Journal of Roentgenology. 2010;194: 1434-1442.

Samir Abboud, MD
Assistant Professor of Radiology
Northwestern University
How To Cite This Post:
[Peer-Reviewed, Web Publication] Schmitz, Z. Kaltman, D. (2020, Feb 10). An Approach to Abdominal Imaging. [NUEM Blog. Expert Commentary by Abboud, S]. Retrieved from http://www.nuemblog.com/blog/abdominal-imaging.
Other Posts You Might Enjoy…


References
Dahabreh IJ, Adam GP, Halladay CW, Steele DW, Daiello LA, Weiland LS, Zgodic A, Smith BT, Herliczek TW, Shah N, Trikalinos TA. Diagnosis of Right Lower Quadrant Pain and Suspected Acute Appendicitis. Comparative Effectiveness Review No. 157. (Prepared by the Brown Evidence-based Practice Center under Contract No. 290-2012-00012-I.) AHRQ Publication No. 15(16)-EHC025-EF. Rockville, MD: Agency for Healthcare Research and Quality; December 2015. www.effectivehealthcare.ahrq.gov/reports/final.cfm.
American College of Radiology. ACR Appropriateness Criteria®: RLQ pain. Available at https://acsearch.acr.org/docs/69357/Narrative/ Accessed 5/10/19.
Duke E, Kalb B, Arif-Tiwari H, et al. A Systematic Review and Meta-Analysis of Diagnostic Performance of MRI for Evaluation of Acute Appendicitis. AJR Am J Roentgenol 2016;206:508-17.
Xiong B, Zhong B, Li Z, Zhou F, Hu R, Feng Z, Xu S, Chen F. Diagnostic Accuracy of Noncontrast CT in Detecting Acute Appendicitis: A Meta-analysis of Prospective Studies. Am Surg. 2015 Jun;81(6):626-9.
Curhan G, Aronson M, Preminger G. Diagnosis and acute management of suspected nephrolithiasis in adults. UpToDate.com. April 30 2019.
Assimos D, Krambek A, Miller N et al. Surgical Management of Stones: AUA/Endourology Society Guideline (2016). https://www.auanet.org/guidelines/kidney-stones-surgical-management-guideline. Accessed 5/10/19.
American College of Radiology. ACR Appropriateness Criteria®: RUQ pain. Available at https://acsearch.acr.org/docs/69474/Narrative/ .
Kiewiet J.J., Leeuwenburgh M.M., Bipat S., et al: A systematic review and meta-analysis of diagnostic performance of imaging in acute cholecystitis. Radiology 2012; 264: pp. 708-720.
Bree, Robert L. Further observations on the usefulness of the sonographic Murphy sign in the evaluation of suspected acute cholecystitis. Journal of Clinical Ultrasound. March/April 1995.
Wertz JR1,2, Lopez JM3, Olson D4, Thompson WM1,2. Comparing the Diagnostic Accuracy of Ultrasound and CT in Evaluating Acute Cholecystitis. AJR Am J Roentgenol. 2018 Aug;211(2):W92-W97. doi: 10.2214/AJR.17.18884. Epub 2018 Apr 27.
Fagenholz, P et al. Computed Tomography Is More Sensitive than Ultrasound for the Diagnosis of Acute Cholecystitis. Surg Infect (Larchmt). 2015 Oct;16(5):509-12. doi: 10.1089/sur.2015.102. Epub 2015 Sep 16.
Lam A1, Nayyar M2, Helmy M2, Houshyar R2, Marfori W2, Lall C2.Assessing the clinical utility of color Doppler ultrasound for ovarian torsion in the setting of a negative contrast-enhanced CT scan of the abdomen and pelvis. Abdom Imaging. 2015 Oct;40(8):3206-13. Doi: 10.1007/s00261-015-0535-4.
Laufer, M. Ovarian and fallopian tube torsion. UpToDate. April 30 2019. https://www.uptodate.com/contents/ovarian-and-fallopian-tube-torsion?search=ovarian%20torsion&source=search_result&selectedTitle=1~70&usage_type=default&display_rank=1 .
Beigi, R. Epidemiology, clinical manifestations, and diagnosis of tubo-ovarian abscess. UpToDate. April 30 2019. https://www.uptodate.com/contents/epidemiology-clinical-manifestations-and-diagnosis-of-tubo-ovarian-abscess?search=tuboovarian%20abscess&source=search_result&selectedTitle=2~24&usage_type=default&display_rank=2 .
Lee DC1, Swaminathan AK. Sensitivity of ultrasound for the diagnosis of tubo-ovarian abscess: a case report and literature review. J Emerg Med. 2011 Feb;40(2):170-5. doi: 10.1016/j.jemermed.2010.02.033. Epub 2010 May 13.
American College of Radiology. ACR Appropriateness Criteria®: Female Pelvic Pain. Available at https://acsearch.acr.org/docs/69503/Narrative/ .
Ultrasound in Pediatric Distal Forearm Fractures

Written by: Jason Chodakowski, MD (NUEM PGY-3) Edited by: Logan Weygandt, MD (NUEM ‘17) Expert commentary by: Rachel Haney, MD (NUEM ‘17)
Why use Ultrasound?
Distal forearm fractures are common fractures in the pediatric population. Although plain radiographs of the forearm are still considered the gold standard for definitive diagnosis, there is growing interest in using ultrasound for diagnosis because it provides zero radiation exposure, it can be used to guide local pain control, and it can confirm reduction success at the bedside. Ultrasound is easy to teach and provides value under circumstances when plain radiography might be unavailable (pre-hospital environment, disaster areas, or in developing countries).
A recent meta-analysis of 12 studies, which included 951 children 18 and younger, found that physician performed bedside ultrasound detected distal forearm fractures with a pooled sensitivity of 98% and a specificity of 96% when compared with the gold standard plain radiographs.[1] The pain associated with ultrasound use was also significantly less.[2]
How do I use Ultrasound?
To evaluate musculoskeletal pathology use the high-frequency linear array transducer employing the six-view ultrasound technique as shown below. You may detect a fracture as an apparent discontinuity or irregularity (divots, step-offs, distortion) of the hyperechoic and continuous bony cortex. Disruptions as small as 1mm can be detected.

Six-view technique (Herren et. al. 2015)

Normal Cortex (Crosby et. al. 2014)

Distal radius fracture (emergencyultrasoundteaching.com)

Distal radius fracture (acep.org)
Pitfalls
In children the evaluation of bones is complicated by the open physes, which may be mistaken for fractures. The difference is that physes will appear as smooth, downward-sloping curves unlike fractures, which will have abrupt step-offs.

Normal open tibial physis (Crosby et. al. 2014)
What else is Ultrasound Good For?
Confirming reductions
Ultrasound is also utilized by emergency physicians to determine successful realignment of pediatric distal forearm fractures after closed reduction.[4]

Fracture reduction (Socranksy et. al. 2016)
Achieving adequate pain control
Ultrasound can also be used to guide hematoma blocks. The hematoma block is a technique wherein the physician injects an anesthetic solution into the hematoma between the fractured bone fragments (see image below). It has been shown to be effective, safe, faster, and uses fewer resources with no significant difference in pain scores when compared to procedural sedation in both adults and children with distal forearm fractures.[6,7]

Clean skin and place a sterile cover over the transducer. Using 5-10cc of 1-2% lidocaine inject into the hematoma between the fractured bone fragments using an 18-22 gauge needle.

Visualization of needle (N) entering between fracture bone fragments (U) (emdocs.net)
Take Home Points
Ultrasound is most useful in evaluating long bone fractures such as the femur, clavicle, ribs, or distal radius and ulna.
A reliable alternative to the plain radiograph is the proper six-view method it, with the advantages of being portable and radiation-free.
Ultrasound can also be reliably used to confirm fracture reduction, as well as for guiding forearm fracture hematoma blocks.
Expert Commentary
Thank you for providing a concise summary of the utility of Point-of-care Ultrasound (POCUS) for pediatric forearm fractures.
I’d like to mention a few key points regarding the use of POCUS for pediatric fracture assessment.
If you do a lot of adult scanning and not much pediatric scanning it is important to keep in mind that children may not be as cooperative (or stationary) as adults.
Smaller children may be afraid of the transducer therefore introducing the transducer to the patient as an object that will not hurt them is key. You should hand the probe to the patient, allow them to touch it and even scan themselves initially in order to get them more comfortable with the probe.
While the 6-view scan you describe will certainly improve sensitivity, adequate sensitivity can be achieved with a 2-view approach. Additionally, the 6-view technique may be prohibitively time-intensive in a busy Emergency Department.
In order to increase sensitivity with the 2-view approach, always start imaging at the point of maximal tenderness, initially in the longitudinal plane with the cortex of the bone parallel to the probe surface. Slide distal and proximal to the point of tenderness. Then rotate the probe 90 degrees to view the cortex in the transverse plane. Fractures are noted as cortical disruptions or step-offs. Fractures are most visible on POCUS when the fracture line is perpendicular to the angle of insonation.
Another key pearl is to use copious gel in order to optimize the focal point of the image. The focal zone on the screen is the part of the image with the highest resolution secondary to convergence of the US beams. The focal point can be changed depending upon your machine, but is typically no more shallow than about 1-cm below the probe surface, therefore if you place a good layer of gel about 1cm thick, you will place the cortext of the bone at the optimal focal point. Using copious gel is also important in reducing any potential discomfort caused by pressure from the probe.
If gel is a limited resource, you can use a water bath as well.
While POCUS is a wonderful tool, especially for fracture detection, I want you to keep in mind that the sensitivity of POCUS for fractures is the highest (low-mid 90s) for the diaphysis of long bones (femur, humerus, radius and ulna). Sensitivity is significantly lower for detecting fractures of other bones and fractures near joint lines secondary to the curvilinear nature of the metaphysis as well as the presence of cartilaginous epiphyseal plates in children.
While POCUS can supplant the use of radiography in austere environments, in a well-resourced emergency department, POCUS should be an adjunct to radiography. In this setting, POCUS can have utility in patients in whom you suspect occult fracture despite negative XRs or for real-time fracture reduction assessment before sedation wears off. Unless you are a pediatric POCUS expert, I would order XR’s as usual for a pediatric patient you suspect has a fracture. In the meantime- continue scanning patients with normal anatomy and documented fractures in order to develop your POCUS expertise! Happy Scanning!

Rachel Haney, MD
NUEM ‘17
Ultrasound Fellow at Massachusetts General Hospital
How To Cite This Post
[Peer-Reviewed, Web Publication] Chodakowski J, Weygandt L. (2019, April 28). Ultrasound in pediatric distal forearm fractures. [NUEM Blog. Expert Commentary by Haney R]. Retrieved from http://www.nuemblog.com/blog/us-for-fracture
Other Posts You May Enjoy
References
Douma-den Hamer, Djoke, et al. "Ultrasound for Distal Forearm Fracture: A Systematic Review and Diagnostic Meta-Analysis." PloS one 11.5 (2016): e0155659.
Chaar-Alvarez FM, Warkentine F, Cross K, et al. Bedside ultrasound diagnosis of nonangulated distal forearm fractures in the pediatric emergency department. Pediatr Emerg Care 2011; 27:1027.
Herren C, Sobottke R, Ringe MJ, et al. Ultrasound-guided diagnosis of fractures of the distal forearm in children. Orthop Traumatol Surg Res 2015; 101:501.
Dubrovsky, Alexander Sasha, et al. "Accuracy of ultrasonography for determining successful realignment of pediatric forearm fractures." Annals of emergency medicine 65.3 (2015): 260-265.
Socransky, Steve, et al. "Ultrasound-Assisted Distal Radius Fracture Reduction." Cureus 8.7 (2016).
Fathi, M. et al. Ultrasound-guided hematoma block in distal radius fracture reduction: a randomized clinical trial. Emerg Med J. 2014 Jul 12.
Bear, David M., et al. "Hematoma block versus sedation for the reduction of distal radius fractures in children." The Journal of hand surgery 40.1 (2015): 57-61.
Ocular Ultrasound: From Floaters to Fogginess

Written by: Steve Chukwulebe, MD (NUEM PGY-3) Edited by: Michael Macias, MD, (NUEM Graduate 2017, US Fellow UC San Diego) Expert review by: John Bailitz, MD
The Case
A 60 year old male with a history of hypertension presents to the emergency department with three days of intermittent floaters in his right eye. Concurrently, he also notes that vision in the right eye has become progressively blurred, first starting at the base of his visual field and now advancing up towards the center of his vision. He denies any trauma to the area as well as any other neurological complaints.
Ocular Exam
Motor: PERRL, EOMI,
Superficial Exam: Clear conjuctiva, left eye cataract
Visual Acuity: OD 20/25, OS 20/40 values corrected for a distance of 10 feet from the chart
Visual Fields: Decreased in the lower quadrants of the R eye to confrontation
The Differential Diagnosis for Floaters
Retinal detachment (RD)
Posterior vitreous detachment (PVD)
Vitreous hemorrhage
Intraocular foreign body
Posterior uveitis/vitreous inflammation
Migraine w/ aura
A bedside ultrasound obtained the following image:

The patient was found to have a retinal detachment and was admitted for definitive management under ophthalmology.
Acute Vision Loss and Floaters
Floaters, often described by patients as lines, circles, dots, cobwebs, and other shapes, are common as part of the degenerative process of the vitreous body. While in the chronic setting they are thought to be related to condensation of the vitreous collagen fibers, new onset floaters in patients 50 years or older have been related to PVD in 95% of cases. Of patients with vitreous floaters and/or flashes as a consequence of PVD, the incidence of RD is 14% [1]. If the PVD is complicated by vitreous hemorrhage, the incidence of RD rises to 70%.
From a population perspective, the incidence of RD ranges between 6.2-17.9 per 100,000 people with the highest rates occurring in the age group 60-69 [2]. Additionally, patients with history of myopia or uncomplicated cataract surgery have a significantly increased risk of developing RD compared to the general population. It is also important to note that there is a 3-33% chance of bilateral involvement [3].
Using the Ultrasound for Detection of Retinal Detachment
On ultrasound, RD appears as a hyperechoic rippled (or undulating) line/membrane in the posterior to lateral globe. A recent paper in Annals of Emergency Medicine reviewed 78 articles and ultimately included three studies (or 201 eyes) in a meta-analysis to evaluate the performance of emergency physicians at identifying RD through ultrasound [4]. Though the 95% confidence intervals for sensitivity and specificity range from 60%-100% in the three studies, each study boasted high accuracy to diagnosing RD. Furthermore the receiver operating characteristic curve for the three studies had an excellent summary area of 0.97, suggesting that bedside ocular ultrasonography is an accurate tool in an emergency physician’s arsenal when a fundoscopic exam is technically challenging.
Keys to Successful Evaluation for Retinal Detachment with Ultrasound
Differentiating between RD and PVD - Keep the gain down:
Since the eye is usually a homogeneous fluid filled structure, it provides a great acoustic window for ultrasonography. Too much posterior retrobulbar acoustic enhancement decreases the observer’s ability to visualize pathology in the vitreous body. It can be difficult to see a difference between RD and PVD on ultrasound since both may present as a wavy membrane in the posterior orbit. In this case, it is important to remember that the retina is a highly reflective surface and should still be seen as a thick or stiff undulating membrane with reduced ultrasonographic gain [5]. Another trick is when asking the patient to move their eye, the PVD membrane appears to be more mobile and dynamic, as if it is moving with the motions of the vitreous, while a RD membrane tends to retain its slow oscillation.
Ultrasound both eyes not just the affected one:
Though RD commonly occurs with the classic story of painless monocular vision loss, described as if a “curtain” or a “shade” is being pulled over their eye, in this case the patient actually presented with better visual acuity in his affected eye. Remember that there is a 3-33% likelihood that a RD can be developing in the other eye.
Artifacts in the vitreous:
Artifact appears as bright echogenic material in the vitreous body that disappear when the patient is asked to move their eye. However, if a persistent hyperechoic object is seen in the body, or there is shadowing or reverberations associated with the object, this is concerning for a foreign body or vitreous hemorrhage.
Using Tegaderm bandage over the eye:
This technique provides a few advantages. One, it allows the ultrasonographer to apply as much gel as needed over the eye without the worry of getting it into the patient’s eye. It is important to note that any pressure on the eye should be avoided if there is any suspicion for globe rupture or foreign body. By applying a generous amount of gel over the eye and stabilizing the hand by placing a finger on the forehead or bridge of the nose, it is possible to stabilize the probe without having it make any contact with the eyelid. This technique also allows for easier clean up after the exam, again focusing on preventing any pressure to the eye.
Conclusion
Bedside ultrasound is a useful tool for rapidly diagnosing RD and getting the patient seen by an ophthalmologist emergently. However, if there is a high enough clinical suspicion for RD and ultrasound is negative, it is still important for the patient to receive a dilated fundoscopic exam by an ophthalmologist in a timely manner.
Expert Commentary:
Thank you for sharing this outstanding case describing one of the most straightforward and useful clinical ultrasound (CUS) applications. Few ED shifts go by when I do not need to perform an Ocular US exam. As mentioned, CUS is helpful for the evaluation of patients with suspected PVD, RD, Vitreous Hemorrhage, and Intraocular Foreign Body, but also for the assessment of patients with other ocular injuries or increased intracranial pressure. New clinicians may sometimes not perform an ocular US due to the perceived difficulty of preparing for, and safely performing the exam.
Pro-Tips on Preparing and Performing Ocular CUS Quickly and Safely
A physical examination of any sensitive structure such as the eye begins by first simply explaining the exam thoroughly to the patient. The explanation also provides a nice review for junior trainees in the room and even for the clinician sonographer! So take the time to explain the ocular ultrasound just as you would a Tonopen measurement or Slit Lamp exam.
Tegaderms are important for any patient who may not be entirely reliable or with suspected traumatic injury. However, for the experienced clinician sonographer with a reliable non-trauma patient, covering the orbit with a Tegaderm is not always necessary. Getting every artifact producing air bubble out of the way during the Tegaderm application may prove difficult. And patients may not appreciate the eye lash and brow waxing, as well as sticky residue left behind by the Tegaderm. As long as the patient agrees to keep their eyes completely until all gel is removed, the likelihood of gel getting into the eye is low. If cooperation is at all an issue, then I ask the patient their preference. From having the technique performed without a Tegaderm on myself countless times by students, and performing clinically on hundreds of patients, gel contamination is rare, and minor eye irritation even less so.
Next, recline the patient to a 45 degrees or even completely supine position. Then place a rim of gel on the clean linear probe. Ask the patient to close both eyes completely but not forcefully. Perform the exam from the head of the bed, first stabilizing your hand on the patient’s forehead, then gently placing the probe over the closed lid. With any soft tissue or musculoskeletal exam, always start with the normal side first to relearn your anatomy and optimize your settings. In particular, according to the As Low As Reasonably Achievable (ALARA) Principle, utilize the lowest Mechanical Index (MI) possible when performing ocular ultrasound. This minimizes the theoretical risk of damage to the delicate retinae from excess ultrasound energy. If you do not know how to adjust MI, then just select the Ocular preset on your machine. If you have no ocular preset, but a patient who desperately needs the ultrasound, at the very least be sure to minimize the ultrasound exam duration.
As you finish examining each eye, remind the patient to keep both eyes closed until all gel is removed. Have an assistant gently wipe any gel from the eyelid using gauze to lift the gel completely from the lid and lashes. For most CUS applications, white cotton napkins found in just about every ED work the best for gel removal. Paper towels simply smear gel, chucks are too expensive, and clothe towels hard to locate in a busy ED. For the ocular exam stick with gauze to lift all the gel away and give the patient one after you are finished just in case. With brief but adequate preparation and explanation, ocular CUS is a safe and effective technique to rapidly rule in emergent ocular pathology!

John Bailitz, MD
Associate Professor of Emergency Medicine
Program Director, Northwestern Emergency Medicine
FOAMed Resources
1. Just in Time Learning
a. Jacob Avilla’s 5 Minute Sono; http://5minsono.com/vids/
b. ACEP Sonoguide https://www.acep.org/sonoguide/smparts_ocular.html
2. Detailed Learning:
a. Introduction to Bedside Ultrasound iBook Volume 2 Chapter 16. https://itunes.apple.com/us/book/introduction-to-bedside-ultrasound-volume-2/id647356692?mt=11
b. Ultrasound of the Week: Ocular Ultrasound https://www.ultrasoundoftheweek.com/tag/ocular/
Posts you may also enjoy
How to cite this post
[Peer-Reviewed, Web Publication] Chukwulebe S, Macias M (2018, March 19). From Floaters to Fogginess. [NUEM Blog. Expert Review by Bailitz J ]. Retrieved from http://www.nuemblog.com/blog/ultrasound-in-RD.
References
Lumi X, Hawlina M, Glavač D et al. Ageing of the vitreous: From acute onset floaters and flashes to retinal detachment. Ageing Research Reviews. 21:71-77. 2015.
Mitry D, Charteris DG, Fleck BW, Campbell H, Singh J. The epidemiology of rhegmatogenous retinal detachment: geographical variation and clinical associations. British Journal of Ophthalmology. 94(6):678-684. 2009.
Gupta OP, Benson WE. The risk of fellow eyes in patients with rhegmatogenous retinal detachment. Current opinion in ophthalmology. 16(3):175-8. 2005.
Vrablik ME, Snead GR, Minnigan HJ, Kirschner JM, Emmett TW, Seupaul RA. The diagnostic accuracy of bedside ocular ultrasonography for the diagnosis of retinal detachment: a systematic review and meta-analysis. Annals of emergency medicine. 65(2):199-203.e1. 2015.
Schott ML, Pierog JE, Williams SR. Pitfalls in the Use of Ocular Ultrasound for Evaluation of Acute Vision Loss. The Journal of Emergency Medicine. 44(6):1136-1139. 2013.
AAA-OK: Approach to Imaging of Abdominal Aortic Aneurysm
Around 30% of symptomatic abdominal aortic aneurysms (AAAs) are misattributed to non-vascular causes, leading to poor outcomes. This post offers an approach to imaging of symptomatic and ruptured AAA's and presents data demonstrating that bedside ultrasound is a powerful tool when this diagnosis is in the differential.
Better than a shotgun approach to diagnosis: Ultrasound in Cholangitis
This week we discuss an interesting case and how bedside ultrasound can help you facilitate rapid diagnosis and disposition of patients presenting to the emergency department with right upper quadrant abdominal pain.
Diagnosing Pneumothorax With Bedside Ultrasound
Ultrasound is superior to chest x-ray in diagnosing pneumothorax, especially in the supine trauma patient, so consider adding it to your armamentarium of diagnostic tools in the trauma bay. Read on to learn how.