

Indications and steps for performing delayed sequence intubation
Posts filed under Procedures
Forensic Photography in the Emergency Department
Most emergency medicine physicians have ready access to their mobile phone and camera. This article reviews how best to utilize photography at the bedside to capture visually essential components of the physical exam to upload into the chart and share with other providers.
Fascia Iliaca Block
Learn this helpful technique for pain control in lower extremity injuries
Hand Nerve Blocks
Written by: Aldo Gonzalez, MD (NUEM ‘23) Edited by: Jason Chodakowski, MD (NUEM '20)
Expert Commentary by: Mike Macias, MD
Hand Nerve Blocks
Nerve blocks are the use of anesthetics to anesthetize an area by injecting directly around the nerve that innervates a certain area. It is useful when there is a large area to provide anesthesia, the area might get distorted by local infiltration and make it difficult to close the tissue, or the distribution of the area to be anesthetized is well-suited to a nerve block.
Indications
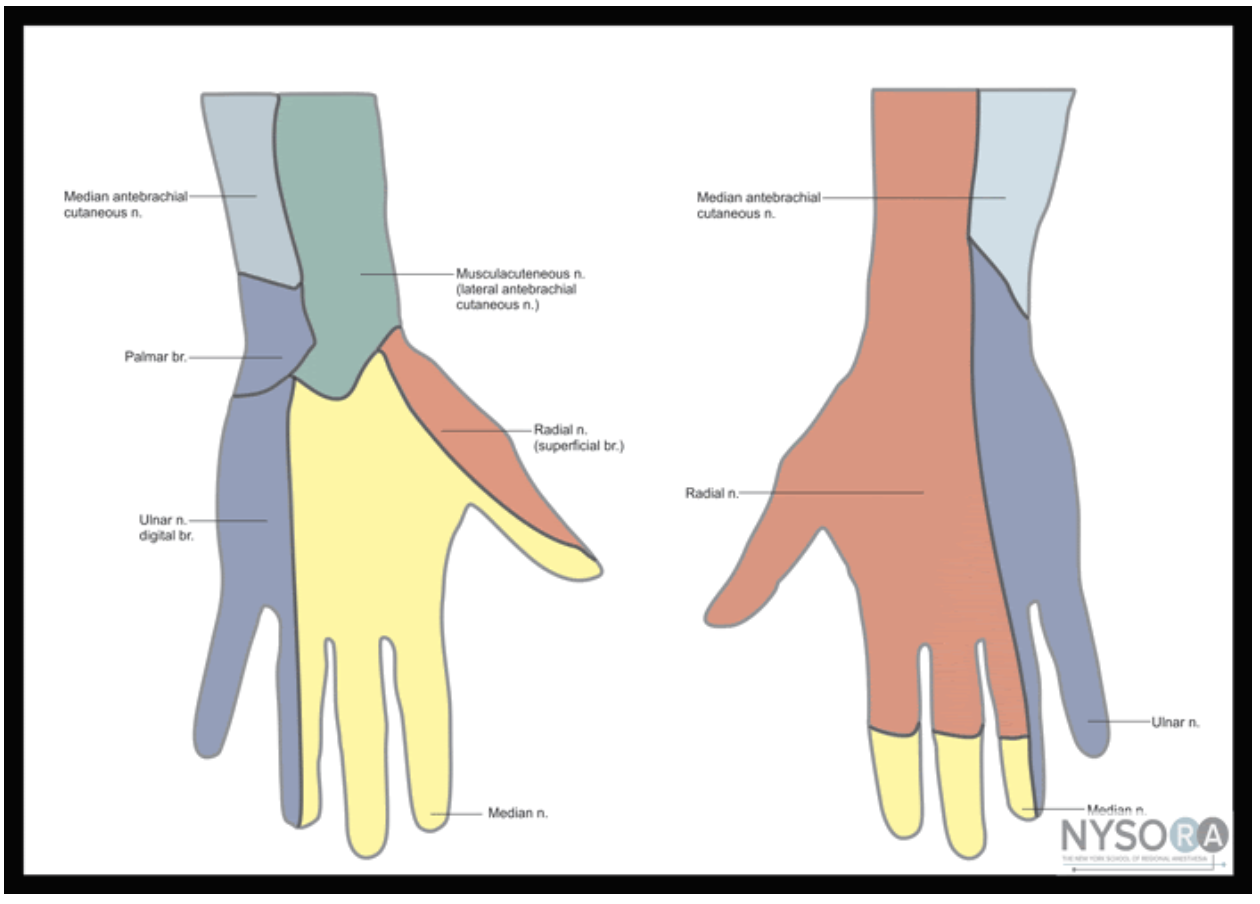
Nerve blocks of the median, ulnar, radial, and digital nerves are useful for injuries of the hand including fractures, lacerations, and burns.
Contraindication
Overlying infection
Previous allergic reaction to anesthetic
Anesthetics

Landmark versus Ultrasound guidance
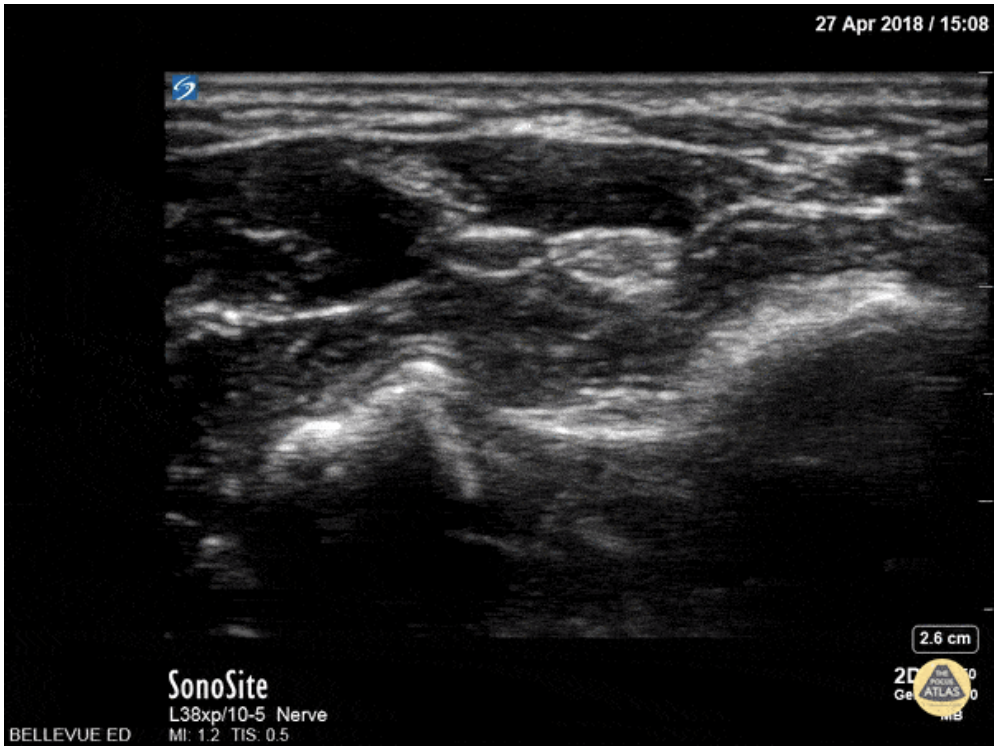
Ultrasound guidance is preferred given the ability to visualize the desired nerve and proper instillation of the anesthetic around the nerve. On ultrasound nerves are circular or triangular hyperechoic structures with hypoechoic structures within. Often described as having a “honeycomb” appearance as seen in the image of the median nerve below.
Materials
Ultrasound with Linear Transducer
Probe Cover
Sterile Ultrasound Gel
Anesthetic
10 cc syringe
18 gauge needle (to draw medication)
25-27 gauge needle at least 1.5 in in length
Antiseptic Solution (ex. Chlorhexidine)
Towel
Positioning
The patient can be either supine or seated with their arm slightly abducted and rested on a flat surface. Their elbow can be flexed with the wrist supinated and in slight extension. A rolled towel can be used for patient comfort and help in maintaining slight extension.

Figure 1: Nerves, arteries, and muscles of the human forearm
Radial Nerve Block
The superficial radial nerve travels between the flexor carpi radialis and the radial artery on anterior (volar) and lateral (radial) aspect of the forearm. Near the wrist the radial nerve splits into the medial and lateral branch of the superficial radial nerve. The block of this nerve should be performed at the mid-forearm to distal third of the forearm before the nerve splits. The nerve may be difficult to see at the distal forearm so instead it can be found proximally and followed distally. A lateral (radial) approach of the forearm provides the most direct route to the nerve.
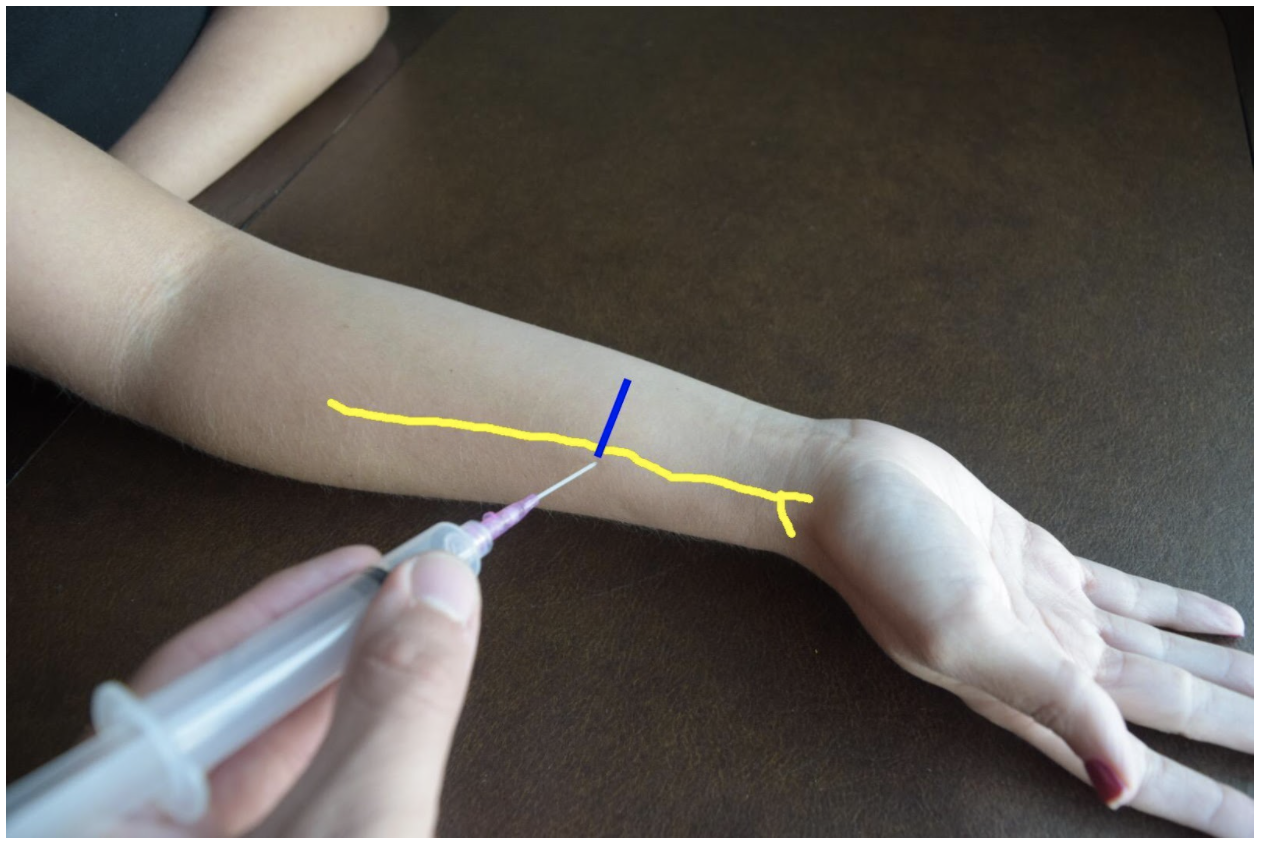
Figure 2: Demonstration of a radial nerve block using a lateral (radial) approach with in-plane ultrasound technique on a patient’s right hand. Radial nerve (yellow line) and ultrasound probe location (blue line).
Ulnar Nerve Block
At the distal forearm the ulnar nerve runs on the medial (ulnar) and anterior (volar) aspect of the forearm between the flexor carpi ulnaris tendon and the ulnar artery. The ulnar nerve lies in very close proximity to the ulnar artery in the distal forearm and increases the risk of accidental intravascular injection. It is safer to identify the ulnar nerve distally and the follow the artery and nerve proximally. Around the proximal third of the forearm the ulnar artery dives deeper and separates from the ulnar nerve. This provides a safer target. A medial (ulnar) approach of the forearm provides the most direct route to the nerve.
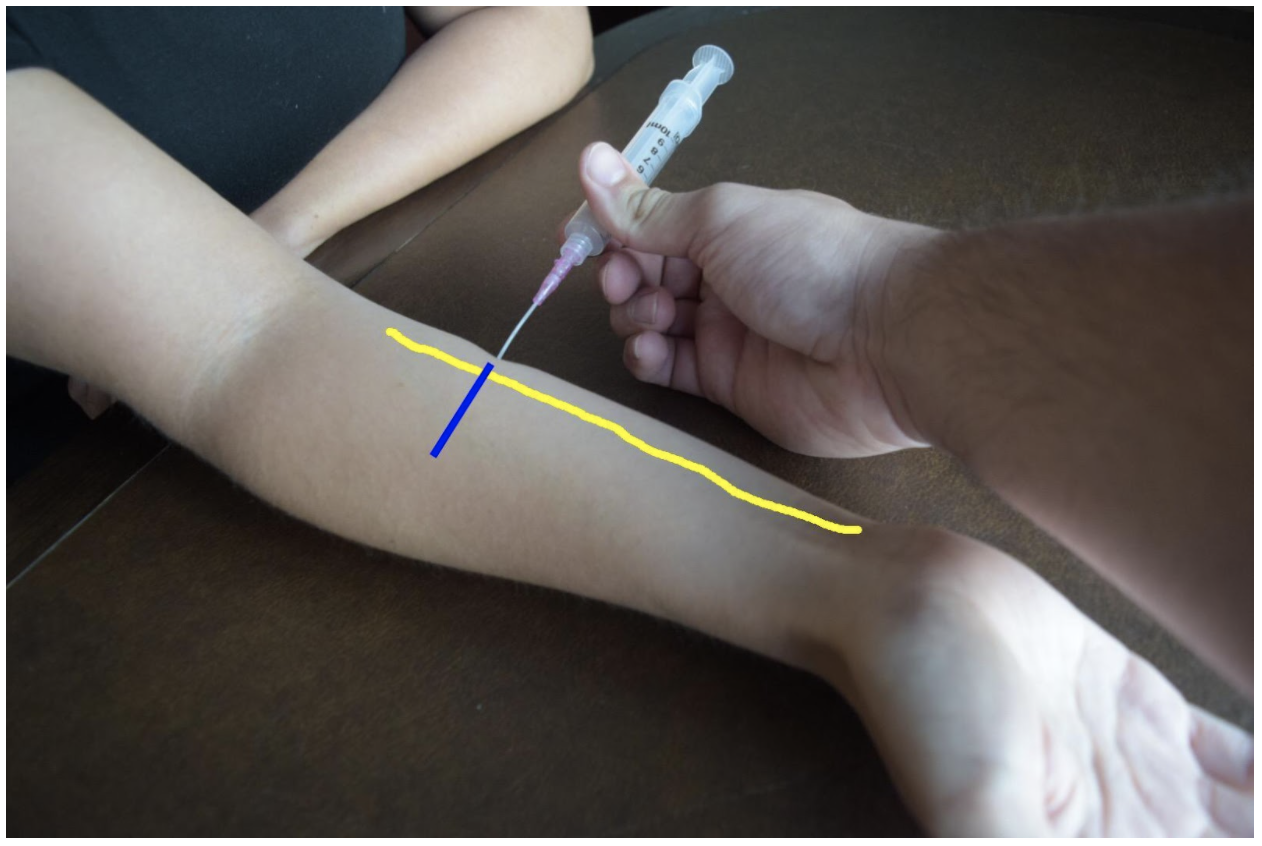
Figure 3: Demonstration of an ulnar nerve block using a median (radial) approach with in-plane ultrasound technique on a patient’s right hand. Ulnar nerve (yellow line) and ultrasound probe location (blue line).
Median Nerve Block
At the mid to distal forearm the median nerve runs in the middle of the anterior (volar) aspect of the forearm between the flexor digitorum superficialis and flexor digitorum profundus muscles/tendons. Near the wrist the nerve can be difficult to appreciate due to all the tendons of the anterior compartment of the arm. The nerve can be best appreciated at the mid-forearm. A lateral (radial) or medial (ulnar) approach can be used for in-plane technique or a mid-line approach using out-of-plane technique. Be mindful to avoid accidentally puncturing the radial or ulnar artery If using an in-plane technique with a lateral or medial approach.
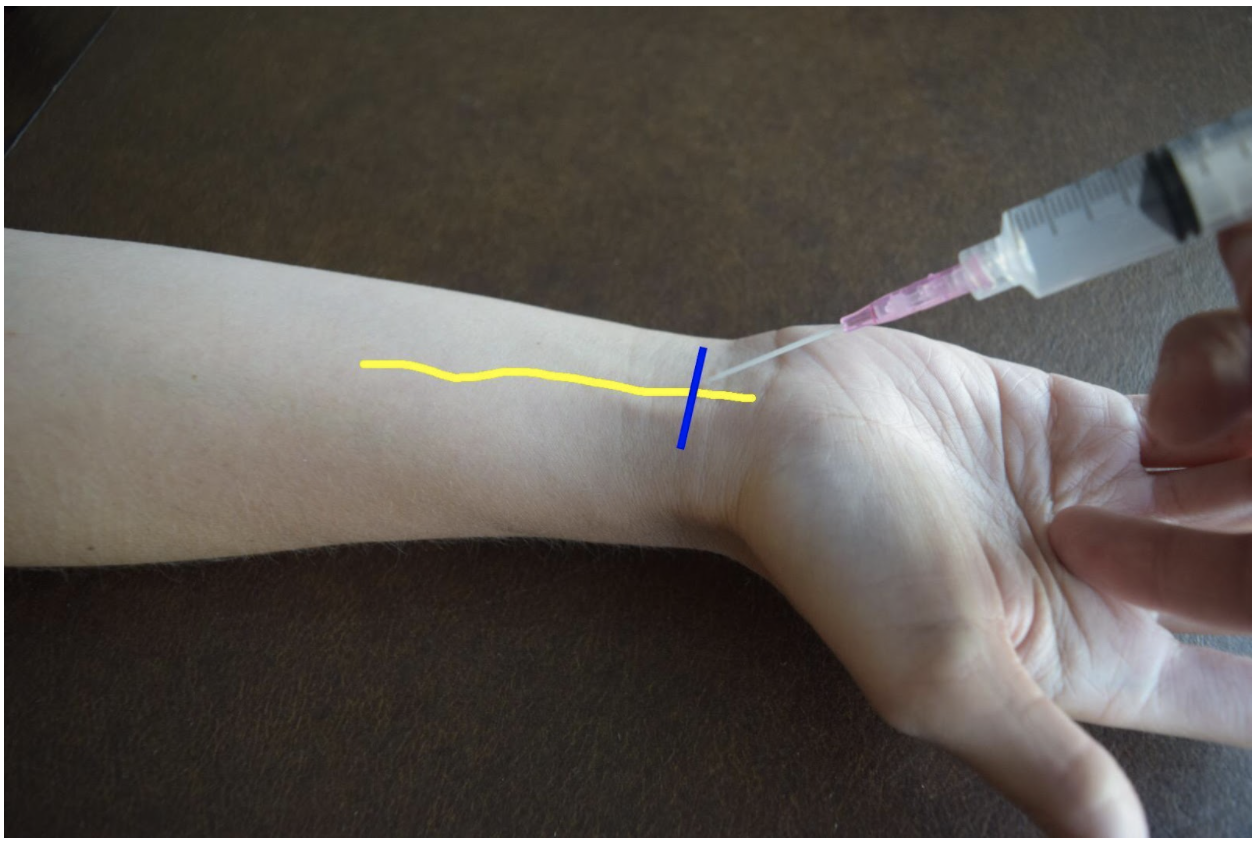
Figure 4: Demonstration of a median nerve block using a midline approach with out-of-plane ultrasound technique on a patient’s right hand. Median nerve (yellow line) and ultrasound probe location (blue line).
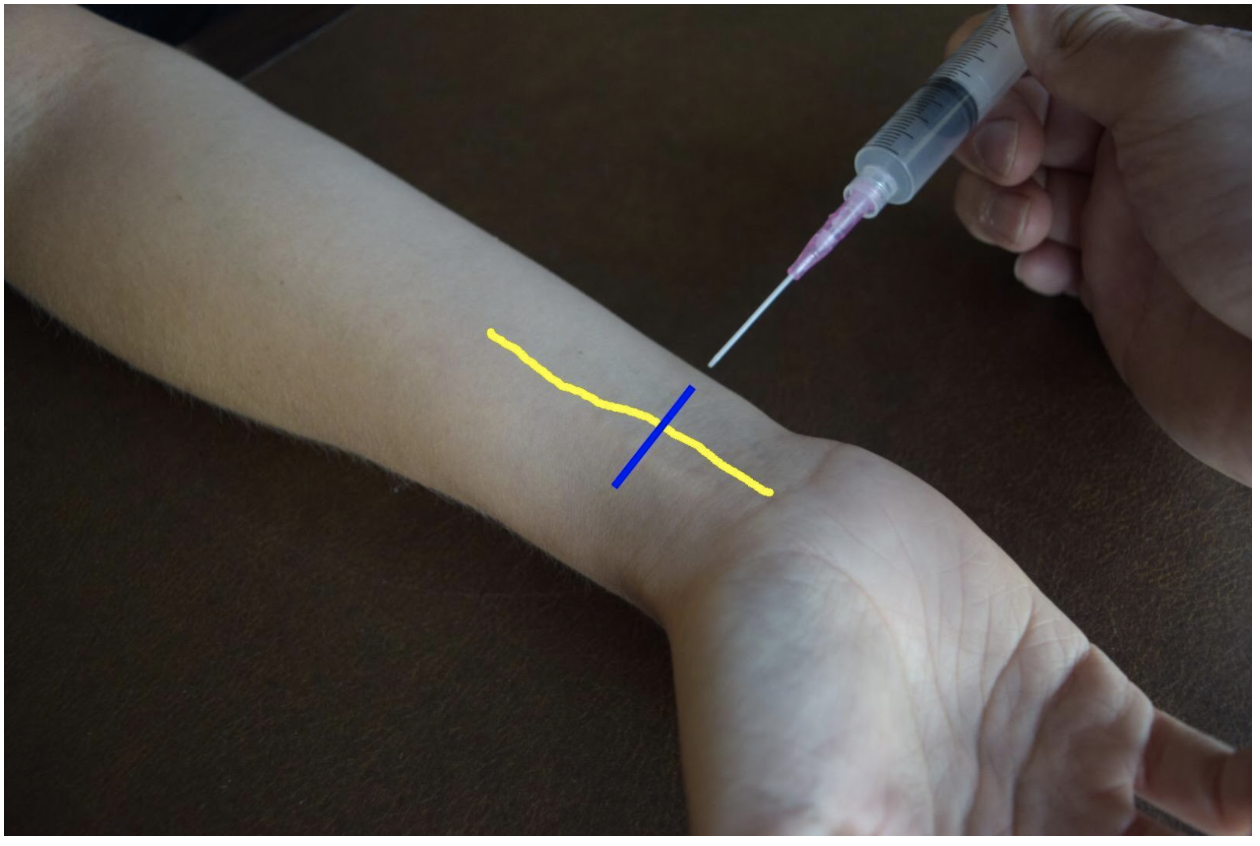
Figure 5: Demonstration of a median nerve block using a median (ulnar) approach with in-plane ultrasound technique on a patient’s right hand. Median nerve (yellow line) and ultrasound probe location (blue line).
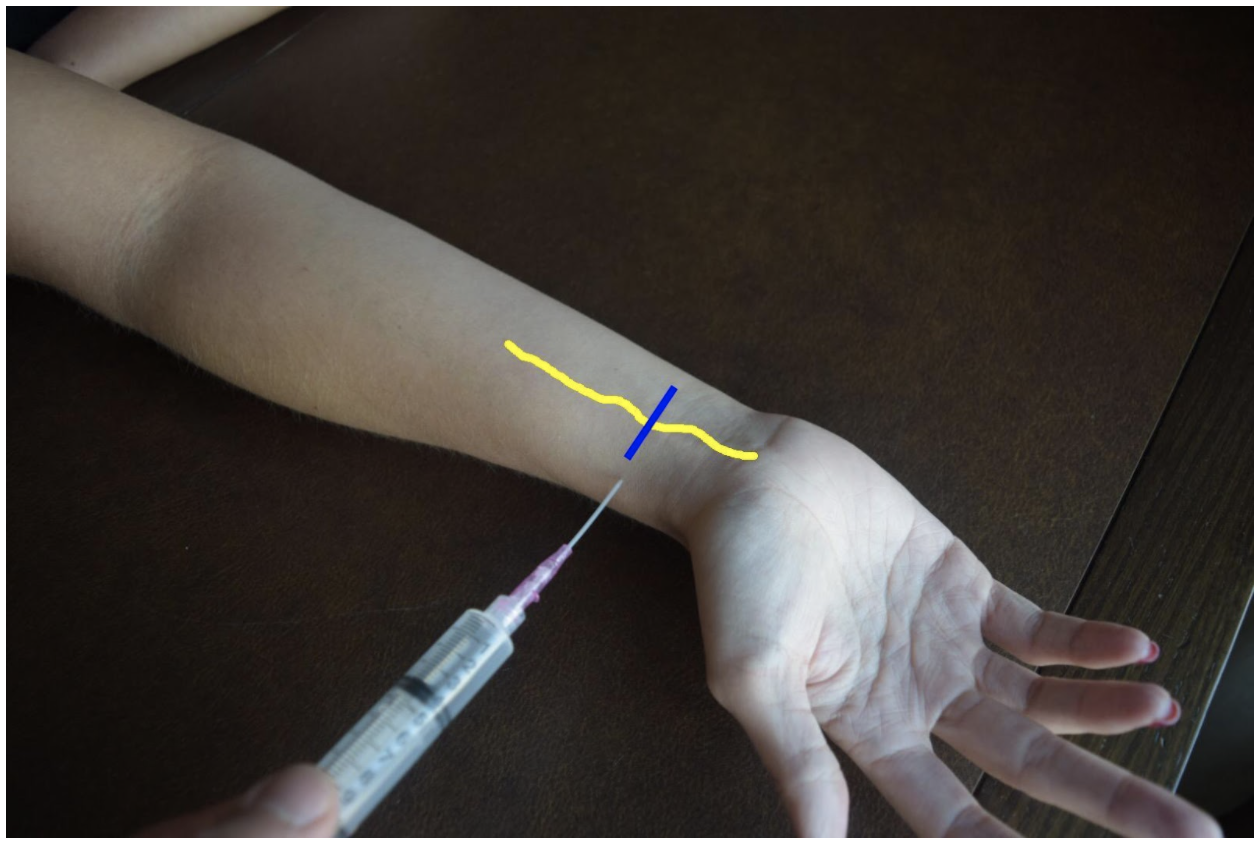
Figure 6: Demonstration of a median nerve block using a lateral (radial) approach with in-plane ultrasound technique on a patient’s right hand. Median nerve (yellow line) and ultrasound probe location (blue line).
Steps for Ultrasound-Guided Nerve Block
Document a neurological exam prior starting the procedure
Select the nerve or nerves best suited to achieve best anesthesia for the injury
Use the linear transducer to visualize the nerve prior beginning the procedure
Plan an approach and select the best site
Draw up anesthetic in the 10 cc syringe with an 18 G needle
Replace 18 G needle with 25-27 G needle
Use antiseptic solution to prepare the skin
Dawn sterile gloves
Cover transducer in sterile cover
Use ultrasound to visualize the nerve and confirm approach
Insert the needle into the skin
Advance the needle using in-plane or out-of-plane technique
Come close to the nerve but do not puncture the nerve
Draw back to confirm not with-in a vessel
Deliver 5mL of anesthetic
The nerve will become enveloped in hypoechoic anesthetic and peel away from the fascia of nearby muscles
Withdraw the needle.
Wait 3-5 minutes until patient is fully anesthetized
References
Drake, R., Vogl, A. W., & Mitchell, A. W. (2015). Gray's Anatomy for Students (3rd ed.): Elsevier.
Farag, E., Mounir-Soliman, L., & Brown, D. L. (2017). Brown’s Atlas of Regional Anesthesia (5th ed.): Elsevier.
Gray, H. (2000). Gray's Anatomy of the Human Body. 20th edition. Retrieved from https://www.bartleby.com/107/
Harmon, D., Barrett, J., Loughnane, F., Finucane, B. T., & Shorten, G. (2010). Peripheral Nerve Blocks and Peri-Operative Pain Relief (2nd ed.): Elsevier.
Pester, J. M., & Varacallo, M. (2019). Ulnar Nerve Block Techniques. In StatPearls [Internet]: StatPearls Publishing.
Roberts, J. R., Custalow, C. B., & Thomsen, T. W. (2019). Roberts and Hedges' clinical procedures in emergency medicine and acute care (7th ed.): Elsevier.
Waldman, S. D. (2016). Atlas of Pain Management Injection Techniques E-Book (4th ed.): Elsevier.
Waldman, S. D. (2021). Atlas of Interventional Pain Management E-Book (5th ed.): Elsevier.
Expert Commentary
Thank you Drs. Gonzalez and Chodakowski for the excellent post on forearm nerve blocks! This is an important skill that definitely improves the care of our patients, especially since hand injuries are such a common emergency department presentation. This is especially true for injuries that are difficult to anesthetize using traditional local injection such as dog bites, burns, abscesses, large lacerations, and fractures of the hand. I’d like to dive a little deeper into a few aspects of forearm nerve blocks:
Ultrasound guidance
I think that the days of a landmark based approach to the majority of nerve blocks are gone with the widespread availability of ultrasound and its superiority with respect to block success and reduced complications. So if you have it, use it!
Which nerve to block?
Once you have made the commitment to block one forearm nerve, it doesn’t require much additional time or effort to block a second or even a third! Often, hand injuries will span several nerve distributions so make sure you are providing adequate anesthesia. Here is a quick way to think of it:
Major hand injury (ie burn, multiple hand fractures): Triple block
Injury to radial aspect of hand or digits 1-4: Radial + median nerve block
Injury to ulnar aspect of hand or 5th digit (ie Boxer’s fracture): Ulnar nerve block
It is important to remember that forearm nerve blocks do not provide anesthesia to the volar forearm or wrist and therefore will not be adequate for distal radius fracture reduction. In this case, an above the elbow Radial nerve block should be performed.
Which local anesthetic should I use?
It’s always important to consider what the goals of your local anesthetic are when determining which one to use. If you are performing a quick procedure, the shorter the better such as lidocaine. If you are providing prolonged pain management such as with a burn, bupivicaine is a better choice. I tend to prefer lidocaine + epinephrine (duration of acton 2-2.5 hours) for most of my hand injuries. Why? In a busy emergency department managing many patients at a time, the initial block and the procedure you plan on performing (ie lac repair, fracture reduction, etc) do not always happen simultaneously (ie patient may still need x-ray, irrigation, ring removal, etc). Using lidocaine + epinephrine will allow you to provide immediate pain relief for your patient but give you time to do other tasks before the patient is ready for the procedure
Positioning
As with any procedure, the set up is extremely important. You nicely described positioning earlier but I just want to highlight a couple additional points. Make sure your patient is comfortable and your ultrasound screen is in-line with your procedure. You don’t want to be turning your head away from your block to look at the screen. For the median and radial nerve block, the patient’s arm should be supinated and resting on a hard flat surface. Both nerves can then be approached using an in-plane technique from the radial aspect of the arm. The ulnar nerve can be cumbersome to get to with this same patient positioning so I recommend abducting the shoulder to about 90 degrees and placing the arm on a Mayo stand next to the patient. This will allow an in-plane approach from the ulnar aspect of the arm. I have also found this positioning technique helpful for the ulnar nerve block.
Procedural Tips
I wanted to end with a couple of important procedural pearls I have learned during my experience with performing these blocks:
Perform a pre-block exam! Always make sure to perform and document a full neurological exam of the hand before you block any nerve. This is important because you want to make sure you know if any sensory or motor changes are present before your perform the block otherwise if a neurological deficit is noted after, it makes it difficult to tell if the block caused the new symptom (you can always wait until the anesthetic wears off but it may be awhile if you used bupivicaine).
Follow the arteries! Sometimes it can be tricky to find the ulnar and radial nerves. The easiest method is to always start distally at the wrist. Both the radial and ulnar nerves run with their paired artery so if you start here and slide proximally, you should see the nerve split away from the artery around the mid forearm. Block them here!
Target the fascial plane! The key to an effective forearm nerve block is “bathing” the nerve in anesthetic. You will want to see spread of the anesthetic around the nerve in a crescent shape, full circumferential spread is not needed. Since these nerves run in the fascial plane the goal is to get your needle tip into this plane to deposit anesthetic. There is never a need to actually touch the nerve so avoid this by aiming for the fascia and not the nerve.
Protect the hand! After you perform a forearm nerve block be sure to communicate with nursing, consultants, and the patient regarding what block was performed and how long the effects will last. If a long acting agent was used such as bupivicaine, the hand should be splinted or arm placed in a sling and instructions provided to patient regarding care at home if they are being discharged.
Thank you again for providing this excellent piece on forearm nerve blocks. I cannot stress enough how essential I think these blocks are to the toolkit of the modern emergency physician. I promise you once you add these to your practice your patient’s will thank you!

Michael Macias, MD
Global Ultrasound Director, Emergent Medical Associates
Clinical Ultrasound Director, SoCal MEC Residency Programs
How To Cite This Post:
[Peer-Reviewed, Web Publication] Gonzalez, A. Chodakowski, J. (2021, Nov 29). Hand Nerve Blocks. [NUEM Blog. Expert Commentary by Macias, M]. Retrieved from http://www.nuemblog.com/blog/hand-nerve-blocks
Other Posts You May Enjoy

Scalpel Finger Bougie
Written by: Em Wessling, MD (NUEM ‘22) Edited by: Therese Whipple (NUEM ‘20) Expert Commentary by: Joseph Posluszny, MD

Expert Commentary
Establishing an airway via a cricothyroidotomy is a stressful and tense experience. In almost all of these cases, experienced airway staff have already attempted advanced airway maneuvers in patients typically at high risk for inability to intubate. As the oxygen saturation drops and the patient becomes unstable, the most adept proceduralist present (whether emergency department physicians or surgeons) are asked to step in to secure a surgical airway.
The scalpel-finger-bougie technique is one proven and reliable method to secure a surgical airway via a cricothyroidotomy. Some additions to the technique described above are:
Use a vertical incision through the skin and soft tissues. If you are too superior or inferior with your initial incision, then this incision can be easily extended as needed. A horizontal incision commits you to that cranial-caudal level. It is often more of a struggle to identify the cranial-caudal orientation of the cricothyroid membrane rather than the medial-lateral orientation.
In a patient with a stable and flexible neck, retract the neck via cranial pressure on the chin to bring the neck structures better into your working field. Insert a shoulder roll if available (unlikely) to augment this positioning.
After the tube is advanced, listen for bilateral breath sounds. It is common, in this adrenaline fueled procedure, to advance the endotracheal tube too far, leading to a right main stem intubation. This can limit your ventilation and oxygenation and can lead to confusion about the airway placement in the neck. If there are no left lung field breath sounds, then pull the tube back until bilateral breath sounds are confirmed with auscultation.
Always verify tube placement with capnography.
Persistent, moderate volume bleeding is often from injury to the anterior jugular vein. Gentle, directed pressure on the area can control this bleeding while the patient is being transported to the operating room for a more definitive airway.

Joseph Posluszny, MD
Assistant Professor of Surgery (Trauma and Critical Care)
Northwestern Memorial Hospital
How To Cite This Post:
[Peer-Reviewed, Web Publication] Wessling, E. Whipple, T. (2021, Aug 2). Scalpel Finger Bougie. [NUEM Blog. Expert Commentary by Posluszny, J]. Retrieved from http://www.nuemblog.com/blog/scalpel-finger-bougie
Other Posts You May Enjoy
Felon
Written by: Daniel Levine, MD (NUEM ‘23) Edited by: Will LaPlant, MD, MPH (NUEM '20) Expert Commentary by: Matt Levine, MD
Expert Commentary
Thank you for the handy concise reference for felon management. Some key points of emphasis and elaboration:
A TENSE distal finger pad is what distinguishes a felon from other finger infections. A paronychia can be the portal of entry (as in this case https://www.ortho-teaching.feinberg.northwestern.edu/cases/hand/case14/index.html) . However, a paronychia alone should not cause a TENSE finger pad so check the finger pad before diagnosing a finger infection as a simply a paronychia. Flexor tenosynovitis is not localized to the distal pad and should be readily distinguishable from a felon, which is localized. Whitlow may be confused for a purulent infection but is cutaneous and again, will not have a TENSE pad.
The felon itself is an intense throbbing pain and the procedure is extensive so analgesia is a major point of emphasis for successful management.
The key to understanding the nature and treatment of a felon is knowledge of the anatomy of the distal finger. There are 15-20 discrete, noncompliant, tough fibrous septae of the finger pad which run from the periosteum to the skin. The abscess of a felon affects these unforgiving septae, which is why is it so painful. The incision must enter the septae and the dissection must break up the remaining septae to completely drain the infection. Other abscesses we drain may have loculations but not the tough septations of a felon. So the dissection must be firm enough to break these septations.
There are many different (and interestingly named) incisions that have been described to decompress a felon, like the “hockey stick” (https://lacerationrepair.com/felon-hockey-stick/) or the “fish mouth” (https://lacerationrepair.com/felon-fish-mouth/). Many sources prefer lateral approaches over volar approaches. The volar approaches incise directly through the highly innervated pad and residual paresthesia affecting finger function is a concern.
Be aware that you are dissecting just volar to the phalanx to get into these septae, so this is deep. If the etiology of the felon is direct extension from a paronychia, drain the paronychia first and see if you can access the felon by dissecting through the paronychia tract. Afterwards, insert packing or a drain. I have even seen consultants make bilateral incisions and feed a drain all the way through to facilitate drainage.
Refer all of these patients to hand clinic. One patient I had who was lost to follow up returned to the ED weeks later with osteomyelitis of the distal phalanx (https://www.ortho-teaching.feinberg.northwestern.edu/cases/bone-lesions/case4/index.html).

Matthew R Levine, MD
Associate Professor of Emergency Medicine
Northwestern Memorial Hospital
How To Cite This Post:
[Peer-Reviewed, Web Publication] Levine, D. LaPlant, W. (2021, March 8). Felon. [NUEM Blog. Expert Commentary by Levine, M]. Retrieved from http://www.nuemblog.com/blog/felon.
Other Posts You May Enjoy


Pericardiocentesis
Written by: David Feiger, MD (NUEM ‘22) Edited by: Abiye Ibiebele, MD (NUEM ‘21) Expert Commentary by: Daniel Schimmel, MD, MS
Introduction
An emergent pericardiocentesis may be a life-saving procedure and is indicated in patients with pericardial effusion and associated hemodynamic instability. The degree of pericardial effusion severity lies on a continuum and when associated with hemodynamic instability, is known as cardiac tamponade. The volume and rate at which the effusion develops most affects a patient’s hemodynamics. The clinical exam findings – hypotension, distant heart sounds, and jugular venous distention (known as Beck’s Triad) – often do not occur simultaneously if cardiac tamponade is suspected and confirmed early.
Given the urgency of the situation and severity of the patient’s clinical status, blind insertion of a needle into the pericardial space using anatomic landmarks has historically been the method of choice to restore hemodynamic stability. The availability of bedside ultrasound in many emergency departments more recently has led many physicians to pursue an image-guided pericardiocentesis. Various studies have demonstrated decreased mortality and morbidity with an ultrasound-guided approach when compared to a blind approach. However, depending on the clinical context and tools available, a blind approach may be the optimal choice.
Indications and Contraindications
Hemodynamic instability secondary to pericardial effusion, is the number one reason to perform an emergent pericardiocentesis in the emergency room. Pericardiocentesis for patients with symptomatic pericardial effusion but without hemodynamic instability may be deferred to inpatient management.
An emergent pericardiocentesis has few contraindications. Aortic dissection or cardiac free wall rupture is sometimes considered an absolute contraindication to pericardiocentesis, but in the absence of immediately available life-saving procedures, pericardiocentesis should be strongly considered. Relative contraindications include use of anticoagulation, platelets < 50K, and uncorrected coagulopathy. Furthermore, trauma patients with hemopericardium should preferentially undergo surgical pericardial drainage or emergency thoracotomy.
Blind Emergent Pericardiocentesis
Relevant Anatomy to Keep in Mind
Internal thoracic artery (internal mammary artery) – artery running cephalad to caudal on the anterior chest wall parallel to the sternum bilaterally
Neurovascular bundle – a collection of an intercostal vein, artery, and nerve running caudal to each rib
Materials
Sterile gloves, gown
Chlorhexidine swab
At least a 7 cm 18-gauge spinal needle or introducer needle if planning for continuous access to pericardial space
Syringes (10mL and 60-80mL)
Three-way stopcock
Plastic drainage tubing
Surgical clamp (optional)
1) Position the patient appropriately.
Provide respiratory support with nasal cannula or mechanical ventilation as indicated. Placing patients upright at 30 degrees to enhances comfort and allows gravity-dependent pooling of pericardial fluid.
2) Select an entry site.
Left parasternal and apical approaches are the most commonly pursued and have been shown to be superior to the classic subxiphoid approach in observational studies. When selecting an entry point, recall the location of the internal thoracic artery and subcostal neurovascular bundle. Cleanse a large area of the chest and upper abdomen with the chlorhexidine swab.
3) Insert and advance the spinal needle.
Insert the spinal needle into skin. Once the bevel is in the skin, remove the stylet, attach a three-way stopcock with a large volume syringe attached and maintain negative pressure as you advance the needle. Avoid sliding the needle laterally to prevent lacerating tissues. If a different trajectory is required, retract the needle, keeping the bevel in the skin and drive the needle at the desired angle maintaining negative pressure on the syringe. Momentary resistance may be met as the needle approaches the pericardium, but with continued advancement, a “pop” may be felt followed by aspirate in the syringe and improving patient hemodynamics. See below for more detailed instructions for each approach.

Subxiphoid
Insertion: 1 cm inferior to the left xiphocostal angle, 30 degrees with the patient’s chest
Direction: Towards left mid-clavicle. If unsuccessful, retract the spinal needle and redirect 10 degrees towards the patient’s right
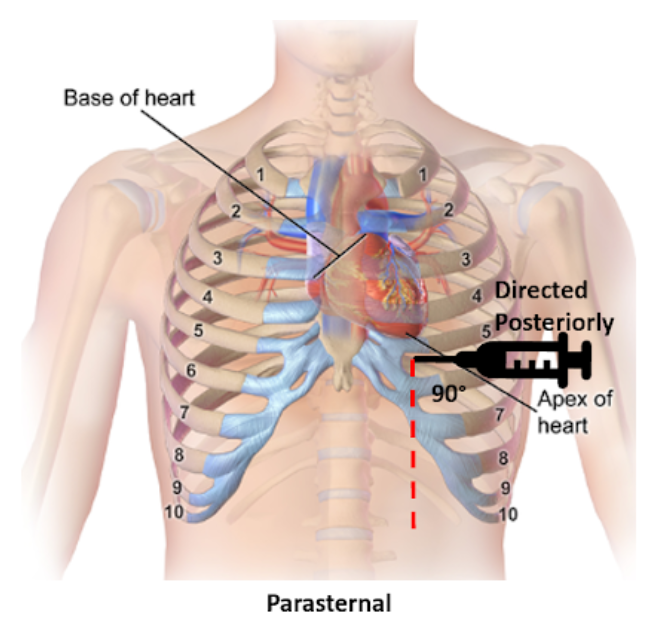
Parasternal
Insertion: Fifth intercostal space at the left parasternal border no more than 1 cm lateral, cephalad to the inferior rib and perpendicular to the patient’s chest
Direction: Posterior

Apical
Insertion: Fifth, sixth, or seventh left intercostal space approximately 6 cm from the parasternal border, cephalad to the inferior rib
Direction: Patient’s right shoulder
4) Draining the pericardial effusion.
Steady the needle with a surgical clamp at the needle shaft closest to the surface of the skin effectively preventing further needle advancement. Attach the plastic tubing to the stopcock allowing emptying of the syringe contents into a collecting vestibule without exchanging syringes. If planning to place a more permanent line (see “Establishing Continuous Access to the Pericardial Space”), consider aspirating just enough fluid to stabilize the patient’s hemodynamics and leave the remaining pericardial fluid to provide space for placing a line.
Tips for Pericardiocentesis with Ultrasound Guidance
Additional materials:
Bedside ultrasound
Sterile ultrasound probe cover
Skin marker
The safety and success of the steps above can be enhanced with bedside ultrasound. Bedside ultrasound can help prior to the procedure by finding the largest effusion nearest the skin and during the procedure by visualizing the needle trajectory in order to avoid important organs and other structures. There are several methods of ultrasound use in pericardiocentesis.
In static guidance, ultrasound is only used for procedure planning. The subxiphoid, parasternal, and apical views can be explored to find the largest effusion and determine the optimal entry. Often, the needle entry point is marked with a skin marker and another mark is made for the planned trajectory. Distance and angle from the skin to the effusion is also noted.
In dynamic guidance, the needle is passed through the skin parallel to the 2D plane created by the ultrasound probe after finding an effusion pocket. The needle can be visualized as it is advanced towards the pericardial effusion and enters the pericardial space.
No ultrasound? Hook up an EKG!
Additional materials:
Continuous EKG monitor
Wire with alligator clips
A continuous EKG can be used to prevent inadvertent traversing of the myocardium with the needle without an ultrasound. Attach one alligator clip to the needle and the other to an anterior lead on a continuous EKG. ST-elevations will be apparent on the EKG if the myocardium is touched. If ST-elevations are noted, simply retract the needle.
Confirmation of Pericardial Access with Ultrasound Guidance
Additional materials:
Bedside ultrasound
Two 10 mL syringes (one with 4 mL of saline, one with 0.5 mL of air)
Confirming success in accessing the pericardial space can also be made injecting agitated saline and visualizing bubble artifact on ultrasound. To do so, attach the two saline syringes to the three-way stopcock. Turn off access towards the patient and rapidly push the contents from one syringe to the other until the fluid appears opacified. When all the saline is in one syringe, close off the access to the empty syringe and push the fluid towards the patient, visualizing it on the ultrasound. Confirmation is especially important when blood is aspirated and helps distinguish between pericardial versus ventricular placement.
Establishing Continuous Access to the Pericardial Space
Additional materials:
Flexible or curved-tip (J) guidewire
6-8 Fr drainage catheter (pigtail, sheath, or central venous catheter)
7 cm or longer 18-gauge introducer needle (as opposed to spinal needle)
Dilator
11 blade scalpel
Suture
Needle driver
Many of the materials above may be found in a central venous kit. Using the Seldinger technique, a line can be placed for continuous access to the pericardial space. Ensure that an introducer needle is used when initially accessing the pericardial space. Keeping the surgical clamp and needle in place, remove the stopcock and syringe, and gently advance the guidewire just beyond the bevel of the needle. Remove the introducer needle, ensuring the guidewire does not move, and use the scalpel to make a short incision at the guidewire’s entry into the skin. Advance the dilator over the guidewire to loosen the tissue. Remove the dilator leaving the guidewire in place and advance the drainage catheter just 1 cm beyond the guidewire into the pericardial space. Retract the guidewire while maintaining the position of the catheter, aspirate fluid to confirm placement, and secure the drain’s position with sutures and placement of a sterile dressing. Further confirmation of proper placement can be made using the agitated bubble study as described in “Confirmation of Pericardial Access with Ultrasound” above.
Conclusion
There are very few contraindications for an emergent pericardiocentesis in a patient with pericardial effusion and hemodynamic instability. While ultrasound-guided pericardiocentesis have lower morbidity and mortality rates, clinical context and emergent patient decompensation may make an image-guided procedure infeasible. Apical and parasternal access with a blind procedure have fewer complications than a subxiphoid approach. A pericardiocentesis may be a life-saving intervention as even a small amount of fluid aspirated may dramatically improve a patient’s hemodynamics.
Expert Commentary
Thank you Dr. Feiger for this excellent summary of pericardiocentesis. From center to center there can be variability in the expertise and mechanism through which pericardiocentesis is performed. Some institutions may have an echo focused pericardiocentesis service, while some institutions may perform the bulk of their pericardiocentesis in an interventional suite with the assistance of fluoroscopic imaging. However, there are times when pericardiocentesis must be performed as an emergency procedure with landmark guidance. Luckily, point of care ultrasound has been very commonplace in the emergency department and intensive care units facilitating visualization of fluid pockets that can be identified for safer access and to demonstrate successful drainage at the end of the procedure.
The relevant anatomy and associated complications from tissue injury during needle advancement for pericardiocentesis changes depending on the planned access route.
Subcostal
Liver laceration or puncture
Pneumothorax
Right atrial or ventricular laceration
Apical
Pneumothorax
Left or right ventricular laceration
Parasternal
Pneumothorax
Right ventricular laceration
In each location, careful use of ultrasound can avoid potential life-threatening complications. How the ultrasound is used also varies depending on location. Generally the ultrasound can be used to identify a path and I will have trainees hold the ultrasound the exact same way as they would hold their needle to mimic the path they will use when advancing into the pericardial space.
Common errors that I have seen are listed below.
Moving the needle side to side while it is in the body to try and find the appropriate space. I am impressed at the body’s ability to tolerate a straight in and out movement of a needle. But moving a needle tip back and forth creates lacerations that are difficult to heal and may result in tissue damage and uncontrollable bleeding requiring surgical intervention.
Moving the needle to find it under ultrasound, rather than moving the probe to find the needle can be dangerous. If the needle is in the wrong location, it should be moved. Otherwise, do not bounce the needle within the body to try and identify it on ultrasound.
A common subcostal error is needle path facing towards the spine through the torso. The subcostal position can be more successful with the patient upright at 30 degrees so that the fluid layers to the bottom portion of the heart, increasing the pocket size for needle entry. However, this position then requires the physician to aim slightly up, almost moving parallel to the ribs, to avoid needle entry being too low and passing underneath the effusion.
Also from the subcostal position, the initial position angle for subcostal pericardiocentesis should be to the left middle cervical bone as Dr. Feiger mentioned. However, many performing subcostal pericardiocentesis overcompensate initially and head too laterally to capture fluid.
From the apical position, the fluid is likely best obtained with the patient in the left lateral decubitus position. A drop door that is often present on an sonographer’s bed for performing echocardiograms is nice but not necessary.
As mentioned, the cardiac probe is not generally used to watch needle entry but to identify the most optimal path. However, if also equipped with a vascular probe, in the parasternal location, the vascular probe can easily watch the needle enter into the pericardial space while avoiding delicate structures like the internal thoracic artery.
Using fluoroscopic guidance, needle location can be identified in relation to the movement of the cardiac border and wire advancement can be used to identify a course consistent with the pericardial space and not limited by other cardiac structures. A small amount of contrast can be injected into the space and seen to highlight the cardiac borders allowing confirmation of the pericardial space.
But in the absence of fluoroscopy, and a more specific confirmation, an echo with agitated bubbles injected can verify presence of the needle, or a microcatheter, in the pericardial space. If after injection, bubbles are seen within the cardiac chambers, the needle should be withdrawn. If possible to obtain a pressure measurement during the procedure, this is one other guide to inform the operator of the needles location. If a right ventricular waveform Is present, the needle has entered the ventricular space. It may be possible to withdraw the needle until the high pressures of the ventricle reduce and if the needle aspirates, another agitated bubble injection can be performed.
An urgent pericardiocentesis with a large effusion can be easily performed at the bedside, particularly with the aid of an ultrasound and knowing the anatomy with immediate improvement in hemodynamics. Send the fluid for analysis and exchange the needle for a drain to ensure patient stability until the evaluation is complete.

Daniel Schimmel, MD, MS
Interventional Cardiologist
Northwestern Memorial Hospital
Associate Professor
Feinberg School of Medicine
How To Cite This Post:
[Peer-Reviewed, Web Publication] Feiger, D. Ibiebele, A. (2021, Feb 8). Pericardiocentesis. [NUEM Blog. Expert Commentary by Schimmel, D]. Retrieved from http://www.nuemblog.com/blog/pericardiocentesis.
Other Posts You May Enjoy


References
Gueria, Rajesh. “Ultrasound Guided Procedures in Emergency Medicine Practice - Pericardiocentesis.” Sonoguide, 2008, www.acep.org/sonoguide/pericardiocentesis.html.
Heffner, Alan C. “Emergency Pericardiocentesis.” Edited by Allan B Wolfson et al., UpToDate, 29 May 2019, www.uptodate.com/contents/emergency-pericardiocentesis?search=pericardiocentesis&source=search_result&selectedTitle=1~65&usage_type=default&display_rank=1.
Konnoff-Phillips, Kelly and Janis Provinse, directors. Agitated Saline Bubble Study. Highland Hospital Emergency Department, 2015.
Maisch, Bernhard, and Sabine Pankuweit. Interventional Pericardiology: Pericardiocentesis, Pericardioscopy, Pericardial Biopsy, Balloon Pericardiotomy, and Intrapericardial Therapy. Springer, 2011.
Nicks, Bret A, et al. Emergency Pericardiocentesis. New England Journal of Medicine, 22 Mar. 2012, www.nejm.org/doi/full/10.1056/NEJMvcm0907841.
Temporomandibular Joint Reductions
Written by: Trish O’Connell, MD (PGY-2) Edited by: Jacob Stelter, MD (PGY-3) Expert commentary by: Matt Levine, MD

Expert Commentary
That was a high yield visual guide to TMJ reductions. Earlier in my career I was often frustrated by these cases. I was taught the traditional reduction method. I found myself having to sedate the patient and stand on the bed to generate enough downward force. This was awkward and I was still usually unsuccessful. The wrist pivot method really changed my practice. I found it required less sedation, easier to generate force without awkward positioning, required less physical strength, and led to higher success rates for me. My current practice is to have a patient roll a 10mL syringe in their mouth while I am setting up, which usually doesn’t work, and to proceed with the wrist pivot technique if still dislocated.
While procedural sedation has evolved away from versed and more towards agents such as ketamine, etomidate, and propofol, versed remains an ideal agent for TMJ reduction. It provides good anxiolysis and is a better muscle relaxant than etomidate and ketamine. The deep sedation of propofol is unnecessary.
When the sedated patient awakens, beware of “the yawn”! I’ve had patients dislocate again that way, to the chagrin of the patient (and the benefit of the procedure-seeking resident). Wrapping Kerlex gauze under the chin and around the top of the head until the patient is alert enough to avoid full yawning will prevent “the yawn.”
The main role of imaging is to rule out associated fracture. Plain films are generally inadequate to confirm or rule out TMJ dislocation. If you really need imaging, CT is the best test. If the patient had no trauma but their mouth is stuck open, you usually won’t need imaging.

Matthew R. Levine, MD
Assistant Professor
Department of Emergency Medicine
Northwestern University
How to Cite this Post
[Peer-Reviewed, Web Publication] O’Connell, T, Stelter, J. (2020, Mar 2). Temporomandibular Joint Reductions. [NUEM Blog. Expert Commentary by Levine M]. Retrieved from https://www.nuemblog.com/blog/tmj-reduction
Other posts you may enjoy
Featured


Oral Nerve Blocks

Written by: Vytas Karalius, MD, MPH (PGY-2) Edited by: Andrew Cunningham, MD (NUEM ‘19) Expert commentary by: Jeffery Hill, MD, MEd
Nerve Blocks of the Head & Neck Part III:
Oral Nerve Blocks
“I can’t feel my face when I’m with you…. but I love it.” – The Weeknd
About this series…
This article is part of a series of articles on the nerve blocks of the head and neck. For more information on other types of useful nerve blocks, please refer to the links below:
Nerve Blocks of the Head & Neck Part I: Facial Nerve Blocks
Nerve Blocks of the Head & Neck Part II: The Occipital Nerve Block
Oral Nerve Blocks
What are the advantages to oral nerve blocks?
Regional nerve blocks can be used in the ED for their ease, efficacy and efficiency in providing anesthesia for common procedures and complaints.
Facial nerve blocks are particularly useful and have several advantages:
Better anesthesia: Provides comparable, sometimes even better, anesthesia
Less needle pokes: Provides complete anesthesia without multiple needle pokes, making them great for the difficult patient, and results in a happier patient and safer procedure
Less pain medications: Decreases opiate and other oral analgesic use
The Set-Up
In addition to the materials you might need for the rest of the procedure, you will need the following items for the nerve block:
Anesthetic (see below)
5mL or 10mL syringe
Blunt fill or 18 gauge needle
25-27 gauge needle
Gauze
Long cotton tipped applicators and/or cotton pledgets
Personal protective equipment – gloves and eye protection are a must
Bite block if necessary
Appropriate, dedicated lighting such as an overhead lamp
Choices of Anesthetic
For oral nerve blocks, use bupivacaine with epinephrine when available. Oral/dental pain can be immensely painful and compromise a patient’s quality of life. The longer you can provide pain relief until they receive definitive care, the better off they will be.

Table 1: Commonly used local anesthetics. Courtesy of our NUEM Clinical Pharmacologist, Dr. Kelsea Caruso, PharmD.
Table adapted from Pharmacology and Physiology for Anesthesia, Chapter 17, 291-308.
General Considerations to Reduce Pain Include:
Using buffered anesthetic
Avoiding cold/refrigerated anesthetic – allow time to warm up to room temperature
Decreasing the rate with which you infiltrate (you’re not pushing adenosine)
Special Considerations for pediatrics:
Depending on your resources, distraction with iPads, child-life specialists, etc. can help improve your success as well.
Hide the needle from view while preparing for the procedure.
Do not forget that the parent can also help with positioning and de-escalating the patient’s anxiety.
Special Considerations for Oral Blocks:
Topical lidocaine should be used prior to nerve block – this will greatly increase the patients’ comfort, their ability to remain still, and ultimately, your success.
Method 1: Ask them to swish viscous lidocaine around in their mouth for about 30 seconds, or as long as they can tolerate it.
Method 2: Soak and generously coat 1-2 cotton tipped applicators (Q-tips) or cotton pledgets with viscous or regular lidocaine and place them in the buccal mucosa at your intended target for 1-5 minutes.
The Anatomy
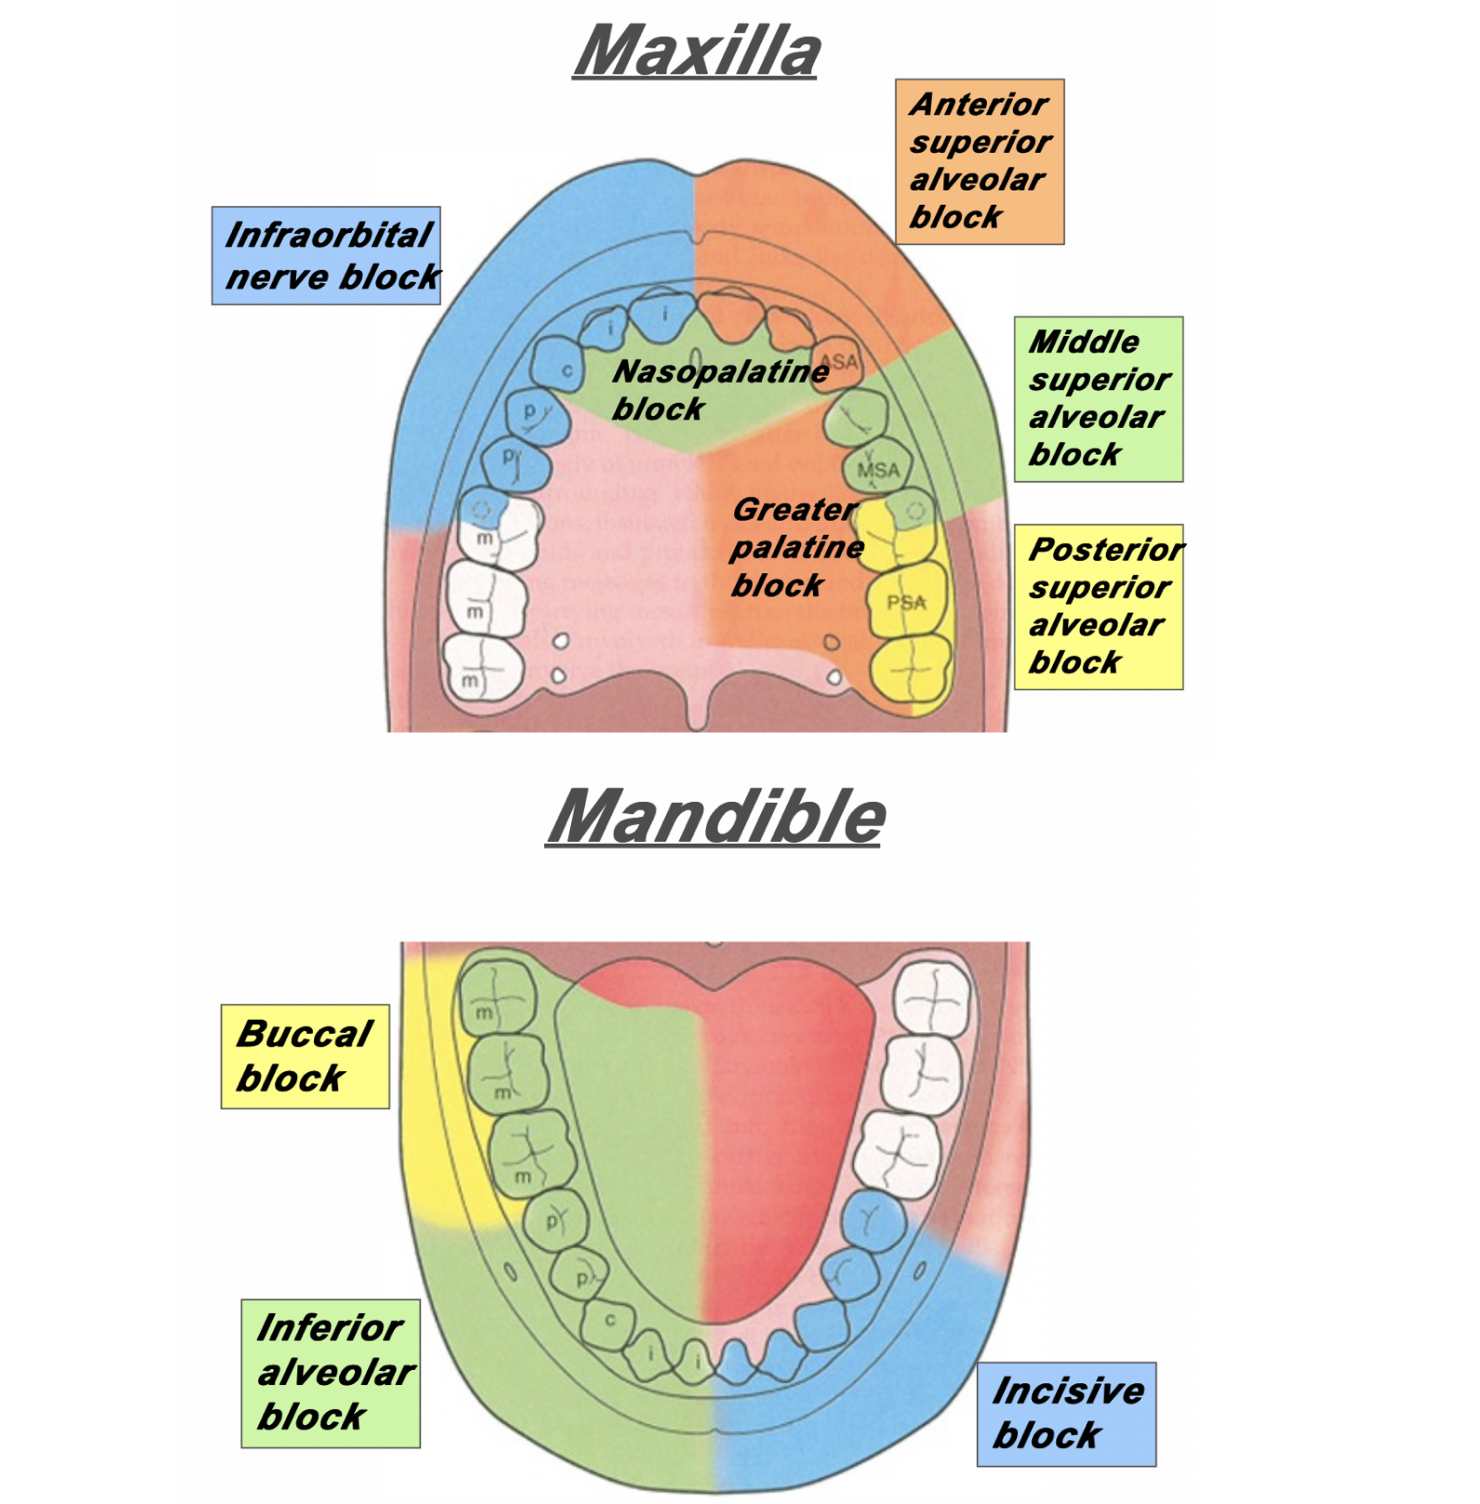
Figure 1: The area of distribution of areas innervated by different nerves of the maxilla and mandible.
Superior Alveolar Nerve Blocks
Step 1: Apply topical anesthetic as discussed earlier to make entry with the needle more comfortable.
Step 2: Retract the lip. Insert your needle through the mucobuccal fold at the at the area locations depicted in Figure 2, Figure 3 and Figure 4.
Step 3: With the bevel facing the maxilla, inject 1-3mL of anesthetic.
![Figure 2: For the posterior superior alveolar nerve, enter just posterior to the root of the second molar. [1]](https://images.squarespace-cdn.com/content/v1/549b0d5fe4b031a76584e558/1579525643429-1EWBG1XTA7ZHHJ5PSYYT/PosteriorSuperiorAlveolarBlock.png)
Figure 2: For the posterior superior alveolar nerve, enter just posterior to the root of the second molar. [1]
![Figure 3: For the middle superior alveolar nerve, enter between the first molar and second premolar. [1]](https://images.squarespace-cdn.com/content/v1/549b0d5fe4b031a76584e558/1579525901957-HQGE6VTL16IGCXYIHRTV/Screen+Shot+2020-01-20+at+7.10.54+AM.png)
Figure 3: For the middle superior alveolar nerve, enter between the first molar and second premolar. [1]
![Figure 4: For the anterior superior alveolar nerve, enter just above the canine tooth. [1]](https://images.squarespace-cdn.com/content/v1/549b0d5fe4b031a76584e558/1579527033350-0S15C2ABWP6RQIMEVBDD/AnteriorSuperiorAlveolarNerve.png)
Figure 4: For the anterior superior alveolar nerve, enter just above the canine tooth. [1]
Inferior Alveolar Nerve Block
Step 1: Apply topical anesthetic as discussed earlier to make entry with the needle more comfortable.
Step 2: Retract the lip/cheek and with the same hand, palpate the coronoid notch with your thumb.
Step 3: With your syringe, enter at an angle in which you are approaching from the contralateral incisor.
Step 4: Insert the needle about 1-2cm posterior to your thumb.
Step 5: Inject 1-3mL of local anesthetic.
![Figure 5: The approach and anatomy of the alveolar nerve block. [1]](https://images.squarespace-cdn.com/content/v1/549b0d5fe4b031a76584e558/1579196433624-MHAVFNTG93XWF0PB1K45/blogpost10.png)
Figure 5: The approach and anatomy of the alveolar nerve block. [1]
Mental Nerve Block & Infraorbital Nerve Block
Mental nerve and infraorbital nerve blocks can also be used to supply anesthesia to the mouth and oral cavity.
These can be found in Part I of our series of Nerve Blocks of the Head and Neck: [insert link].
The infraorbital block can be very useful in conjunction with a superior alveolar block for patients with extensive facial pain stemming from their dental complaints.
Please note: the mental nerve block does not supply anesthesia to the teeth – only the lips, skin and buccal tissue. For anesthesia to the bottom teeth, an inferior alveolar nerve block is recommended (Figure 1).
Expert Commentary
Thank you for this concise review of a necessary and practical skill for any Emergency Medicine provider. As you point out performing oral blocks not only can facilitate laceration repair/abscess drainage but they can also immediately relieve a patient’s pain from acute or chronic pulpitis or a developing peri-apical abscess.
Here are a couple of additional tips/points of reinforcement:
Patient positioning and lighting is key to identifying landmarks - When you are the recipient of these blocks in a dentist office you will note that they have you lying nearly completely and that they have exceptionally bright overhead lights. Trying to perform these blocks with the patient sitting upright is a literal pain in the back and not having a bright light sources means you are going mostly be feel. So, for all these patients, I recommend lying them back in the bed with the HOB at approximately 20 degrees. And, I recommend either a headlamp, swinging over an overhead light (if available), or bringing in a portable light source.
Superior Alveolar Nerve Blocks can be tough - I often find that those that are first learning dental blocks shy away from the superior alveolar nerve blocks. I, personally find them to be a bit more difficult than the inferior alveolar nerve blocks and, consequently, also find that my success rate is not as good as with inferior alveolar nerve blocks. However, when they do work, they are every bit as effective in helping your patient feel better in a dramatic way. And since you will always be better at the procedure you have done 50 times than the procedure you have done once or twice, I heartily encourage offering this to patient’s with upper dental pain. Over time I have found greater success with the procedure by ensuring that I am placing my needle and instilling my anesthetic about 1 mm above the junction of the buccal and gingival mucosa. If you try to instill into the gingival mucosa, it tends to be quite a painful injection and somewhat less effective as a block.
Talk it up, but Don’t Sell it as a Cure All - I offer dental blocks to nearly all of my patients that present with dental pain. I think it is a highly effective way to immediately take care of the patient’s pain. When you are talking to your patient’s about the procedure, let them now that they could have up to 8 hours of pain relief but that every patient is different in the way they metabolize the anesthetic and the blocks themselves will have variable effectiveness (how close did you get to the nerve, how much did you still, etc). I also let them know that there is a chance you might miss your mark and the block won’t be effective which would either necessitate a second attempt or an alternative approach to controlling their pain.

Jeffery Hill, MD, MEd
Assistant Professor of Emergency Medicine
Assistant Residency Program Director
University of Cincinnati Health
References
Ailes D, Waseem M. Regional Anesthesia (Nerve Blocks). In: Ganti L. (eds) Atlas of Emergency Medicine Procedures. Springer, New York, NY. 2016.
Cepeda MS, Tzortzopoulou A, Thackrey M, Hudcova J, Arora Gandhi P, Schumann R. Adjusting the pH of lidocaine for reducing pain on injection. Cochrane Database Syst Rev. 2010 Dec 8;(12).
Hollander JE, Camacho, M. Assessment and management of facial lacerations. Stack AM, Wolfson AB, ed. UpToDate. Waltham, MA: UpToDate Inc. https://www.uptodate.com (Accessed on March 20, 2019.)
Hsu DC. Clinical use of topical anesthetics in children. Stack AM, Wiley JF, ed. UpToDate. Waltham, MA: UpToDate Inc. https://www.uptodate.com (Accessed on March 20, 2019.)
Jeng CL, Rosenblatt MA. Overview of peripheral nerve blocks. Maniker R, Crowley M, ed. UpToDate. Waltham, MA: UpToDate Inc. https://www.uptodate.com (Accessed on March 20, 2019.)
Spangler RM, Abraham MK. Regional Anesthesia of the Head and Neck. In: Roberts and Hedges’ Clinical Procedures in Emergency Medicine and Acute Care. Elsevier Inc, Philedelphia, PA. 2019: Chapter 30, 545-559.
Suzuki S, Koköfer A, Gerner G. Local Anesthetics. In Hemmings HC & Egan TD, eds. Pharmacology and physiology for anesthesia: foundations and clinical application, 1st ed. Saunders, Philedelphia, PA. 2013: 291-308.
All images were obtained from:
[1] Spangler RM, Abraham MK. Regional Anesthesia of the Head and Neck. In: Roberts and Hedges’ Clinical Procedures in Emergency Medicine and Acute Care. Elsevier Inc, Philedelphia, PA. 2019: Chapter 30, 545-559.
How to Cite This Post
[Peer-Reviewed, Web Publication] Karalius V, Cunningham, A. (2020, Jan 20). Oral Nerve Blocks. [NUEM Blog. Expert Commentary by Friedman, B]. Retrieved from http://www.nuemblog.com/blog/oralnerveblock
Other Posts You Might Enjoy…
Occipital Nerve Block
Written by: Andrew Rogers, MD (PGY-2) Edited by: Aaron Quarles, MD (NUEM ‘19) Expert commentary by: Ben Friedman, MD
Nerve Blocks of the Head & Neck Part II:
The Occipital Nerve Block
About this series…
This article is part of a series of articles on the nerve blocks of the head and neck. For more information on other types of useful nerve blocks, please refer to the links below:
Nerve Blocks of the Head & Neck Part I: Facial Nerve Blocks
Nerve Blocks of the Head & Neck Part III: Oral Nerve Blocks
Introduction/Overview
An occipital nerve block is a peripheral nerve block performed on the greater and lesser occipital nerves to help treat headache. Occipital nerve block (ONB) has been used in the treatment of cervicogenic headache, cluster headache, and occipital neuralgia, with demonstrated efficacy in improving pain and reducing headache frequency (1-3). By definition, occipital neuralgia will respond to ONB, and failure of symptoms to resolve should raise into question of the original diagnosis (2, 3).
Occipital nerve block may also be efficacious in the treatment of migraine. In a retrospective cohort study of 562 patients who received at least one greater occipital nerve block (GONB) for the treatment of migraine, 82% had >30% reduction in numeric pain scale from baseline with 58% having a >50% improvement (4). Recently, a small, randomized, sham-controlled trial of GONB performed in the Emergency Department for migraine refractory to metoclopramide therapy demonstrated greater short-term headache relief (5). GONB may be particularly useful in migraine patients with evidence of occipital nerve irritation or tenderness.
Indications
Occipital neuralgia
Cluster headache
Cervicogenic headache
Migraine, particularly with occipital nerve irritation or tenderness
Contraindications
Medication allergy
Infection overlying site of injection
Skull defect
Anatomy
Key anatomy points of review:
The occipital nerve originates from C2-C3 nerve roots
The GON perforates the fascia just underneath the superior nuchal ridge
The GON lies just medial to the occipital artery

Figure 1: Greater Occipital Nerve Anatomy (6)
What to Inject
Typically, a local anesthetic such as lidocaine (1-2%) or bupivacaine (0.5%) (or a combination of the two) is injected.. Lidocaine has a quicker onset, while bupivacaine has a longer lasting effect. Total volume injected is 2-4cc per nerve block.
A steroid such as such as betamethasone (2-4mg) or triamcinolone (10-20mg) may be added to the local anesthetic (3). For the Emergency Physician, one should consider how the addition of a steroid may complicate or impact a patient’s follow up with their primary neurologist or primary care physician. Additionally, one study failed to show a significant difference in headache relief for transformed migraines treated with or without triamcinolone in addition to local anesthetic (7).
The Procedure:
Identify the location of the GONB via one of 3 methods:
Palpate the occipital artery pulse about 2cm lateral to the occipital protuberance. The greater occipital nerve is just medial to the occipital artery
Alternatively
Palpate the occipital protuberance and the mastoid process (on side of interest). Measure 1/3 the distance between the two points starting from the occipital protuberance. Stay just superior to the superior nuchal line to remain over the cranium. (Figure 2)
Alternatively
Identify the point of maximal tenderness in the general region as defined above that may elicit paresthesia in the occipital nerve distribution when palpated
Clean the site of injection with an alcohol swab or similar cleaning solution.
Using a 23-25G needle, insert the needle at a 90-degree angle toward the occiput until a bony endpoint is obtained. Aspirate to avoid intravascular injection and to prevent injection into CSF. Inject 1cc at the GON, 1cc medial to the nerve, and 1cc lateral to the nerve.
The procedure can be performed bilaterally.

Figure 2: Representative schematic to aid in locating the greater occipital nerve, using method 1(b) as described above.
Key Points:
The greater occipital nerve block can used in the treatment of refractory migraine, cluster headache, occipital neuralgia, or cervicogenic headache
If palpation of the GON reproduces headache pain or irritation, it may be a good target for GONB
A GONB can be performed bilaterally if needed
Use local anesthetics such as lidocaine and/or bupivacaine
Aspirate while inserting the needle to avoid intravascular injection and to avoid being in CSF
Inject in a fanning technique just medial to the occipital artery pulse, one third of the distance from the occipital protuberance to the mastoid process, or at the site of maximal tenderness in the region
Expert Commentary
This well-written and informative review of the greater occipital nerve block (GONB) will help clinicians choose appropriate patients for this procedure and perform it with a high likelihood of success. In my experience, the GONB is easy to learn and easy to utilize clinically because it is a “forgiving” nerve block—patients often seen to respond even if the local anesthetic is not delivered precisely. As Dr. Rogers notes, using a “fan” technique maximizes the chances of success. While corticosteroids are efficacious for migraine, the most common type of headache seen in the ED, I prefer to deliver the corticosteroids separately from the GONB as either an intravenous or intramuscular injection. That way, I am not limited by volume and can administer more local anesthetic. And while a 23 or 25 gauge needle can certainly get the job done, my patients seem to appreciate it more when I use a 27 gauge needle. Finally, while not evidence-based, I think about using the GONB for any type of headache that is refractory to first or second line treatment—I’ve had success using it in a wide variety of atypical headaches (just don’t forget to rule out badness!)

Benjamin W. Friedman, M.D.
Professor
Department of Emergency Medicine
Montefiore Medical Center
How to Cite this Post
[Peer-Reviewed, Web Publication] Rogers A, Quarles A. (2020, Jan 13). Occipital Nerve Block. [NUEM Blog. Expert Commentary by Friedman, B]. Retrieved from http://www.nuemblog.com/blog/occipitalnerveblocl
References:
Sources
“Occipital Nerve Blocks: When and What to Inject?” Tobin, Joshua; Flitman, Stephen. Headache. 2009. Nov-Dec, 49 (10):1521-33
“Occipital Neuralgia.” Garza, Ivan. UpToDate. 25 August, 2017. Accessed 28 January 2019.
“Greater Occipital Nerve Block.” Ward, John. Seminars in Neurology. 2003; 23(1): 059-062. Accessed 28 January 2019.
“Greater Occipital Nerve Block for Acute Treatment of Migraine Headache: A Large Retrospective Cohort Study.” Allen et al. Journal of the American Board of Family Medicine. Vol 31, Issue 2. March/April 2018. P 211-218.
“A Randomized, Sham‐Controlled Trial of Bilateral Greater Occipital Nerve Blocks With Bupivacaine for Acute Migraine Patients Refractory to Standard Emergency Department Treatment With Metoclopramide.” Friedman, Benjamin, et. Al. Headache. October 2018. Vol58, Issue 9. Pp1427-1434.
“Greater Occipital Nerve.” Volker, Joseph. Earthslab.com. 8 August, 2018.
“Greater Occipital Nerve Block Using Local Anaesthetics Alone or with Triamcinolone for Transformed migraine: a radomised comparative study.” Ashkenazi A, et al. Journal of Neurology, Neurosurgery, and Psychiatry. 2008 April; 79(4):415-7
Other Posts You Might Enjoy…
Featured
Bougie Journal Club

Written by: Amanda Randolph, MD (NUEM PGY-3) Edited by: Katie Colton, MD (NUEM ‘19) Expert commentary by: Howard Kim, MD
Introduction:
Endotracheal intubation is one of the most common and life-saving procedures performed in the Emergency Department (ED), though it is not without risk – approximately 12% of ED intubations result in an adverse event. First-pass success has been linked to improved outcomes, but in the case of a difficult airway, this goal can be challenging. The bougie is typically reserved as a rescue device in these situations. However, a study recently published in JAMA questions this approach, and instead asks whether the routine use of a bougie during all difficult airway attempts would improve first-pass success.
The Study:
Driver BE, Prekker ME, Klein LR, et al. Effect of Use of a Bougie vs Endotracheal Tube and Stylet on First-Attempt Intubation Success Among Patients With Difficult Airways Undergoing Emergency Intubation: A Randomized Clinical Trial. JAMA. 2018;319(21):2179–2189. doi:10.1001/jama.2018.6496
Study Design:
This study was a randomized clinical trial performed at Hennepin County Medical Center, an urban academic Emergency Department.
Population:
Investigators enrolled consecutive patients 18 years and older whom the attending emergency physician planned to intubate using a Macintosh laryngoscope blade (direct or video).
Exclusion criteria included known anatomic distortion of the upper airway (ie angioedema, epiglottitis, laryngeal mass, or malignancy), as the bougie has already been proven more effective in these patients in previous studies. Prisoners and pregnant patients were also excluded.
After intubation, the physician recorded whether any difficult airway features were present: body fluids obscuring the laryngeal view, airway obstruction or edema, obesity, short neck, small mandible, large tongue, facial trauma, or cervical spine immobilization. Patients were then subcategorized based on the presence of 1 or more difficult airway characteristics.
Intervention Protocol:
To optimize a balanced study population, eligible patients were first sorted into 2 strata – those with obesity or cervical immobilization, and those without these features. From that point, patients from each stratum was randomized 1:1 to either bougie or endotracheal tube (ET tube) + stylet for the first attempt.
The intubating physician was free to direct the procedure as they saw fit, including patient positioning, pre-oxygenation, the use of RSI, and cricoid pressure. The physician could choose between direct laryngoscopy using a Macintosh blade, or video laryngoscopy using a C-MAC or GlideScope. If video laryngoscopy was chosen, the physician could elect whether to view the video screen.
In the bougie group, the physician inserted the bougie into the trachea, an assistant loaded the ET tube, and the operator guided the tube through the vocal cords. If resistance was met, the physician retracted the tube 2cm, rotated 90 degrees and re-advanced.
In the ET tube + stylet group, a straight to cuff shape was used. If resistance was encountered, the physician could reshape the tube/stylet as needed.
If intubation was unsuccessful on the first attempt, the physician was free to change any equipment or devices. Correct tube placement was determined by waveform capnography.
Outcome Measures:
Primary outcome: first-pass intubation success
Successful intubation on the first laryngoscopy attempt with device as previously randomized (bougie or ET tube)
Secondary outcomes:
Hypoxemia (sat < 90%, or > 10% desat during intubation if already hypoxemic)
First attempt time elapsed (laryngoscope insertion to removal)
Esophageal intubation
Results:
In patients randomized to the bougie arm, there was a 14% absolute increase in the rate of first-pass success in patients with at least one difficult airway feature (96% vs 82% bougie vs ET tube +stylet).
The bougie approach was superior in subsets of patients with predictors of airway difficulty including C-spine immobilization, obesity, and Cormak-Lehane grades 2-4.
Even in patients not predicted to have a difficult airway, there was a 7% absolute increase in first-pass success with the bougie approach (99% vs 92% with ET tube + stylet).
There was a small but significant increase in the time elapsed on first-pass success with the bougie (38 seconds) vs ET tube + stylet (34 seconds).
A more extensive summary of the results is depicted in Table 3:

Interpretation:
This study concludes that the bougie improves first-pass success rate both in difficult airways and standard airways. The small increase in time to first-pass success when using a bougie is outweighed by the need to fall back on rescue techniques more frequently when starting with an ET tube and stylet. Therefore, authors propose the use of a bougie as a routine primary intubation device for all patients. This argument is compelling and potentially practice-changing. Most EDs including NMH have adopted the practice of using a bougie right away when there is an obviously difficult airway (laryngeal mass, neck hematoma etc), but otherwise the bougie is often reserved for backup after one or more failed attempts. This relies on a perhaps now invalid model of an algorithmic approach to the difficult airway in which operators progress through a series of rescue devices and maneuvers. In light of this study, it may be time for a culture shift in EM toward routine bougie use.
Strengths:
This is a well-designed randomized controlled trial, with a total of 752 patients studied, generating enough power to provide meaningful results. The methodology of using the bougie and the ET tube + stylet was highly standardized. At the same time, the physicians were free to direct the remainder of the intubation strategy, including preoxygenation, medications, patient positioning, operator training, laryngoscope type, and video assistance. This is a realistic approach that would be generalizable to the typical ED experience. The power of this study was sufficient to then create subgroup analyses for each of these factors, and prove they were not confounders.
Weaknesses:
This study is primarily limited by its single center design and thus may not be generalizable to all Emergency Departments. This particular hospital had been using the bougie routinely prior to this study, which is uncommon. This may have led to overestimation of the bougie’s benefit. Further studies involving multi-centered trials are needed to affirm generalizability. Finally, this study by design could not be blinded, which could have led to biased results.
Take Home Points:
This was a single center randomized controlled trial of bougie vs ET tube + stylet for first-pass intubation
The bougie was significantly more effective in all patients, with or without difficult airway features
This study is potentially practice-changing and suggests the bougie should be used as a routine primary intubation device for all patients in the ED
Further studies including a multi-centered trial would be helpful to affirm generalizability
Expert Commentary
Thank you for the excellent review of this randomized trial of a bougie-first intubation strategy. I agree that this study is potentially practice-changing, with the important caveat that your initial mileage may vary due to the study setting of a single ED with an existing culture of utilizing the bougie. Still, the demonstrated 11% absolute difference in first-pass success among all-comers (including patients with and without difficult airway characteristics) is compelling.
Intuitively, routine use of the bougie should be a familiar concept to ED physicians. We regularly utilize Seldinger technique in the placement of various vascular access devices, and the bougie can be thought of as the Seldinger technique of the airway. Anecdotally, I feel that the primary benefits of the bougie are improved visualization of the glottic inlet and tactile feedback from tracheal clicks and holdup. Many of us will encounter airways that we do not initially perceive to be difficult based on anatomic features (e.g., non-obese, reassuring Mallampati) only to be perplexed by the visual appearance of the glottic inlet after blade placement (see Kovacs et al., 2017) or complete obscuring of the glottic inlet by rapidly re-accumulating blood or vomitus. In these scenarios, tactile feedback can be reassuring of proper tube placement.
Importantly, use of the bougie requires the operator to understand three key points: first, many novice users instinctively remove the intubating blade after the bougie is placed but prior to railroading the endotracheal (ET) tube over the bougie; this makes ET tube placement difficult but can be addressed by re-inserting the intubating blade (and confirming that the bougie remains in the correct position). Second, as the study authors point out, the bevel tip of the endotracheal tube can get caught on the arytenoids. This can be addressed by rotating the ET tube and re-attempting insertion. Finally, bougie placement can be difficult with hyper-angulated devices, such as the traditional GlideScope blade or the “D-Blade” for the C-MAC – hence the reason for excluding these devices in the trial. These hyper-angulated devices require the ET tube (and bougie) to navigate a hyper-acute angle for delivery, which is why they come with a special hyper-angulated metal stylet.
Finally, while I am an advocate of a bougie-first intubation strategy, I would emphasize that it is important not to become too infatuated with or dependent on a single airway technique. For example, a bougie cannot solve the dilemma of a small, restricted mouth that will not accommodate blade placement (e.g., advanced scleroderma), nor will it allow you to navigate an edematous tongue that occludes the entire oropharynx (e.g., severe angioedema). The best airway technicians are facile in a number of airway techniques, are always cognizant of the potential for their primary approach to be unsuccessful, and have a clear algorithm for how to respond to potential obstacles. This requires learning as many airway techniques as possible during your training (e.g. video, direct, LMA, bougie, fiber-optic).
References:
Kovacs G, Duggan LV, Brindley PG. Glottic Impersonation. Can J Anaesth. 2017 Mar;64(3):320. PMID 28028675.

Howard S. Kim, MD MS
Assistant Professor
Department of Emergency Medicine
Northwestern University Feinberg School of Medicine
How To Cite This Post
[Peer-Reviewed, Web Publication] Randolph A, Colton K. (2019, Nov 25). Bougie Journal Club. [NUEM Blog. Expert Commentary by Kim H]. Retrieved from http://www.nuemblog.com/blog/bougie.
Other Posts You May Enjoy
Featured
Ultrasound Confirmation of Endotracheal Tube Placement

Written by: Maurice Hajjar, MD (NUEM PGY-2) Edited by: Alex Ireland, MD (NUEM PGY-4) Expert commentary by: John Bailitz, MD
Introduction
Although the cuff is inflated and the laryngoscope is removed, no emergent intubation is complete without first confirming the correct placement of the endotracheal tube (ETT). A variety of indicators exist that can confirm ETT placement into the trachea rather than the esophagus—chest rise, condensation in the tube, auscultation of breath sounds, lack of abdominal breath sounds, visualization with a video or fiberoptic laryngoscope, and both quantitative waveform capnography and qualitative (or colorimetric) capnometry.
However, situations exist in which these techniques may be unavailable, impractical, or can even fail or mislead providers. A hectic cardiac arrest scenario may present the perfect storm. Chest compressions preclude providers from visualizing chest rise. Gastric contents or blood can mask tube condensation or preclude visualization of the cords with a video laryngoscope. Colorimetric capnometry can have low sensitivity in patients without a palpable pulse and can also be falsely positive if exposed to blood or gastric contents [1]. The sensitivity of quantitative waveform capnography decreases significantly in cardiac arrest as it requires adequate pulmonary circulation which may be absent in this or other low flow states [2,3]. Furthermore, despite increasing use, it may be unavailable at the institution altogether [4].
Taken together, there is a relatively high risk of esophageal intubation in this scenario which bears disastrous consequences. Any single method of confirming ETT placement is imperfect; as such, there is room for unique modalities in emergent intubations.
Using Point of Care Ultrasound to Confirm Endotracheal Tube Placement
Why it works
Point of care ultrasound (POCUS) is readily available in emergency departments (EDs) and intensive care units in most settings and both intensivists and emergency providers have at least some training in its use at the bedside. Conceptually, the use of transtracheal US to confirm ETT placement relies on the differing anatomy of the trachea and esophagus. Recall that the trachea remains open due to cartilaginous rings while the esophagus will collapse unless filled (e.g., by an ETT). Thus, an esophagus with an ETT will be more readily visualized adjacent to the trachea than one without.
The sonographic appearance of the trachea is characterized by a bright, hyperechoic curvilinear structure with posterior shadowing and reverberation artifact (Figure 1). If the trachea was intubated, then a single bullet sign [5] (Figure 2) will be visualized, which is an increase in both the echogenicity and the posterior artifact indicating the presence of an air-filled ETT.
![Figure 1: Sonographic view of trachea showing air-mucosa interface with posterior reverberation and shadowing artifact. [Photo courtesy of John Bailitz, MD]](https://images.squarespace-cdn.com/content/v1/549b0d5fe4b031a76584e558/1572626234251-VL5QSV3R6S608OO7J8OI/1.+Figure+1+-+Trachea.png)
Figure 1: Sonographic view of trachea showing air-mucosa interface with posterior reverberation and shadowing artifact. [Photo courtesy of John Bailitz, MD]
![Figure 2: Clip demonstrating the bullet sign: a single air-mucosa interface with increased posterior shadowing and artifact indicates the trachea has been intubated. [Photo courtesy of John Bailitz, MD]](https://images.squarespace-cdn.com/content/v1/549b0d5fe4b031a76584e558/1572626261525-86AN0IKGCSGN5EHY11VN/image-asset.gif)
Figure 2: Clip demonstrating the bullet sign: a single air-mucosa interface with increased posterior shadowing and artifact indicates the trachea has been intubated. [Photo courtesy of John Bailitz, MD]
Conversely, if the esophagus is intubated, then a double tract sign [6] (Figure 3) will be visualized, which is the appearance of a “second” trachea, or a similar hyperechoic line with posterior shadowing and reverberation artifact lateral to that of the trachea. This second air-mucosa interface indicates that the esophagus is stented open by an air-filled ETT.
![Figure 3: Clip demonstrating the double tract sign: the appearance of a second air-mucosa interface with posterior artifact adjacent to the trachea indicates the esophagus has been intubated. [Photo courtesy of John Bailitz, MD]](https://images.squarespace-cdn.com/content/v1/549b0d5fe4b031a76584e558/1572626372841-E4OFNNGZHEOI7ECDRIJP/3.+Figure+3+-+Double+Tract+Sign.gif)
Figure 3: Clip demonstrating the double tract sign: the appearance of a second air-mucosa interface with posterior artifact adjacent to the trachea indicates the esophagus has been intubated. [Photo courtesy of John Bailitz, MD]
How it is used
As alluded to above, the primary use of US in confirming ETT placement is determining that the trachea, rather than the esophagus, has been intubated. This can be confirmed either statically or dynamically. In static confirmation, the US probe is used post-intubation to visualize either the bullet sign or the double tract sign. Additionally, if the operator is uncertain, she or he could lightly move the ETT up and down to ascertain if there is movement in the region of the trachea or esophagus7. In dynamic confirmation, the US probe is used during intubation to visualize the increase in artifact as the tube passes into the trachea or the appearance of artifact as the tube passes into the esophagus.
Of note, transtracheal US cannot be used to determine the distance of the ETT from the carina or to determine if the right mainstem bronchus has been intubated. Thoracic ultrasound, however, can be used to observe bilateral pleural sliding but requires multiple ventilations. Additionally, anatomical variance may cause the esophagus to be positioned directly posterior to the trachea, leading to false positive tracheal intubations [8].
Technique [6–8]
Use a high frequency linear probe with sonographic gel applied liberally.
Place the probe superior to the suprasternal notch in a transverse orientation, being careful to minimize downward pressure.
Adjust sonographic depth (depending on body habitus) to visualize the trachea and, if visible, the esophagus which will typically lie posterolateral to the trachea.
Interpret:
If performing static confirmation post-intubation, look for the bullet sign or the double tract sign.
If performing dynamic confirmation during intubation, look for an increase in motion artifact posterior to the trachea or the appearance of a “second” trachea (double tract sign).
Brief Review of Evidence
A meta-analysis pooled data from 11 studies and 969 intubations and showed an aggregate sensitivity of 98% and specificity of 94% in emergency intubations, with capnography as the gold standard [5]. More recently, a meta-analysis of 17 studies and 1,596 patients showed a sensitivity of 98.7% and specificity of 97.1%, with a positive likelihood ratio of 34.4 and a negative likelihood ratio of 0.019. This compares favorably to pooled data from studies examining capnography, which in one meta-analysis showed slightly lower sensitivity but similar specificity (93% and 97%, respectively)2,10. Furthermore, POCUS has several distinct advantages over capnography as mentioned above.
POCUS is a skill familiar to many ED providers. A pilot study in a non-emergent, controlled operating room setting of patients intubated by anesthesiologists demonstrated that ED providers with no formal airway US training could identify tracheal intubations with a sensitivity and specificity approaching 100% [8]. In a cadaver study, the performance of residents compared favorably to that of ultrasound fellowship-trained emergency physicians, ranging from 91-100% sensitivity and 48-96% specificity depending on cadaver body habitus [11].
In the emergent setting, ultrasound assessment not only has high sensitivity and specificity for tracheal intubation but can be performed rapidly. A study of patients being intubated for impending respiratory failure, cardiac arrest, or trauma found that ED residents trained in airway US could identify tracheal intubation using ultrasound with 98.9% sensitivity, 94.1% specificity, and a 93% concordance with criterion standard quantitative capnography. Furthermore, confirmation of ETT tube with ultrasonography could be performed within an average of nine seconds [6]. During CPR, real-time tracheal ultrasonography was 100% sensitive and 85.7% specific for detecting tracheal versus esophageal intubation compared to the combined criterion standard of waveform capnography and auscultation. Furthermore, this study examined ultrasonography performed during chest compressions, suggesting that ultrasonography can be a highly reliable method of ETT confirmation without interrupting compressions [12].
Summary
Established methods of confirming ETT placement in an emergent intubation are imperfect.
Quantitative waveform capnography has reduced sensitivity in the setting of a cardiac arrest or other low-flow states and requires multiple ventilations prior to confirmation.
Ultrasound can rapidly be used to confirm ETT placement with comparable sensitivity and specificity to criterion standards without requiring ventilation or an interruption of chest compressions.
Providers with some familiarity with US can use it to distinguish between tracheal and esophageal intubations reliably.
Expert Commentary
Thank you for his outstanding review of an exciting and relatively new application in Emergency Ultrasound. Although the literature on this topic has exploded in the last few years, tracheal ultrasound was already included in the 2015 ACLS Guidelines as a reliable method to confirm endotracheal intubation.
As a longtime ultrasonographer and resuscitationist, I find this application particularly useful in two common ED situations. The first is out of hospital cardiopulmonary arrest in which the patient was already intubated by paramedics in the field. As the patient arrives in the resuscitation bay, there are a number of competing priorities. Rapid confirmation of correct endotracheal tube placement during chest compressions allows the team to quickly move on to other priorities. The second is the difficult intubation of the crashing ED patient. Particularly, in patients who are obese or otherwise have distorted airway anatomy, the ultrasound machine provides real time visualization of the endotracheal tube placement, or a rapid confirmation immediately after. In either situation, the ultrasound machine will certainly be helpful not only for confirmation of ETT location, but further for ruling out pneumothorax and main stem intubation, before moving onto other causes of cardiac arrest such as cardiac tamponade, massive PE, and blood loss.
Regarding technique, dynamic visualization during intubation may be difficult particularly if external laryngeal manipulation while is being preformed. So static visualization immediately after placement is often more feasible. Forceful, or up and down movement of the tube may dislodge an endotracheal tube, damage the airway, or stimulate a cough or vomiting in the non-paralyzed patient. Instead, simply gently rotating the tube from side to side creates an easily visible change in the tracheal air column if correctly located, or “esophageal sliding” of the mucosa over the endotracheal tube if incorrectly placed in the esophagus.
Final shout outs to the authors of this well written blog. But also to Dr. Michael Gottlieb, full disclosure my former fellow, for his considerable research in this area. Dr. Gottlieb first identified the need for better confirmatory methods as an EM intern. Although I was initially skeptical as a resuscitationist, Dr. Gottlieb quickly convinced me with a well-done literature review during which he identified a gap in the existing literature. Dr. Gottlieb then took the initiative and turned one research question into an exciting are of scholarship for his career and the many fellows that followed that benefitted from Dr. Gottlieb’s mentoring. This is such a wonderful example of turning a simple clinical question into a rich and rewarding area of leadership through scholarship!

John Bailitz, MD
Vice Chair for Academics
Department of Emergency Medicine
Northwestern Feinberg School of Medicine
Citations
1. MacLeod BA, Heller MB, Gerard J, Yealy DM, Menegazzi JJ. Verification of endotracheal tube placement with colorimetric end-tidal CO2 detection. Ann Emerg Med [Internet] 1991 [cited 2019 Jan 8];20(3):267–70. Available from: http://www.ncbi.nlm.nih.gov/pubmed/1899985
2. Li J. Capnography alone is imperfect for endotracheal tube placement confirmation during emergency intubation. J Emerg Med [Internet] 2001 [cited 2019 Jan 8];20(3):223–9. Available from: http://www.ncbi.nlm.nih.gov/pubmed/11267809
3. Takeda T, Tanigawa K, Tanaka H, Hayashi Y, Goto E, Tanaka K. The assessment of three methods to verify tracheal tube placement in the emergency setting. Resuscitation [Internet] 2003 [cited 2019 Jan 8];56(2):153–7. Available from: https://www.sciencedirect.com/science/article/pii/S0300957202003453
4. DeIorio NM. Continuous end-tidal carbon dioxide monitoring for confirmation of endotracheal tube placement is neither widely available nor consistently applied by emergency physicians. Emerg Med J [Internet] 2005 [cited 2019 Jan 13];22(7):490–3. Available from: http://www.ncbi.nlm.nih.gov/pubmed/15983084
5. Das SK, Choupoo NS, Haldar R, Lahkar A. Transtracheal ultrasound for verification of endotracheal tube placement: a systematic review and meta-analysis. Can J Anesth Can d’anesthésie [Internet] 2015 [cited 2019 Jan 11];62(4):413–23. Available from: http://www.ncbi.nlm.nih.gov/pubmed/25537734
6. Chou H-C, Tseng W-P, Wang C-H, et al. Tracheal rapid ultrasound exam (T.R.U.E.) for confirming endotracheal tube placement during emergency intubation. Resuscitation [Internet] 2011 [cited 2019 Jan 9];82(10):1279–84. Available from: http://www.ncbi.nlm.nih.gov/pubmed/21684668
7. Chao A, Gharahbaghian L. Tips and Tricks: Airway Ultrasound [Internet]. Am. Coll. Emerg. Physicians Emerg. Ultrasound Sect. 2015 [cited 2019 Jan 13];Available from: https://www.acep.org/how-we-serve/sections/emergency-ultrasound/news/june-2015/tips-and-tricks-airway-ultrasound/#sm.00000hnz0e2u2ofnizwz7io2f5wg6
8. Werner SL, Smith CE, Goldstein JR, Jones RA, Cydulka RK. Pilot study to evaluate the accuracy of ultrasonography in confirming endotracheal tube placement. Ann Emerg Med [Internet] 2007 [cited 2019 Jan 9];49(1):75–80. Available from: http://www.ncbi.nlm.nih.gov/pubmed/17014927
9. Gottlieb M, Holladay D, Peksa GD. Ultrasonography for the Confirmation of Endotracheal Tube Intubation: A Systematic Review and Meta-Analysis. Ann Emerg Med [Internet] 2018 [cited 2019 Jan 16];72(6):627–36. Available from: http://www.ncbi.nlm.nih.gov/pubmed/30119943
10. Gottlieb M, Bailitz J. Can Transtracheal Ultrasonography Be Used to Verify Endotracheal Tube Placement? Ann Emerg Med [Internet] 2015 [cited 2019 Jan 11];66(4):394–5. Available from: http://www.ncbi.nlm.nih.gov/pubmed/25805115
11. Gottlieb M, Bailitz JM, Christian E, et al. Accuracy of a novel ultrasound technique for confirmation of endotracheal intubation by expert and novice emergency physicians. West J Emerg Med [Internet] 2014 [cited 2019 Jan 13];15(7):834–9. Available from: http://www.ncbi.nlm.nih.gov/pubmed/25493129
12. Chou H-C, Chong K-M, Sim S-S, et al. Real-time tracheal ultrasonography for confirmation of endotracheal tube placement during cardiopulmonary resuscitation. Resuscitation [Internet] 2013 [cited 2019 Jan 10];84(12):1708–12. Available from: http://www.ncbi.nlm.nih.gov/pubmed/23851048
How To Cite This Post
[Peer-Reviewed, Web Publication] Hajjar M, Ireland A. (2019, Nov 4). Ultrasound Confirmation of ETT Placement. [NUEM Blog. Expert Commentary by Bailitz J]. Retrieved from http://www.nuemblog.com/blog/us-ett.
Other Posts You May Enjoy
Featured
Needlestick Injuries

Written by: Logan Wedel, MD (NUEM PGY-2) Edited by: Hashim Zaidi, MD (NUEM ‘19) Expert commentary by: Tim Loftus, MD, MBA
So You Just Sustained A Needlestick Injury… Now What?
A Brief Guide For Healthcare Professionals
Needlestick injuries continue to be a common source of work related injury among health care professionals.
Since the Needle-Stick Safety and Prevent act of 2000, non-surgical needle sticks have decreased by 31.6% (2001-2006). Over this same time period, incidents within the surgical setting have increased 6.5%.
However the most recent data from the CDC still estimates 385,000 injuries a year, which equates to more than 1,000 needle stick injuries per day amongst health care professionals. Unfortunately, this is believed to be a gross under-estimation secondary to the vast amount of incidents that go un-reported.
So I Got Stuck… What Is My Actual Risk?
High Risk
Inoculation from deep or open wound
Stick with a hallow bore needle / Needle used for blood draw
Low Risk
Suturing needle
Discarded needle
No Risk
Unused needle
No break in the skin
Good News! The risk of occupational transmission is low!
Transmission Rates by Disease - From a Source Positive Patient
Hepatitis B: 1% - 62% (Depending on exposure type and infectivity of source patient)
Risk of developing clinical evidence of infection ranges from 1% - 31%
Risk of developing serologic evidence of infection ranges from 23% - 62%
Fortunately, this disease is the most easily prevented. Staying up to date on vaccines is the #1 way to prevent HBV infection!
Hepatitis C: 1.8%
Has ranged from 0% - 7% in some studies
Extremely low transmission rates from mucous membrane exposure
Human Immunodeficiency Virus (HIV): 0.3%
Rates drop to 0.09% with mucous membrane exposure
Immediately After Exposure
Safely cease the procedure. Have another operator take over if available.
The best way to prevent transmission after contact is to wash the site thoroughly with soap and water
Take your time to perform this well
Flush the nose and mouth if they were exposed
Copious irrigation of the eyes if there was ocular exposure
Reporting
This is the last thing you want to be doing, but....
It is critical to report the incident. Each institution has its own protocol that health care professionals are required to follow. The first step usually deals with informing the charge nurse or unit manager if you are in a healthcare facility. Follow your local institutional protocols to document and report the exposure.
Every healthcare facility has protocols for occupational exposure. Remember-this is not a unique event and these exposures happen. If there is uncertainty on how to proceed, see if the institution has infection control personnel, occupational health agents, or other administrators or staff who would be familiar with the process.
This happens. Follow the institutional process and remember this is not uncommon. By not reporting or following protocol you risk transmission of blood borne infectious agents without timely diagnosis and treatment.
Management + Blood Draws
1. Collect the Source Patient's Blood -- Disclose the Incident
If unable to acquire (patient no longer present, refuses, or unknown source), post-exposure prophylaxis will need to be considered carefully
Council the source patient on the standard practice to test for blood born infectious agents given the exposure
Determine the source patient's baseline disease characteristics and any treatment history
2. Your Blood Work
Determine your baseline disease characteristics
Hepatitis B status
Vaccinated with or without response
Un-vaccinated without infection
Evidence of current infectivity
Hepatitis B immune globulin (HBIG) may be utilized post exposure particularly for those who are not vaccinated
Hepatitis C status
HIV status
3. Follow Up Blood Work - Short and Long Term Monitoring
Hepatitis B: repeat test at 6 months post exposure
Hepatitis C: repeat testing at 2, 4, 8 weeks post exposure
HIV : repeat testing at 6 weeks, 3 months, 6 months, 1 year post exposure
Post Exposure Prophylaxis
Hepatitis B
Hepatitis B Immune Globulin Alongside Vaccination Series
Roughly 75% effective and preventing infection
Administer ASAP - effectiveness after 7 days is unclear
Hepatitis C
No available post exposure prophylaxis
Follow your blood work to monitor disease status
Human Immunodeficiency Virus (HIV):
Three Drug Cocktail: Truvada QD (Tenofovir 300mg + Emtricitabine 200mg) + Raltegravir 400mg BID is the preferred regimen
Dual Nucleoside Reverse Transcriptase Inhibitor +
Integrase Inhibitor
Protease Inhibitor
Non Nucleoside Reverse Transcriptase Inhibitor
Multiple Regimens Exist: Can target specific resistance patterns. Expert consultation can be made with local experts or by calling the National Clinicians’ Post-Exposure Prophylaxis Hotline (PEPline) at 888-448-4911.
Initiate ASAP - effectiveness unknown after 72 hours
28 Day Regimen
Close physician/laboratory follow up to monitor toxicity
Prevention
Always take the the time to apply proper personal protective equipment (PPE)
It will save you time and save you stress
Gowns, Gloves, Goggles
Common mistake to forget eye protection
Double glove in higher risk circumstances
Safe practices: Never reuse needle / Never re-cap needle
Safe needle disposal
Expert Commentary
Thank you to Dr. Wedel on an excellent review and summation of what is a frequent and yet frustrating topic for EM physicians. The evaluation and management of potential blood or body fluid exposures is an area riddled with logistical nuances that frequently change and can be state and institution-specific. As such, it can be very helpful to mentally break the topic down as has been done so nicely here, into considerations of risk, reporting, testing, and management (including PEP). There are a few important points and nuances that deserve further discussion:
Safety
Safety is of utmost priority - safety for yourself, your colleagues, and your patients and their family members. These events are vastly underreported for a variety of reasons, but often this is the first step in tracking these events, mitigating downstream morbidity, addressing issues upfront, and preventing transmission. A safety culture is built on a daily basis by each and every one of us.
Nature of Exposure
This post focuses on occupational exposures to healthcare workers, which are relevant to us, but are by far not the only possible or definite exposure we will see. The more detailed and thorough history we can elicit in these situations may make the difference between initiation or not of post-exposure prophylaxis, as an example. It is incumbent upon us in emergency medicine to remain up to date on state and local laws and regulations as well as institutional policies and procedures, which help guide us to correctly managing these situations. As an example, the evaluation and management plan of an exposed healthcare worker may differ compared to that of a patient’s family member, pregnant female, or law enforcement officer or other government official. The more details we can gather regarding the nature of exposure and possible risk of blood-borne pathogen transmission will help us in these nuanced situations.
Post-Exposure Prophylaxis
This is nicely outlined by Dr. Wedel - to highlight a few points:
HBV - immunization is key. Please ensure your own HBV immunization status is up to date and obtain history of HBV immunization in all patients who are able to provide this.
Tetanus - depending on the nature of the exposure, be mindful that tetanus immunization may be necessary.
HIV - post-exposure prophylaxis has been shown to be very effective in this situation, decreasing likelihood of HIV transmission by as much as 81%. The effectiveness is best the sooner it gets started after the exposure and is recommended within 72 hours. While there are widely used and preferred regimens, the specific details of each situation may alter the choice of PEP regimen, including kidney function, source patient’s HIV status and resistance patterns, pregnancy, cost, dosing frequency, and side effect profile. The decision to initiate PEP should be involve a detailed and informed conversation with the patient, as 50% of HCW’s have reported side effects to PEP and as many as 33% have prematurely stopping taking the medicines.
Consent
Make sure to consider one’s local practice environment, policies, and procedures with respect to potential body fluid exposure testing and treatment. Certain states, such as Illinois, require consent, pre-test information, and other considerations when performing HIV testing in the ED setting. However, as is the case in Illinois with the AIDS Confidentiality Act and in as many as 35 other states, informed consent and pre-test information may not be required when HIV testing is either medically indicated or in cases of blood or body fluid exposure with certain individuals, including health care workers, law enforcement officers, and paramedics. Be mindful that exception from informed consent does not compel the source patient to submit to testing if a blood specimen is not already available, as this usually requires a court order. Further, exception from informed consent does not waive us of the responsibility to thoroughly discuss with these patients the rationale behind testing, reporting, and details of unconsented HIV testing.
Overall, blood and body fluid exposure in the health care setting is extremely common and relatively easy to manage, but often gets relegated to standard institutional protocols that may or may not be applied appropriately given the unique circumstances of each patient encounter. Thank you again to Dr. Wedel for an excellent review, as a thoughtful approach to these situations can help guide us in having a detailed, informed conversation with our patients surrounding transmission risk, testing procedures, post exposure prophylaxis, and rationale behind follow-up timing and testing procedures.
There are many resources out there to help us, including each institution’s corporate/occupational health, risk management, state and local laws and regulations, and the PEPline.
AIDS Confidentiality Act (410 ILCS 305): http://www.ilga.gov/legislation/ilcs/ilcs3.asp?ActID=1550&ChapterID=35
Cowan E & Macklin R. Unconsented HIV Testing in Cases of Occupational Exposure - Ethics, Law, and Policy. Acad Emerg Med. 2012. 19(10):1181-1187. https://www.ncbi.nlm.nih.gov/pmc/articles/PMC3473147/pdf/nihms-402780.pdf doi:10.1111/j.1553-2712.2012.01453.x.
ACEP Policy Statement: https://www.acep.org/patient-care/policy-statements/bloodborne-pathogens-in-emergency-medicine/

Timothy Loftus, MD, MBA
Assistant Professor
Department of Emergency Medicine
Northwestern University
How to Cite this Post
[Peer-Reviewed, Web Publication] Wedel L, Zaidi H. (2019, Oct 14). Needlestick Injuries. [NUEM Blog. Expert Commentary by Loftus T]. Retrieved from http://www.nuemblog.com/blog/needlestick.
Other Posts You Might Enjoy…
References
"CDC Guidance for Evaluating Health-Care Personnel for Hepatitis B Virus Protection and for Administering Postexposure Prophylaxis Management." Centers for Disease Control and Prevention, U.S. Department of Health & Human Services, https://www.cdc.gov/mmwr/PDF/rr/rr6210.pdf.
"Exposure to Blood: What Healthcare Personnel Need to Know." Centers for Disease Control and Prevention, U.S. Department of Health & Human Services, https://www.cdc.gov/HAI/pdfs/bbp/Exp_to_Blood.pdf.
"HIV/AIDS PEP." Centers for Disease Control and Prevention, U.S. Department of Health & Human Services, https://www.cdc.gov/hiv/basics/pep.html.
"HIV/AIDS Post Exposure Prophylaxis (PEP)." Centers for Disease Control and Prevention, U.S. Department of Health & Human Services, https://www.cdc.gov/hiv/risk/pep/index.html
"Oral Health: Occupational Exposure to Blood." Centers for Disease Control and Prevention, U.S. Department of Health & Human Services, https://www.cdc.gov/oralhealth/infectioncontrol/questions/occupational-exposure.html.
"The National Surveillance System for Healthcare Workers." Centers for Disease Control and Prevention, U.S. Department of Health & Human Services, https://www.cdc.gov/nhsn/PDFs/NaSH/NaSH-Report-6-2011.pdf
"Updated U.S. Public Health Service Guidelines for the Management of Occupational Exposures to HBV, HCV, and HIV and Recommendations for Postexposure Prophylaxis." Centers for Disease Control and Prevention, U.S. Department of Health & Human Services, https://www.cdc.gov/mmwr/preview/mmwrhtml/rr5011a1.htm.
Intraosseous Lines

Written by: Dana Loke, MD (NUEM PGY-3) Edited by: Victor Gappmaier, MD (NUEM Alum ‘18) Expert commentary by: John Sarwark, MD
Since its development in the 1940s, intraosseous (IO) access has been a mainstay of resuscitation in both pediatric and adult patients[1]. IO access has been used in medical emergencies requiring immediate access when peripheral IV access is either not possible or time-prohibiting, such as cardiac arrest, status epilepticus, shock, trauma, and burns[2]. There is mounting evidence supporting the continued use of IO lines both in-hospital and pre-hospital. Studies have demonstrated similar outcomes between IO and IV access with return of spontaneous circulation, further supporting their use during cardiac arrest3. In fact, the International Liaison Committee on Resuscitation (ILCOR) stated in 2010 that “Delivery of drugs via an endotracheal tube is no longer recommended – if IV access cannot be achieved, drugs should be given by the IO route”[4]. Currently, IO access is achievable in two ways: manually or with commercially-available drill-inserted devices (such as the EZ-IO).
Why use an IO instead of a central line during a resuscitation?
Besides the obvious advantage that IO insertion is quicker, it is also cheaper than central line insertion. On average IO lines cost about $100 compared to $300 for central lines[4]. Additionally, there are far fewer complications associated with IO lines compared to central lines. All medications that can be given via central line can also be given via IO line. Blood can be drawn and sent for lab analysis just as with IV access. Although an IO line only has one lumen, there are multiple possible insertion sites, and multiple IO lines can be placed in the same patient simultaneously. Furthermore, IO lines are easy to remove when more definitive vascular access has been obtained.
But perhaps one of the biggest advantages of an IO is that it requires less training and experience to insert than a central line. Their ease of use allows trained RNs, techs, and novice providers to obtain vascular access without interrupting assessment by senior providers. In fact, a recent study showed that IO access can effectively be taught as a four-step approach to medical students[5].
Contraindications
There are a few important contraindications to IO access for the EM physician to be aware of. The first is any fracture at or proximal to the insertion site, as this can cause extravasation of fluids or medication and increases the risk of compartment syndrome[2]. The second is cellulitis or evidence of other infection such as abscess at the insertion site, similar to other procedures like central lines and PIV access[2]. Sites of prior attempts should not be used for a second attempt. Lastly, patients at risk for fracture (for instance, osteogenesis imperfecta or osteopetrosis) should not be given an IO line[4].
Technique
Although manual insertion of an IO line is possible using a Cook or Jamshidi needle, commercial devices such as the EZ-IO are widely available and should always be used for IO insertion if available. The EZ-IO kit includes the IO needle set (with 45 mm, 25 mm, and 15 mm needles), power driver, IO tubing, and adhesive dressing as shown in the image below[6]. The 25 mm needle is the standard needled used for adults. If the humerus is used or there is excessive tissue (i.e. muscular or obese patients), then the 45 mm needle should be used. The 15 mm is generally used in children or any adults <40 kg.

There are multiple sites in which IO access can be obtained as shown in the image below [4,5]:
Proximal humerus – insert about 1 cm above the surgical neck (which can be found by sliding a finger up the anterior humeral shaft until the greater tubercle is felt)
Of note, this is the preferred insertion site during resuscitation, especially those involving abdominal trauma, as medications and fluids enter the circulation faster as they reach the central circulation via the SVC and bypass the pelvic and abdominal vessels.
Proximal tibia – insert 2 finger breadths below the patella and 1-2 cm medial to the tibial tuberosity in adults
Distal tibia – insert 3 cm proximal to the most prominent aspect of the medial malleolus
Femur, iliac crest, sternum – not routinely used and may require a special device

After choosing the correct needle and site, clean the site with alcohol swabs or chlorhexidine, and connect the needle set to the power driver (i.e. the drill). Remove the needle cap and insert the needle by drilling with a consistent downward pressure perpendicular to the bone surface. It is customary to feel a sudden loss of resistance, as the needle “gives” when entering the medullary space. Remove the power driver from the needle and secure the site with the adhesive dressing. At this point, you can aspirate blood for lab analysis and then connect primed IO tubing to flush the IO line. Now the line is ready for use to primed IV tubing. Make sure to document the time of insertion as IO lines should not be left in for more than 24 hours.
Medications
Any medication that can be given intravenously can also be given intraosseously[2]. This includes contrast media and blood transfusions[7]. Some amount of hemolysis of transfused blood has been documented when given intraosseously, although this is of unclear clinical significance[4]. According to multiple studies, the IO route is pharmacokinetically equivalent to the IV route and therefore there is no need to change medication doses when administering via IO8.
Labs
While any lab can be sent from an IO blood sample, it is important to be cognizant of the correlation between certain labs when obtained via IO vs IV. Labs that have good correlation include hemoglobin/hematocrit, chloride, glucose, urea, creatinine, and albumin[4]. However, other labs including WBC, platelets, serum CO2, sodium, potassium, calcium do not correlate well or in any predictable way with venous samples4.
Removal
All IO lines should be removed within 24 hours of the insertion time or earlier if there is any sign of extravasation (i.e. progressive pain or swelling at the insertion site). After disconnecting all infusions, the EZ-IO needle and hub can be removed by attaching a 10 cc luer-locked syringe to the hub and rotating clockwise while pulling back[4]. As with all potential sharps, the device should be disposed of in a biohazard sharps container.
Complications
Although rare, there are several complications of IO access to be aware of. These include osteomyelitis, fracture, extravasation, compartment syndrome, and necrosis of the epiphyseal plate[4]. However, perhaps the most common complication is injury to self or others while obtaining access. To avoid injury, warn conscious patients about the procedure and in unconscious patients make sure to stabilize the site.
Key Points
IO lines are a mainstay of resuscitation and used when peripheral IV access is either not possible or time-intensive.
Compared to central access in resuscitations, IO access is cheaper, quicker, safer, and easier to obtain.
Contraindications to IO insertion include fracture at or proximal to the insertion site, cellulitis or other infection overlying the insertion site, prior attempt at the insertion site, or bone disease such as osteogenesis imperfecta or osteopetrosis.
Make sure to choose the appropriate needle and insertion site prior to obtaining IO access.
All medications that can be given intravenously can be given intraosseously at the same doses.
Remember that not all lab values from an IO sample correlate with IV samples. Accurate IO labs include: hemoglobin/hematocrit, chloride, glucose, urea, creatinine, and albumin.
IO lines should be removed within 24 hours of insertion.
Complications are rare but include osteomyelitis, fracture, extravasation, compartment syndrome, and necrosis of the epiphyseal plate.
Expert Commentary
Intraosseous lines in the emergency department have always made perfect sense to me so I appreciate the scrappy enthusiasm for them in this article. In my opinion, they are an incredibly logical alternative to “crash” central lines. I mean, seriously, in a scenario where a patient is coding or about to code, why in god’s name should we be farting around with a femoral line? People get stuck with needles. Arteries are inadvertently punctured. There’s a huge mess and it’s often not sterile. An IO goes in clean and easy within seconds and boom, you’ve got yourself access, and essentially central access at that. You can put pretty much anything in it, although I did hear in my time around the ICU circuit in residency that the exception to this is TPN. That’s largely a piece of meaningless chin stroking trivia but, hey, maybe it will make you sound smarter on MICU rounds tomorrow AM.
The needle sizes can be a bit confusing in a tense situation. To avoid any issues, just remember this to keep it simple: USE THE BLUE NEEDLE. I have yet to have a patient who was so obese they needed the yellow needle in their tibia, and the pink one is exclusively just for kids. The best route is indeed via the humerus as the flow rate is reportedly as good as a subclavian line. Folks tend to jump for the tibia as their go-to site, and that’s perfectly fine but if you’re doing this out of uncertainty with the landmarks of the humerus it’s easier than you think. One way I was taught was to place your hands in an inverted “V” over the proximal humerus, and where your thumbs meet over the bone there is your target for your drill.
Not to be a Robert Downer Junior but I should remind everyone that there was an article in Annals this year entitled “Intraosseous Vascular Access Is Associated With Lower Survival and Neurologic Recovery Among Patients With Out-of-Hospital Arrest.” The title really states it all, showing a lower rate of “favorable” modified Rankin score in the patients that got IO over IV. Another study from Resuscitation last year titled “Intraosseous compared to intravenous drug resuscitation in out-of-hospital cardiac arrest” also showed decreased rates of ROSC and survival to hospitalization (but not to discharge) in the IO group. Bear in mind the IO’s in these articles are placed in the field and not in the hospital, although I can’t think there’s too much difference in technique between us and our friends out in the rigs.
I’m not going to get into the nitty gritty of each of these papers and I certainly don’t think we are actively making moves to remove them from our practice in our specialty but keep your eyes open for more discussion and research on this in the coming months to years. I still like the IO and it’s still a part of my practice and I encourage you to use it as well. Drill, baby, drill!

John P Sarwark, MD
NUEM Alumnus 2016
How to Cite This Post
[Peer-Reviewed, Web Publication] Loke D, Gappmaier V (2019, February 25). Intraosseous Lines [NUEM Blog. Expert Commentary by Sarwark J]. Retrieved from http://www.nuemblog.com/blog/io
References
Foëx, B.A. (2000). Discovery of the intraosseous route for fluid administration. J Accid Emerg Med, 17(2) 136-137.
Faga, M., & Wolfe, B. (2016). Vascular access in hospitalized patients. Hospital Medicine Clinics, 5(1), 1-16.
Clemency, B., Tanaka, K., May, P., Innes, J., Zagroba, S., Blaszak, J., Hostler, D., Cooney, D., McGee, K., & Lindstrom, H. (2017). Intravenous vs. intraosseous access and return of spontaneous circulation during out of hospital cardiac arrest. Am J Emerg Med , 35(2), 222-226.
Nickson, C. (2015, June 10). Intraosseous access. Retrieved February 26, 2018, from https://lifeinthefastlane.com/ccc/intraosseous-needle-insertion/
Afzali, M., Kvisselgaard, A.D., Lyngeraa, T.S., & Viggers, S. (2017). Intraosseous access can be taught to medical students using the four-step approach. BMC Med Educ, 17(1), 50.
Teleflex. (2018). Intraosseous access. Retrieved February 26, 2018, from https://www.teleflex.com/usa/product-areas/vascular-access/emergency-trauma-products/intraosseous-access/
Winkler, M., Talley, C., Woodward, C., Kingsbury, A., Appiah, F., Elbelasi, H., Landwher, K., Li, X., & Fleischmann, D. (2017). The use of intraosseous needles for injection of contrast media for computed tomographic angiography of the thoracic aorta. J Cardiovasc Comput Tomogr, 11(3), 203-207.
Von Hoff, D.D., Kuhn, J.G., Burris, H.A. 3rd, & Miller, L.J. (2008). Does intraosseous equal intravenous? A pharmacokinetic study. Am J Emerg Med, 26, 31–38
Ultrasound-guided Peripheral IJ Catheter Placement

Written by: Samantha Knopp, MD (NUEM PGY-3) Edited by: Andrew Ketterer, MD (NUEM Alum '17) Expert commentary by: John Bailitz, MD
We’re all familiar with the “difficult access” patient: the nurses have tried all possible traditional peripheral routes, both ultrasound-guided and not, the resident has been in with the ultrasound and had no better luck, the EJ blew a few minutes after it was placed. The choices you seem to be left with are intraosseous access (certainly useful in an actual emergent situation, although having a spike drilled into their long bones is not something that most awake and alert patients are thrilled about) or gain central access via a central venous catheter (again, useful and appropriate in some circumstances, but poses increased risk for complications).
Fortunately, there is a third option! The ultrasound-guided catheterization of the IJ with a peripheral IV, a technique first described in the literature in 2009 [1], has been shown to be a safe and efficacious means of access when all else fails. [2,3]
What is it?
Ultrasound-guided placement of a standard single-lumen angiocatheter into the internal jugular vein.
When is it useful?
In patients who require an IV, and no suitable extremity or external jugular veins can be reliably accessed, assuming that:
the patient is not unstable requiring emergent resuscitation (in which case an IO is preferable), and
the patient does not require central venous access
How to do it
The perennially creative people over at EM:RAP have an excellent video demonstration of the peripheral IJ:
Step-by-step instructions:
What you’ll need:
Ultrasound machine with linear transducer
Sterile ultrasound gel
Chlorhexidine
Tegaderm x 2 (or other bio-occlusive dressing; 1 for dressing, 1 to cover ultrasound probe)
Single lumen angiocatheter (various studies have used varying sizes: 18-20 gauge, 4.8cm-6.35cm)
Loop catheter extension
Saline flush
How you'll do it:
Place patient is supine position (can also use Trendelenburg)
Use ultrasound to visualize IJ
Prep the area with chlorhexidine and drape the patient (limited draping, see video)
Cover probe with Tegaderm or sterile probe cover
Visualize vessel once again, using sterile jelly and have the patient perform Valsalva maneuver
Puncture the skin at a 45-degree angle and advance needle into the IJ lumen
Once flash is observed, advance the catheter into the lumen and withdraw the needle
Connect the loop catheter extension, ensure that blood draws back, then flush the tubing and apply dressing
The Evidence
Accessing the IJ with a peripheral venous catheter was first described in a 2009 letter to the editor in the Journal of Emergency medicine.[1] Only a few studies were subsequently published between 2009 and 2016 regarding the procedure’s technique, its safety, or its efficacy. The few small case series that were published studied 37 patients in total; in all series, the procedure was noted to have a high success rate and on average took significantly less time than placing a central IJ catheter.[5,6,7] The past year has seen two additional prospective studies evaluating both the efficacy and the safety of the peripheral IJ, enrolling a total of 107 patients.[2,3] The first study noted no complications at 1 and 6 weeks associated with US-guided peripheral IJ catheterization.[2] The second, a multicenter study, noted an 88% success rate and a 14% complication rate (the only complication being lost patency—of note, it is unclear whether or not this was considered a complication in the first study).[3] In all studies, the time to insert the peripheral IJ was approximately 5 minutes or less. While the body of literature thus far is still relatively small, it would seem to suggest that the use of a peripheral IJ is a safe and suitable alternative in appropriately selected patients who have no other feasible routes of vascular access, and in whom the insertion of an IO or central line is otherwise unnecessary.
The Takeaway
The placement of a peripheral IV into the internal jugular vein under ultrasound guidance has been described as efficacious and safe.
On average, it is not a time-consuming procedure. This is operator-dependent, but it takes significantly less time than placing a central venous catheter in most cases and is associated with fewer complications.
Expert Commentary
The rare but classic case remains the difficult vascular access patient with severe shortness of breath. Using either the long angiocatheter in the central line kit, and today a long peripheral intravenous catheter, an experienced clinician sonographer may be able to insert the catheter with the patient nearly upright. In such patients, either an infraclavicular subclavian or supraclavicular subclavian central line approach may result in a pneumothorax, quickly turning a bad situation into a nightmare for everyone. Instead, quickly placing a simple long peripheral catheter into the IJ using US guidance immediately establishes the vascular access needed to administer life saving medications. When the patient is stabilized, the traditional central line may then be placed if still required.
Necessity breeds invention! So it is exciting for new and experienced clinicians alike to now be able simply use the long peripheral IV catheter in both stable patients not needing central access, and the rare unstable patients who must remain upright, and only opening an expensive central line kit when needed.

John Bailitz, MD
Associate Professor of Emergency Medicine
How you cite this post
[Peer-Reviewed, Web Publication] Knopp S, Ketterer A (2018, August 27). Ultrasound-guided peripheral IJ catheter placement. [NUEM Blog. Expert Commentary by Bailitz J]. Retrieved from http://www.nuemblog.com/blog/peripheral-IJ
Posts you may also enjoy
References
Moayedi, Siamak, “Ultrasound-Guided Venous Access with a Single Lumen Catheter into the Internal Jugular Vein.” The Journal of Emergency Medicine. 2009;37(4):419
Kiefer D, Keller SM, Weekes A. “Prospective evaluation of ultrasound-guided short catheter placement in internal jugular veins of difficult venous access patients.” Am J Emerg Med. 2016 Mar;34(3):578-81
Moayedi S, Witting M, Pirotte M. “Safety and Efficacy of the “Easy Internal Jugular (IJ)”: An Approach to Difficult Intravenous Access” J Emerg Med. 2016Dec;51(6):636-42
Butterfield M, Abdelghani R, Mohamad M, Limsuwat C, Kheir F. “Using Ultrasound-Guided Peripheral Catheterization of the Internal Jugular Vein in Patients With Difficult Peripheral Access.” Am J Ther. 2015 Oct 8.
Teismann N, Knight R, Rehrer M, Shah S, Nagdev A, Stone M. “The Ultrasound-guided “Peripheral IJ”: Internal Jugular Vein Catheterization using a Standard Intravenous Catheter” J Emerg Med. 2013Jan;44(1):150-54
Zwank, Michael. “Ultrasound-guided catheter-over-needle internal jugular vein catheterization.” Am J Emerg Med. 2012Feb;30(2):372-73
The Use of the Angiocatheter in Central Venous Line Insertion
There are two techniques for guide wire insertion when performing central line placement. This week we compare the evidence for the two approaches and provide support for the cathether-over-needle (CON) technique which may prove useful in specific situations.
Simple Steps To Auricular Hematoma Drainage
A step-by-step guide to management of auricular hematoma.
Quick Guide To Minor Facial Trauma: Part 2
In the emergency department, we commonly encounter minor injuries to the face and mouth. In a two part series, we will provide a short overview of some helpful strategies for dealing with these cosmetically sensitive injuries in an effective manner.
Owning The Ankle Arthrocentesis
As ER doctors, we stick a lot of needles into a lot of different body parts. Sometimes into vessels, sometimes into the area around the spinal cord, and of course, sometimes into hot, swollen joints. The ankle is included in this which can often prove difficult to access. To help you through your next angry ankle, here are a couple of pointers.
The Best Agent For Digital Nerve Blocks
Explore the evidence behind previously held beliefs regarding local anesthetic use in digital nerve blocks.