Written by: Melissa Kubacki, MD, MS, (NUEM ‘26) Edited by: Mara Bezerko, MD, (NUEM ‘25)
Expert Commentary by: David Zull, MD, FACEP, FACP, FASAM
Introduction:
Photography in the emergency department has never been easier than it is today. With the ability to upload media directly from your phone to a patient’s chart, you don’t need to leave the room, know how to operate complex photography equipment, or be skilled in the craft. However, understanding how to take high quality and informative photographs in the acute care setting has many advantages. Photography improves documentation and assessment by future clinicians and those who may not be able to examine the patient in person. It can be useful in telemedicine, evaluating abuse, medicolegal assessment, wound healing, education, and research. In the emergency department, photography can aid our work by providing a detailed record of injury including size, color, and location, which may otherwise be difficult to document in writing precisely and can vary in description from examiner to examiner.
Forensic photography is specifically any photograph, when properly obtained, which may be used in legal proceedings. As emergency physicians, we should aim to take all of our photographs in a way that could be upheld in court; you may not be able to predict which of your cases may go to trial one day. Appropriately captured photography can record and document injuries which cannot be preserved indefinitely, jog your memory of a case, allow court and jurors to see injuries as they were, demonstrate malice or criminal intent, and to demonstrate the absence of injury or alleged findings.
A Word on Consent:
Similar to any other procedure in the emergency department, consent is required for photography. The purpose and intended use of the photographs, as well as the risks and benefits should be discussed. Some hospital systems may have consent forms specifically for photography.
Legal Minutia:
There are a few helpful principles to keep in mind when photographing a case which could go to court. For an image to be accepted as evidence in court, it must be accurate and objective in its description of the subject. Both the photograph and the photographer must be able to withstand challenges to authenticity and credibility.
A photograph will likely be accepted as evidence if it shows the original appearance of the subject (not edited or photoshopped), helps to identify or characterize the injury, is not too gruesome, is well composed (not too much going on or distracting), is in focus, includes a scale for size reference, and it corresponds to the verbal description given by the photographer being questioned. Digital cameras are acceptable means of obtaining photographs. More recently, as phone apps for EMRs become popular, cell phone cameras may also be used, but only if the photo is not also saved onto the user’s personal device. Photographs taken should never be edited, as this could be interpreted as manipulating evidence.
Taking the Best Photos:
The goal is to optimize the quality and interpretability of the photos you take–no matter what the purpose of obtaining the photographs was or with what device you used.
● Hold the camera at a 90° angle to the plane of the injury/trauma area to be photographed, preventing distortion of scale
● Place a ruler or other marker of scale (Image 1) either along the patient’s skin or held 1-2 inches off the skin, minimizing curvature of the ruler as much as possible. If a scale is not available, a well recognized object such as a coin can be used as a reference.
● Insert a color guide in the image to assist with calibration across different lighting
● Include some form of identifying information on all photos such as an MRN to remove doubt about the identity of the subject
● Remove any extraneous instruments or dressings which may distract from the injury or object of the photograph. Draping can help clarify the subject and hide distractions.
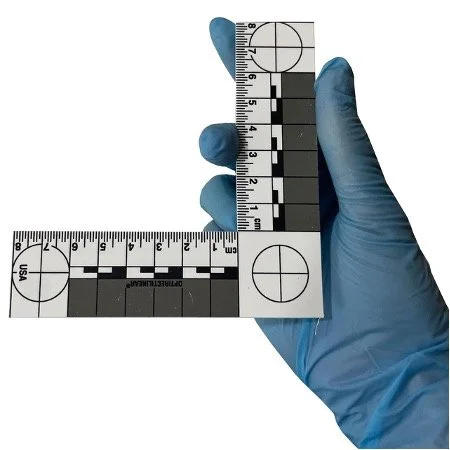
Image 1: ABFO No. 2, two dimensional scale
To ensure complete visualization of an injury, multiple photographs of the same object is often required. It is typically recommended that photos are taken from at least two distances, usually approximately three feet from the injury so that the entire body part can be visualized and identified, such as the arm, and again close up (about one foot) to allow better visualization of details (Figure 1). You can take additional, more close up photos if the injury is small or if there are additional details which would benefit from increased zoom–just make sure you are not losing valuable focus in your images. All photos from each distance should be taken at least twice, both with and without the ruler/color guide. This ensures the photographs do not cover up part of the injury (and lawyers cannot claim that they do).

Figure 1: depiction of scale and rulers when obtaining forensic photography
Remember to consider the patient’s comfort and dignity. Cover up any uninjured areas of their body with a drape, sheet, or blanket. Have a chaperone in the room if a sensitive body part needs to be photographed.
Conclusion:
Emergency medicine physicians are responsible for accurately documenting injuries and trauma–often in vulnerable patients–and typically receive very little training on how to obtain, evaluate and document these photographs. Remember that any picture you include in a patient’s chart can be used in court at a later date. Hopefully, keeping these simple tips and tricks in mind can help improve your acute care photography skills and capture meaningful medical information that can benefit both patients and their attorneys.
References
1. Blitzer HL., Jacobia J. Forensic digital imaging and photography. San Diego, CA: Academic Press, 2002.
2. Dysmorphology Subcommittee of the Clinical Practice Committee; American College of Medical Genetics. Informed consent for medical photographs. Genet Med. 2000; 2:353–5.
3. Evans S, Baylis S, Carabott R, et al. Focussing on the future: survey results on the image capture of patterned cutaneous injuries. J Forensic Leg Med. 2014; 24:7–11.
4. Gabison S, McGillivray C, Hitzig SL, Nussbaum E. A study of the utility and equivalency of 2 methods of wound measurement: digitized tracing versus digital photography. Adv Wound Care. 2015; 28:252–8.
5. Pasqualone GA. Forensic RNs as photographers. Documentation in the ED. J Psychosoc Nurs Ment Health Serv. 1996; 34:47–51.
6. Riviello, Ralph J, and Heather V Rozzi. “Forensic Photography Tips.” ACEP Now, American College of Emergency Physicians, 11 Nov. 2022, www.acepnow.com/article/forensic-photography-tips/2/?singlepage=1.
7. Smock WS. Development of a clinical forensic medicine curriculum for emergency physicians in the USA. J Clin Forensic Med. 1994; 1:27–30.
8. Smock, William S, and Patrick E Besant-Matthews. “Forensic Photography in the Emergency Department.” Forensic Emergency Medicine, 2nd ed., Lippincott Williams & Wilkins, Philadelphia, PA, 2007, pp. 268–291.
Expert Commentary
Medical photography is an essential tool used across a variety of healthcare specialties, including emergency medicine, dermatology, plastic surgery, forensic medicine, and general internal medicine. By capturing high-quality visual records of a patient’s condition, medical photography supports accurate diagnosis, documentation, treatment planning, and education. To ensure that these photographs are useful and comparable, standardized poses are critical.
Standardized poses in medical photography are necessary for achieving consistency and reliability across images. They ensure that photographs taken at different times, by different practitioners, or in different locations can be directly compared. This is particularly important for tracking the progression of a condition, evaluating treatment outcomes, or providing evidence in legal cases.
Head and Neck
· Frontal View: The patient faces the camera directly, with a neutral expression and eyes open. This pose is useful for documenting facial symmetry, skin lesions, or surgical outcomes.
· Lateral Views (Left and Right): The patient's head is turned 90 degrees to each side to capture the profile.
· Oblique Views: The head is turned approximately 45 degrees to show partial profile and frontal features simultaneously.
· Close-Ups: For detailed examination of specific areas, such as a lesion, a photograph should be taken at close range often requiring a macro setting on your camera.
Upper Body and Torso
· Frontal View: The patient stands or sits upright, facing the camera. Arms should be by the sides unless documenting shoulders or arms.
· Posterior View: The patient turns to face away from the camera. This pose is useful for documenting the back, including the spine and shoulders.
· Lateral Views: The patient stands sideways to the camera, allowing for assessment of posture, chest, or abdominal contours.
Extremities
· Hands and Feet: Standard poses for hands include dorsal, palmar, and lateral views. For feet, dorsal, plantar, and lateral views are required.
· To document range of motion, photographs should be taken with the extremities in both flexed and extended positions if possible.
Full Body
· Anterior View: The patient stands upright facing the camera, ensuring the entire body is in the frame. This is often used for documenting posture or dermatological conditions that affect large areas of the body.
· Posterior View: The patient stands upright with their back to the camera.
· Lateral Views: Full-body lateral images are useful for assessing alignment or structural abnormalities.
Technical Considerations
To achieve standardization, it is not enough to define poses; technical factors must also be controlled. These include lighting, background, camera settings, and patient preparation. Consistent, even lighting is imperative to avoid shadows or highlights that could obscure details. This is best achieved by utilization of a ring flash attachment, but since few smartphone owners possess this attachment, taking photos with or without your standard flash provides a variety of photo exposures to choose from.
A neutral, non-reflective background—typically white, gray, or blue—is ideal for ensuring that the subject stands out clearly. Avoid cluttered or distracting backgrounds, but sometimes reflecting the chaos of the ER at the time may be helpful..
Adjusting camera settings may sometimes play a role. On the Iphone, for example, you can tap on the screen to adjust the spot you want in focus. You can also tap on the screen and move the slider to adjust brightness. The macro setting is instrumental in getting close up photos. Avoid night mode as it is usually better to use the flash. Also avoid portrait mode since it blurs out the background and this would decrease the photos utilization in forensics.
Patients should be instructed to remove any items that could obscure or detract from the area being photographed, such as jewelry or clothing. The patient’s posture should be relaxed but consistent, and they should be informed about the poses you are planning and the purpose of the photographs.
Obtaining informed consent is mandatory before capturing any medical photographs. The importance of the photos should be emphasized to the patient whether it be for consultant viewing, tracking wound or lesion progression, providing photos for teaching purposes or forensic evidence. Close up, anonymous photographs used for teaching purposes only and have no identifiers, may only require verbal consent.
In conclusion, standardized poses for medical photography are indispensable for ensuring consistency, accuracy, and utility. By adhering to established protocols and technical guidelines, healthcare providers can create reliable visual records that improve diagnosis, treatment planning, and education.

David Zull, MD, FACEP, FACP, FASAM
Professor of Emergency Medicine and Internal Medicine
Northwestern University Feinberg School of Medicine
How To Cite This Post:
[Peer-Reviewed, Web Publication] Kubacki, M. Berzerko, M. (2025, November 24). Forensic Photography in the Emergency Department. [NUEM Blog. Expert Commentary by Zull, D.]. Retrieved from http://www.nuemblog.com/blog/forensic-photography.