Vasopressor Nonresponse

Written by: Elizabeth Stulpin, MD (NUEM ‘23) Edited by: Aaron Wibberly, MD (NUEM ‘22)
Expert Commentary by: Joshua Zimmerman, MD (NUEM ‘17)


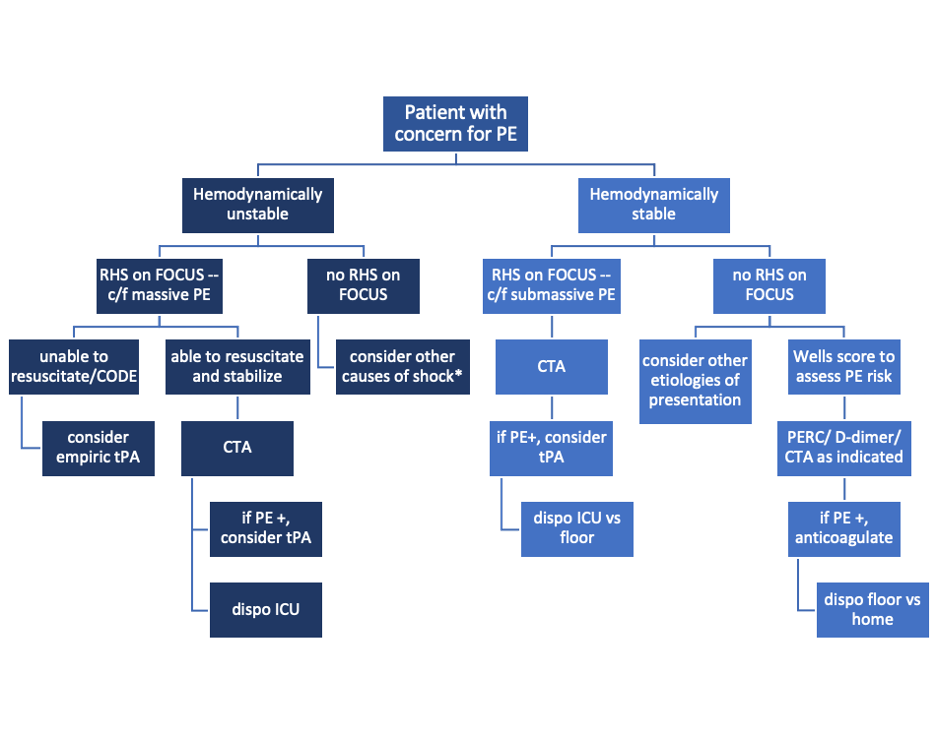
Non-Response to Vasopressors

Shock is defined as a state of cellular and tissue hypoxia resulting in end organ dysfunction. This state may arise due to impaired oxygen delivery to tissues, impaired oxygen utilization by the tissues themselves, increased oxygen consumption, or a combination of these mechanisms. Due to its extremely high morbidity and mortality as well as high healthcare costs, the prompt recognition, diagnosis and resuscitation of shock is key. And for most forms, EM physicians are not typically shocked by shock. They have a toolbox of strategies, mainly fluids and vasopressors, to stabilize these critically ill patients. 

However, what happens when the trusted treatment paradigm fails? There is a subset of patients who, despite aggressive conventional resuscitation, have an inadequate hemodynamic response and develop refractory shock. This is seen in approximately 7 percent of patients, with short-term mortality ranging from 50 to 80 percent. Due to this significantly lower incidence and increased mortality, alternate causes for refractory shock must be considered when vasopressors do not have the desired effect.  

Acidosis

Acidosis in shock states can present from multiple different sources, including sepsis, hypoxemia, ingestions, hyperlactatemia from hypoperfusion, amongst others. With increasing acidosis, calcium influx is reduced, contractility is inhibited and the binding affinity of pressors is reduced, all of which lead to excess vasodilation and refractory hypotension. While bicarbonate is sometimes given in an effort to increase cellular pH, it is controversial for any pH >7.0. At those levels, bicarbonate administration has not been shown to improve cardiac output, MAP or pressor response. While a bicarbonate drip and hyperventilation can temporize an acidosis, emergent HD or CRRT is a definitive treatment if the cause cannot be quickly reversed. 

Adrenal Insufficiency

Cortisol has a myriad of functions in the body, not limited to its synergistic effects with catecholamines to help cause vasoconstriction. Thus, when the adrenal glands are chronically suppressed and then experience an acute stressor, hypotension can ensue. The most common cause of chronic suppression is long-term steroid use, and a stressor can include surgery, infection, hypovolemia, pregnancy, medications, or reduced steroid use. Clues that suggest adrenal insufficiency include nausea/vomiting, cutaneous hyperpigmentation, and multiple electrolyte abnormalities (hyponatremia, hyperkalemia, hypoglycemia). Previously healthy individuals, in the setting of critical illness, can also infrequently decompensate into a state of relative adrenal insufficiency. To reverse these effects as well as refractory hypotension, hydrocortisone is the preferred agent due to both its glucocorticoid and mineralocorticoid properties. A loading dose of 100mg IV should be given, followed by 50mg every 6 hours thereafter. 

Alternate Shock

Not all shock is declared equal. For example, a patient in cardiogenic shock will likely worsen with the administration of fluids and the wrong vasopressors. Similarly, obstructive shock as seen in massive PEs, tension pneumothoraces or cardiac tamponade will not improve without addressing the cause. 

Anaphylaxis 

Anaphylaxis may present as hypotension alone. Thus, it may easily be confused with a different form of shock and treated with vasopressors such as norepinephrine and vasopressin, which are not first line for anaphylaxis. Along with using epinephrine as the pressor of choice and other conventional therapies for anaphylaxis, there are alternate medications available for persistent refractory hypotension. One of these is methylene blue. While typically reserved for treatment of methemoglobinemia, the cellular mechanism of methylene blue can decrease vasodilation. Data suggest that this effect can be seen with a one-time dose of 1-2mg/kg. 

Hemorrhage

Often a common cause of refractory shock in the post op setting, bleeding can be obscure in its early stages before a hemoglobin drop is appreciated or before the patient develops abdominal distension and flank dullness (retroperitoneal bleed). If concerned, empiric uncrossed unmatched blood can be transfused. 

Hypocalcemia

Calcium homeostasis is necessary for the proper maintenance of myocardial contractility and vascular tone. Hypocalcemia can be hinted at through history or by hints such as a prolonged QTc on an ECG. Those at higher risk of hypocalcemia (vitamin D deficiency, ESRD, hyperparathyroidism, burns, multiple blood transfusions, etc.) may have greater severity of shock with increased mortality. In repleting calcium, co-administration of phosphorous and magnesium may allow for reversal of the patient’s shock state.  

Hypothyroidism

Decompensated hypothyroidism can have profound effects, including bradycardia, impaired myocardial contractility, and decreased peripheral vasoconstriction. However, even subclinical hypothyroidism with an elevated TSH but normal T4 increases risk of poor outcomes due to effects on cardiac function. While the diagnosis of hypothyroidism can be delayed by lab results, clues to the diagnosis include thyroidectomy scar, non-pitting edema of the extremities, macroglossia, altered mental status, hypoglycemia and hypothermia. Initial hypotension may not respond to vasopressors, but shock should improve once thyroid hormone is given. Stress dose steroids (hydrocortisone 100mg IV) should also be given due to the association between adrenal insufficiency and hypothyroidism, and giving thyroid hormone without steroids can precipitate adrenal crisis. 

Ingestions

When in doubt, look at the medication list! Both beta blocker and calcium channel blocker toxicity can cause profound myocardial depression, bradycardia and hypotension due to their inhibition of calcium signaling. Refractory hypotension can be overcome with the use of direct cardiac pacing, calcium, glucagon, or high dose insulin.  And if all else fails, ECMO can overcome medication toxicity until it can be fully metabolized or cleared. 

When conventional resuscitation for shock with fluids, vasopressors and/or inotropes fails, it is time for a cognitive pause. By running through this list of alternate causes of refractory shock, other methods of resuscitation can be added to improve patient outcomes and stabilize the patient.  

Sources:

1) Amrein K, Martucci G, and Hahner S. Understanding adrenal crisis. Intensive Care Medicine. 2018; 44(5): 652-655.

2) Boyd J, Walley K. Is there a role for sodium bicarbonate in treating lactic acidosis from shock?  Curr Opin Crit Care. 2008;14:379-83.

3) Farkas J. Decompensated Hypothyroidism. The Internet Book of Critical Care. 2016. Accessed https://emcrit.org/ibcc/myxedema/ 

4) Ho H, Chapital A, and Yu M. Hypothyroidism and Adrenal Insufficiency in Sepsis and Hemorrhagic Shock. Arch Surgery. 2004; 139(11):1199-1203. 

5) Kerns W. Management of B-Adrenergic Blocker and Calcium Channel Antagonist Toxicity. Emergency Medicine Clinics of North America. 2007; 25: 309-331. 

6) Levy B, Collin S, Sennoun N, et. al. Vascular hyporesponsiveness to vasopressors in septic shock: from bench to bedside. Intensive Care Medicine. 2010; 36: 2019-2029. 

7) Manji F, Wierstra B, and Posadas J. Severe Undifferentiated Vasoplegic Shock Refractory to Vasoactive Agents Treated with Methylene Blue. Case Reports in Critical Care. 2017. 

8) Minisola, S et al. Serum Calcium Values and Refractory Vasodilatory Shock. Chest. 2019; 155(1): 242. 

9) Nandhabalan P, Ioannou N, Meadows C and Wyncoll D. Refractory septic shock: our pragmatic approach. Critical Care. 2018; 22(1):215. 

10) Smith L, and Branson B. Refractory Hypotension – Diagnosis and Management in Surgical Patients. California Medicine. 1961; 95(3): 150-155

11) Velissaris D, Karamouzos V, Ktemopoulos N, Pierrakos C, and Karanikolas M. The Use of Sodium Bicarbonate in the Treatment of Acidosis in Sepsis: A Literature Update on a Long Term Debate. Critical Care Research and Practice. 2015.

12) Wang H, Jones A, and Donnelly J. Revised National Estimates of Emergency Department Visits for Sepsis in the United States. Critical Care Medicine. 2017; 45(9): 1443-1449. 


Expert Commentary

Dr. Stulpin's review of a very critical topic is well articulated and concise.  I would like to particularly emphasize her final points before delving into the details.  As she pointed out, patients failing to respond to typical resuscitative efforts represent quite a quagmire to the ED physician.  It is easy to arrive at premature closure and presume all shock to be sepsis simply needing more fluids or vasopressors.  However, there is significant risk in this practice, and I would thus advocate very strongly for a “pause” and thorough reassessment of the patient’s presentation and condition.  Much akin to a pre-procedural time out, this should be deliberate and uninterrupted to prevent diagnostic momentum from building and arriving at a premature closure on the etiology of the patient’s condition.  

This review covers much of the differential and pathophysiology that is germane to a discussion of refractory shock.  Rather than review this in detail, I would like to discuss a practical approach to application of this knowledge at the bedside.  So, as we approach the patient who is refractory to standard resuscitation, one’s first task is to confirm the patient is receiving the desire therapy and that this is truly shock refractory to intervention.  Check all access points for infiltration –the single most reversible cause for refractory hypotension is that the patient is not receiving fluids/vasopressors, etc. due to inadequate access.  Check dosing and confirm with nursing that infusions have been running appropriately.  If access is the issue, I would advocate placing a more reliable form such as central access or, in the very unstable, IO access early in the reassessment.  While I am an advocate for US guided access in stable patients and feel that this is often a great tool, this is a scenario I would advocate against US guided peripheral access.  This form of access is often time consuming, and more importantly, signs of infiltration are less evident in deeper IV sites which is a serious concern if you are running peripheral vasopressors.  

Presuming your access is adequate, the next task is to reassess perfusion in its entirety.  While not mandatory, this is a point where I would consider placing an arterial line for optimally reliable BP monitoring.  One must perform a complete re-examination as well.  If not already completed, a rectal exam for the occult GI bleeding.  One should additionally particular attention on reassessment to skin and perfusion.  Check capillary refill, skin temperature and coloration as a matter of habit for cases of refractory shock.  Cool extremities are not typically associated with distributive shock and should make you consider shock states with high SVR such as cardiogenic or acute blood loss.  In addition, a repeat skin exam may reveal new rashes – I look specifically for the presence of petechiae, purpura or urticaria.  Urticaria should prompt consideration of anaphylaxis.  If the patient has received any antibiotics yet this is an important consideration given antibiotics are one of the most common medication precipitants of anaphylaxis and this may be the source of their worsening shock state.  

After completing your thorough exam, I strongly advocate for a sonographic assessment as well.  This is where the RUSH exam, or at least a modified version, fits well into patient assessment and can offer a great deal of information.  I pay particularly close attention to the cardiac and abdominal windows.  This can aid in the rapid diagnosis of an obstructive shock state such as cardiac tamponade, or acute RV failure in the setting of massive PE.  Free intra-abdominal fluid should be considered hemorrhage until proven otherwise in the shock patient.  One reminder is that when assessing for occult bleeding, the FAST exam views are an excellent tool but not sufficiently sensitive for definitive rule out.  In particular, the FAST exam lacks sensitivity for retroperitoneal bleeding and therefore if there remains high clinical concern, CT imaging should also be considered.  

Once a thorough re-examination is completed, reconsider the patient’s medications as another source.  Patients are on a myriad of antihypertensives and other agents that can lower blood pressure.  Many of the pathways that metabolize or eliminate these drugs are compromised in a state of hypoperfusion and can lead to a synergistic worsening of hypotension.  One example of this is the case of BRASH Syndrome.  In addition to antihypertensives, a review of the patient’s medication list should include a particular search for steroids or other adrenal replacements such as fludrocortisone.  An extremely important cause of refractory hypotension to consider is that of adrenal insufficiency.  As Dr. Stulpin reviewed in her discussion above, this can come in both primary and secondary forms.  The latter is far more common and induced by exogenous steroid use.   A wise ICU attending once taught that no patient should die without stress dose steroids.  While perhaps a bit morbid, the take home point here was that adrenal insufficiency can present in any patient, not just those with underlying disorders of glucocorticoid production.  Pay particular attention to patients with autoimmune disorders or others on chronic steroid therapy as these are the populations that are particularly at risk.  Patients presenting with unexplained hypoglycemia in the setting of sepsis or shock of any kind should also be strongly considered to receive stress dose steroids.  Do not wait for a cortisol level to treat this condition.  Consider, as well, checking TSH and free T3/T4 as patients with adrenal insufficiency can simultaneously harbor other endocrinopathies.  

To summarize, refractory hypotension or failure to respond to traditional interventions is relatively uncommon but critical to identify in shock patients.  Often these patients have a primary diagnosis of septic shock but can suffer from concurrent shock related to one or more of the differential considerations we have reviewed above.  A thoughtful reassessment, both of the patient’s physical exam findings, US and other diagnostics, medication list and history of present illness will offer clues that may uncover an additional etiology critical to treat and to ensure the best outcome possible.

Joshua D. Zimmerman, MD

Health System Clinician

Feinberg School of Medicine

Northwestern Medicine


How To Cite This Post:

[Peer-Reviewed, Web Publication] Stulpin, E. Wibberly, A. (2022, Jan 24). Vasopressor Nonresponse. [NUEM Blog. Expert Commentary by Zimmerman, J]. Retrieved from http://www.nuemblog.com/blog/vasopressor-nonresponse


Other Posts You May Enjoy

Posted on January 24, 2022 and filed under Pharmacology, Critical care.

Hyponatremia

Written by: Jim O’Brien, MD (NUEM ‘23) Edited by: David Kaltman, MD (NUEM ‘20)
Expert Commentary by: Sarah Dhake, MD (NUEM ‘19) & Josh Waitzman, MD, PhD


Expert Commentary

Thanks for a great review on hyponatremia by Drs. O’Brien & Kaltman. I’ve recruited the expert insight from one of my favorite colleagues and fellow Northwestern University Feinberg School of Medicine graduate Joshua Waitzman, MD PhD, Instructor of Nephrology at Beth Israel Deaconess Medical Center in Boston, MA. 

I’ll highlight a few points from an emergency medicine point of view with Dr. Waitzman’s additional commentary from the nephrology perspective. 

  • I’d argue the primary question you need to answer in the ED for hyponatremia patients is whether or not hypertonic saline is indicated. For those well-appearing neurologically intact hyponatremia patients w/ sodium levels > 120, further work-up & analysis of the underlying etiology can be deferred to the inpatient side. It’s always appreciated to send the hyponatremia labs (eg urine lytes, osms, TSH, etc) for the admitting team, however differentiating SIADH from cerebral salt-wasting should not be at the top of your priority list. Especially as the etiology of hyponatremia is commonly multifold. 

    • Dr. Waitzman: additionally, a key reminder is to STOP AND THINK before giving isotonic fluids (0.9% NS, LR, bicarb gtt, etc). For most patients with moderate-to-severe hyponatremia, giving a liter of normal saline is normally the wrong answer.

      • If your patient has SIADH, heart failure, or cirrhosis (common causes of hyponatremia), additional IV fluids will end up worsening the hyponatremia. 

      • If your patient is volume depleted, isotonic fluids will fix the volume problem and shut off ADH, leading to rapid increases in urine output and rises in sodium. The worst thing we can do to patients with bad hyponatremia is overcorrect them too quickly. 

  • If you are considering hypertonic saline, make sure to get your nephrologist on board early. Nephrology is the primary team that will be following your patient from arrival in the ED through discharge so if you’re debating whether the patient requires 3% NaCl, please consult your nephrology team ASAP.  Though w/ that said, if your patient is seizing due to hyponatremia, push the hypertonic then get nephrology on board afterwards.

    • Dr. Waitzman: 100%. If you’re debating on hypertonic saline, call nephrology at any time. However, for the sake of your friendly overworked nephrology fellow, please wait until the AM before calling about patients who appear well and have sodium > 125. When consulting nephrology for hyponatremia, please have a urine sodium, potassium, and creatinine at the ready.

  • Hypertonic saline is not only indicated for seizures, coma, suspected cerebral herniation or focal neurological deficits as noted above. Keep in mind the indication for 3% also extends to altered mental status and can present w/ simple confusion or even “just acting off” from baseline. Do keep in mind the acuteness of the neurologic status is also imperative to determining the need of hypertonic. More acute symptoms = higher likelihood of needing 3%. It’s essential to get background information from family/friends if the patient is unable to provide any additional history regarding their own baseline level of functioning. 

    • Dr. Waitzman: In my mind, using hypertonic saline should be based on three things.

      • First, how bad is the sodium level? It’s normally not worth it for most patients above 120. 

      • Second, how acute is the hyponatremia? Hypertonic can be risky for those with chronic hyponatremia but curative for those with hyperacute hyponatremia like marathon runners.

      • Third, how severe are the symptoms? Seizures attributed to hyponatremia need treatment ASAP. 

    • Because I’m a nephrologist, I approach the use of hypertonic saline like an equation, combining the acuteness of the hyponatremia with the severity of symptoms. For example, the more recent the sodium drop w/ more severe symptoms = more comfortable w/ hypertonic. The more chronic the hyponatremia and the less severe symptoms = hypertonic may have more risk than benefit. 

  • Of note, you do NOT need a central line for hypertonic saline administration. Though this is dictated by your own hospital protocols, hypertonic saline has been shown to be safe when pushed in small doses through a large-bore peripheral (proximally placed) IV [1,2]. Though if your administration says differently, do not waste time putting in a triple lumen catheter if hypertonic is truly indicated in your hyponatremia patient. Drill an IO and push the 100-150cc 3% NaCl as soon as possible. 

    • Dr. Waitzman: PREACH.

  • Do remember that pseudo-hyponatremia is a thing. Most commonly seen in our ED patients w/ hyperglycemia, other solutes which can lead to pseudo-hyponatremia are mannitol, glycol, or maltose (all three most commonly encountered on the inpatient side or post-outpatient urologic procedures). If you appreciate an elevated glucose on your chemistry panel, you can use the following equation 

Corrected Na = Measured Na + [(1.6 * (glucose-100)/100)] [3]

or this helpful link via MDCalc (https://www.mdcalc.com/sodium-correction-hyperglycemia) to determine the appropriate corrected sodium. 

  • Dr. Waitzman: If you hate math, consider a blood gas sodium. There is no pseudohyponatremia on a blood gas sodium and it results faster than your normal chemistry panel sodium level.

  • MDMA/ecstasy use is an uncommon cause of hyponatremia that should not be forgotten [4]. Keep that in mind in your presumed “intoxicated” young party-goers, especially those where these drugs are prevalent (eg raves, music-festivals, etc). MDMA leads to hyponatremia by activation of arginine vasopressin which increases kidney free water absorption [5]. 

  • Vaptans have not been established as standard of care for hyponatremia in emergency medicine. If these are to be utilized in an ED patient, it is essential that there is a nephrologist on board who is actively involved in the patient’s management.  

    • Dr. Waitzman: wholeheartedly agree. Vaptans don’t have a place in the acute settings (like the ED) and have a huge risk of over-correcting the sodium. If you need to acutely correct hyponatremia, hypertonic is the answer, not vaptans. 

  • With boarding being a nation-wide issue, one final piece of commentary from both the emergency medicine & nephrology perspective: if you’re sending your patient to the ICU for hyponatremia, it’s because they require q2hr sodium levels. Please continue those q2hr sodium levels while they remain under your care in the ED while waiting for an ICU bed. Blood gas sodiums are a great way to trend sodium levels as they’re accurate & result quickly (and avoid the potential for pseudohyponatremia as described above). 

I’d like to extend an incredibly huge thank you & sincere gratitude to Dr. Waitzman for his assistance & expertise on this expert commentary. We’re all exceptionally lucky to work with such fantastic nephrology colleagues and are eternally appreciative for all their help, insight, and expertise. 

References:

  1. Alenazi AO, Alhalimi ZM, Almatar MH, Alhajji TA. Safety of Peripheral Administration of 3% Hypertonic Saline in Critically Ill Patients: A Literature Review. Crit Care Nurse. 2021 Feb 1;41(1):25-30. doi: 10.4037/ccn2021400. PMID: 33560431.

  2. Mesghali E, Fitter S, Bahjri K, Moussavi K. Safety of Peripheral Line Administration of 3% Hypertonic Saline and Mannitol in the Emergency Department. J Emerg Med. 2019 Apr;56(4):431-436. doi: 10.1016/j.jemermed.2018.12.046. Epub 2019 Feb 8. PMID: 30745195.

  3. Katz MA. Hyperglycemia-induced hyponatremia--calculation of expected serum sodium depression. N Engl J Med. 1973 Oct 18;289(16):843-4. doi: 10.1056/NEJM197310182891607. PMID: 4763428.

  4. Petrino R, Marino R. Fluids and Electrolytes. In: Tintinalli JE, Ma O, Yealy DM, Meckler GD, Stapczynski J, Cline DM, Thomas SH. eds. Tintinalli's Emergency Medicine: A Comprehensive Study Guide, 9e. McGraw Hill; Accessed July 21, 2021.

  5. Campbell GA, Rosner MH. The agony of ecstasy: MDMA (3,4-methylenedioxymethamphetamine) and the kidney. Clin J Am Soc Nephrol. 2008 Nov;3(6):1852-60. doi: 10.2215/CJN.02080508. Epub 2008 Aug 6. PMID: 18684895.

Sarah Dhake, MD

Division of Emergency Medicine, NorthShore University HealthSystem

Clinical Assistant Professor, University of Chicago - Pritzker School of Medicine

Twitter: @ssandersEM

sdhake@northshore.org


Joshua Waitzman, MD PhD

Instructor in Medicine, Harvard Medical School
Division of Nephrology, Department of Medicine
Beth Israel Deaconess Medical Center

Twitter: @Jwaitz
jswaitzm@bidmc.harvard.edu


How To Cite This Post:

[Peer-Reviewed, Web Publication] O’Brien, J. Kaltman, D. (2022, Jan 10). Hyponatremia. [NUEM Blog. Expert Commentary by Dhake, S and Waitzman, J]. Retrieved from http://www.nuemblog.com/blog/hyponatremia


Other Posts You May Enjoy

References

share to twitter u%

Add SEO info

Posted on January 10, 2022 and filed under Endocrine.

Running Injuries

Written by: Eric Power, MD (NUEM ‘24) Edited by: Justin Seltzer, MD (NUEM '21) Expert review by:  Terese Whipple, MD (NUEM '20)


With over 40 million runners in the United States alone and an ever-increasing interest in fitness among the general population, the frequency of running injuries presented to urgent care and emergency departments will only grow with time. This is especially true due to the high rate of injury among runners, with a published annual incidence rate ranging from 19% to 79%; with even conservative estimates, that is nearly 8 million running injuries annually. 

There are several risk factors for running injuries with which the emergency physician should be familiar. Running injuries are generally the sequela of repetitive stress. Acute injuries represent a small minority of cases and are usually not serious. The strongest risk factors include older age, high mileage running, beginners or suddenly restarting running, those making a rapid increase in speed and/or distance, low bone density, and those with a history of previous injuries.

This article will focus primarily on several “low acuity” running injuries along with their initial evaluation and management. A vast majority of running injuries are not serious, however, the evaluation of the injured runner still demands detailed musculoskeletal examination and thoughtful consideration of more dangerous potential causes of the symptoms. Proper clinical diagnosis and recommendations can certainly speed recovery and return to activity. 

Iliotibial (IT) band syndrome

Major population: Young, active with a recent change in running mileage and/or runs on hilly terrain

Presentation: Lateral knee pain, especially with activity, with or without lateral thigh and hip pain

Diagnosis: Tenderness along lateral thigh extending into the lateral knee, swelling at the distal aspect may be present, Ober’s test for IT band tightness (not diagnostic)

  • EM differential: meniscus injury, stress fracture, lateral ligamentous injury

Initial treatment: No running until pain resolves then gradual return at painless speeds, distances, home exercise program to stretch IT band

Follow-up: Routine primary care, consider PT referral

Patellofemoral pain syndrome

Major population: Young, usually female, participating in sports with high volume running and/or jumping

Presentation: Anterior, aching knee pain worse with knee flexion (e.g. climbing stairs)

Diagnosis: Anterior patella tenderness; pain with patellar grind test, deep knee flexion

  • EM differential: meniscus injury, stress fracture, ligamentous injury

Initial treatment: home exercise program or formal physical therapy to strengthen quadriceps, core, and hip abductors.  consider a patella stabilizing knee brace 

Follow-up: Routine primary care, consider PT referral

Medial Tibial Stress Syndrome (“Shin Splints”)

Major population: Any patient with a recently initiated intense exercise regimen

Presentation: Anteromedial tibial pain provoked by activity and improved with rest

Diagnosis: Reproduction of pain with palpation of a diffuse area of the posteromedial border of the tibia

  • EM differential: stress fracture, DVT, exertional compartment syndrome

Initial treatment: Rest, icing (~20 minutes per hour) until the pain has resolved, then a gradual return to activity at painless speeds, distances

Follow-up: Routine primary care, consider PT, sports medicine referral due to high failure rate of conservative management

Achilles Tendinopathy

Major population: Usually middle-aged with recently initiated exercise or increased intensity/frequency

Presentation: Chronic, gradually worsening posterior heel and foot pain, often worst in the morning, with an impaired plantarflexion and explosive movements of the ankle

Diagnosis: Tendon palpation reproduces the pain, diminished range of motion and strength, calf muscle atrophy (late finding)

  • EM differential: calcaneal stress fracture, DVT, Achilles tendon rupture

Initial treatment: Reduce the intensity of activity to walking only until pain resolves, home exercise program to stretch and eccentrically load the Achilles tendon 

Follow-up: Sports medicine and PT referrals due to benefit of rehabilitation and availability of multiple specialized therapies; some cases are treated surgically

Plantar Fasciitis

Major population: High volume or newly initiated/increased running or sports, slightly more common in women

Presentation: Classically plantar midfoot to heel pain worse with the “first step” in the morning

Diagnosis: Pain reproduced with palpation of the medial tubercle of the calcaneus and proximal plantar fascia, positive windlass test 

  • EM differential: Foot stress fracture

Initial treatment: Avoid triggering activities, home exercise program to stretch and deeply massage the plantar fascia

Follow-up: Referral to PT and a foot and ankle specialist (orthopedic surgeon or podiatrist) as chronic symptoms are common

Key points

  • A majority of running injuries are not serious or acute but can be function limiting if not properly diagnosed and managed

  • It is important to rule out major relevant differential diagnoses such as stress fractures, DVT, and ligament/tendon injuries prior to discharge

  • Universal management is with rest, as needed NSAIDs, a gradual return to activity when the pain has resolved, and routine primary care follow up; primary care sports medicine or orthopedic surgery should be reserved for severe symptoms or failure of conservative management

  • Alongside home exercises and stretches, consider PT referral routinely


References

  1. Li HY, Hua YH. Achilles Tendinopathy: Current Concepts about the Basic Science and Clinical Treatments. Biomed Res Int. 2016;2016:6492597. 

  2. McClure CJ, Oh R. Medial Tibial Stress Syndrome. [Updated 2020 Aug 10]. In: StatPearls [Internet]. Treasure Island (FL): StatPearls Publishing; 2020 Jan-. Available from: https://www.ncbi.nlm.nih.gov/books/NBK538479/

  3. Petersen W, Ellermann A, Gösele-Koppenburg A, et al. Patellofemoral pain syndrome. Knee Surg Sports Traumatol Arthrosc. 2014;22(10):2264-2274. 

  4. Petraglia F, Ramazzina I, Costantino C. Plantar fasciitis in athletes: diagnostic and treatment strategies. A systematic review. Muscles Ligaments Tendons J. 2017;7(1):107-118. Published 2017 May 10. 

  5. Strauss EJ, Kim S, Calce JG, Park D. Iliotibial Band Syndrome: Evaluation and Management. American Academy of Orthopaedic Surgeon. 2011;19(12):728-736.

  6. van der Worp MP, ten Haaf DS, van Cingel R, de Wijer A, Nijhuis-van der Sanden MW, Staal JB. Injuries in runners; a systematic review on risk factors and sex differences. PLoS One. 2015;10(2):e0114937. Published 2015 Feb 23. 


Expert Commentary

Thank you to Drs. Power and Seltzer for their concise and relevant review of common overuse injuries seen in runners. Although most of these injuries would not be considered emergent, correct diagnosis and referral of these patients is important to keep them active and decrease their likelihood of suffering the heart attacks, strokes, and chronic pain we see daily. This post did an excellent job of walking through several common injuries however, there is one more that I would like Emergency Physicians to consider in their differential for runners with extremity pain: Stress Fracture.

  • A stress fracture is break down in bone that occurs when abnormal stress is applied to healthy bone or normal stress is applied to unhealthy bone (osteopenia/porosis)

  • Female athletes are at particular risk if they are not fueling well enough, sometimes manifesting in menstrual dysfunction and decreased bone density

  • Commonly occurs in healthy runners when an athlete is increasing their training volume or intensity, or other new stress is applied such as a new running surface

  • Complain of insidious onset pain that worsens with running and other pounding activity. Pain is often better with rest early on.  

  • If the bone is palpable from the surface, it will have point tenderness over the area. Pain will be reproduced with the hop test and the fulcrum test

  • X-rays may be normal early on, later in the course, they may show periosteal reaction or fracture line. MRI can be obtained on an outpatient basis if needed. 

  • Most stress injuries can be managed by decreased weight bearing through alterations in training, however, sometimes offloading with a walking boot or crutches may be necessary depending on severity and location. 

  • High-risk stress injuries that warrant prompt sports medicine or orthopedics referral: femoral neck (superior aspect), patella, anterior tibia, medial malleolus, talus, tarsal navicular, the proximal fifth metatarsal, tarsal sesamoids.

    •  If strong suspicion of a high-risk stress injury or diagnosis is confirmed in the ED, these patients should be given crutches and made non-weight bearing until follow-up.

Hopefully, this post will help you build a differential for overuse injuries you may encounter in the ED, and provide proper follow-up in order to keep our patients healthy, active, and engaged in the activities they enjoy. 

Terese Whipple, MD

Assistant Professor

Department of Emergency Medicine

University of Iowa Hospitals and Clinics


How To Cite This Post:

[Peer-Reviewed, Web Publication] Power, E. Seltzer, J. (2022, Jan 3). Running Injuries. [NUEM Blog. Expert Commentary by Whipple, T]. Retrieved from http://www.nuemblog.com/blog/runninginjuries

Other Posts You May Enjoy


Posted on January 3, 2022 and filed under Orthopedics.

Top Blogs of 2021

Congratulations to all of the authors with the most popular posts of 2021!

1. Pill in the Pocket (23,646 views)

The runaway favorite of this year was Dr. David Feiger’s (NUEM ’22) and Dr. Jon Andereck’s (NUEM ’19) post reviewed by Dr. Kaustubha Patel of Northwestern's Bluhm Cardiovascular Institute about the “pill-in-the-pocket” approach to treating atrial fibrillation. 

Take-Home Point: In select patients, the “pill-in-the-pocket” approach is a safe and effective way to treat infrequent but symptomatic paroxysmal atrial fibrillation that reduces ED visits and improves patients’ quality of life. 

2. Peripheral Vasopressors: Do I need that central line? (8,683 views)

In the second most popular blog of the year, Dr. Saabir Kaskar (NUEM '23) and Dr. Abiye Ibiebele (NUEM '21), with commentary by Northwestern pulmonologist/intensivist, Dr. Marc Sala, summarize the current literature on the peripheral infusion of vasopressors, which is becoming more and more commonplace as the evidence evolves to support earlier initiation of pressors and more judicious use of crystalloid for many forms of shock.

Take-Home Point: While the evidence at this time is limited, clinicians should feel comfortable administering peripheral vasopressors as a bridge to central infusion for a limited time. Peripheral vasopressors have a lower risk of complications than previously thought and allow clinicians to minimize delays in administering vasoactive medications that may have a mortality benefit. 

3. Pericardiocentesis (2,553 views)

Rounding out the top three is Dr. David Feiger's (NUEM '22) and Dr. Abiye Ibiebele's (NUEM '21) post on emergent pericardiocentesis, a potentially life-saving procedure in a patient with hemodynamically significant cardiac tamponade, with expert commentary by Northwestern interventional cardiologist, Dr. Dan Schimmel. 

Take-Home Point: Bedside pericardiocentesis is a rare but important procedure that can be performed emergently using ultrasound or landmark guidance. While a subxiphoid approach is commonly performed, an apical or parasternal approach may be considered to minimize potential complications. Consider exchanging the needle for a drain once the pericardium is accessed to bridge to definitive therapy.

4. Hanging Injury (959 views)

Dr. Vytas Karalius (NUEM '22), Dr. Nery Porras (NUEM '21), and expert commentator Dr. Kevin Emmerich describe the mechanisms of injury and management of patients presenting with hanging injuries, an unfortunate but all-too-common method of self-harm worldwide. 

Take-Home Point: Hanging injuries can have wide-ranging immediate and delayed complications on multiple organ systems and clinicians should evaluate for cervical spine and cerebrovascular injury and anticipate a difficult airway due to evolving airway edema. Clinicians should have a high index of suspicion for polytrauma or toxic ingestion. Even with an initial negative workup, all patients should be admitted for observation (with a low threshold to transfer to a trauma center) and ultimately a psychiatry consult. 

5. Paronychia (623 views)

In one of two procedural infographics to make the top ten this year, Dr. Richmond Castillo (NUEM '23), Dr. Andra Farcas (NUEM '21), and Dr. Matthew Kippenhan provide a visual guide to diagnosing and treating a common "fast-track" complaint. 

Take-Home Point: Paronychia is a common infection of the nail fold that often requires an incision and drainage procedure if a purulent fluid collection is present. Be wary of several other "can't miss" visual diagnoses on the differential, such as herpetic whitlow, felon, and proximal onychomycosis. 

6. Antiemetics/Gastroparesis (572 views)

With expert commentary by NUEM faculty Dr. Howard Kim, Dr. Nery Porras (NUEM '21) and Dr. Terese Whipple (NUEM '20) provide an overview of the role of antipsychotics in the treatment of gastroparesis and other cyclic vomiting syndromes. These conditions can be difficult to treat, frustrating for both patients and providers, and refractory to traditional antiemetic therapies. 

Take-Home Point: Antipsychotic medications such as haloperidol and droperidol are effective therapies for nausea, vomiting, and abdominal pain associated with gastroparesis. Despite previous black box warnings on droperidol causing it to fall out of favor, it is safe and well-tolerated at the doses typically used in an emergency department setting. 


 7. Basic Capnography Interpretation (560 views)

Dr. Shawn Luo (NUEM '22) and Dr. Matthew McCauley (NUEM '21) review the basics of interpreting continuous waveform capnography, a versatile tool with multiple uses in both the emergency department and critical care settings. Dr. Seth Trueger, NUEM faculty, provides expert commentary. 

Take-Home Point: Continuous waveform capnography (otherwise known as end-tidal CO2) is a valuable tool that can inform real-time management decisions in both intubated and non-intubated patients. Recognizing several common patterns can guide providers during several use-cases such as confirming endotracheal tube placement, cardiac arrest, and procedural sedation. 

8. Knee Dislocation (436 views)

Knee dislocations are a rare but highly morbid condition for which Dr. Andrew Rogers (NUEM '22) and Dr. Amanda Randolph (NUEM '21) provide a streamlined approach to diagnosing and treating. NUEM's own emergency orthopedic guru, Dr. Matthew Levine, provides expert commentary. 

Take-Home Point: Knee dislocations are time-sensitive injuries that require rapid diagnosis and treatment because of the high rate of vascular complications. Emergent closed reduction is key, with a thorough neurovascular exam before and after. All patients require ABIs (with CT angiography if the ABI is abnormal) and admission for neurovascular checks. Speak with your consultants early.

9. TPA in Frostbite (422 views)

For those who practice in colder climates, Dr. Patrick King's (NUEM '23) and Dr. Nery Porras's (NUEM '21) review of the current literature on the role of tPA in frostbite is timely as we enter into the winter season. Expert commentary is provided by Dr. Anne Lambert Wagner, medical director of the Burn and Frostbite Center at the University of Colorado Health. 

Take-Home Points: While literature continues to evolve, current evidence supports the use of tPA in select patients with severe frostbite injuries in multiple digits, multiple limbs, or proximal limb segments presenting within 24 hours of injury. Combined with active rewarming strategies, tPA use results in significantly improved outcomes. 

10. Felon (381 views)

Rounding out the top 10 for 2021 is the second procedural infographic, which is closely related to our Paronychia post. The expert review of Dr. Matthew Levine, Dr. Daniel Levine (NUEM '23), and Dr. Will LaPlant (NUEM '20) illustrate the diagnosis and management of felons in the emergency department.
Take-Home Point: Understanding finger anatomy is key to understanding felons, which present as tense, throbbing, purulent infections of the distal finger pad. Incision and drainage is the mainstay of therapy for felons, with a course of oral antibiotics and mandatory hand surgery follow-up to avoid complications such as flexor tenosynovitis or osteomyelitis of the distal phalanx. 

Posted on December 27, 2021 and filed under top 10 2021.

Hip Pain in Pediatrics

Written by: Tommy Ng, MD (NUEM ‘24) Edited by: Patricia Bigach, MD (NUEM ‘22) Expert review by:  Terese Whipple, MD '20


So your kid won’t walk

One of the most common complaints in a pediatric Emergency Department is a child refusing or inability to ambulate. For normal development, a child is typically able to stand at 9 months, walk at 12 months, and run at 18 months. There is a certain degree of variability for these age constraints however any acute decrease in mobility should prompt an evaluation. A limp is defined as any abnormality in gait caused by pain, weakness, or deformity [1].  There are a plethora of conditions that can manifest with an antalgic gait or refusal to bear weight and it may be difficult to distinguish between etiologies given a child’s age.

History and physical

Age is an important factor as certain conditions are more likely depending on the patient’s age

Acuity should be determined as the chronicity of limp as certain etiologies are more acute while others are indolent. Additionally, certain infectious etiologies are more likely to present acutely or chronically.

Fever may suggest an infectious or rheumatologic cause

Trauma can help distinguish soft tissue vs orthopedic injuries

Past medical history is important to be focused on recent illnesses, antibiotic use, history of sickle cell disease, or hormonal diseases.

Physical examination should always include an attempt to ambulate the child unless there is an obvious contraindication noted immediately (eg open fracture). If the child refuses to bear weight, the child should be made non-weight bearing until serious pathology which can be worsened by walking is ruled out. Strength and range of motion of both lower extremities should also be examined [2].  


Normal gait cycle (orthobullets.com)


Differential: the bad, the worse, and the ugly

Infectious

  • Transient Synovitis - Relatively common with a lifetime risk of 3%. Affects ages 3-8, males to females 2:1 [3]. Typically well appearing with normal labs, however, this is a diagnosis of exclusion and a septic joint should be ruled out. Management includes NSAID use and return to activity as tolerated [4].

  • Septic Arthritis - A “do not miss” diagnosis, commonly ages 3-6 with a slight male predominance [5]. Typically presenting with fevers and abnormal labs. The Kocher Criteria (originally developed in 1999 and validated in 2004) can be helpful in determining the likelihood of septic arthritis [6]. Management includes imaging studies, typical ultrasound to assess for a joint effusion, then a diagnostic arthrocentesis & antibiotics. The antibiotic regimen should be tailored to the child’s age and other predisposing factors to certain pathogens.


  • Osteomyelitis - Occurs in 1:5000-7700 kids in increased prevalence with MRSA communities; 2:1 male to female predominance with half of all cases occurring in ages less than 5 [7]. Commonly hematogenous spread from bacteremia; clinical suspicion should prompt radiologic evaluation. X-rays may be likely to be normal/inconclusive early in the disease course and MRI may be often indicated. Labs can be helpful but are not specific; a systematic review of >12,000 patients showed that elevated WBC was only present in 36% of patients [7]. ESR and CRP are non-specific but have a sensitivity of 95% [7]. Antibiotic therapy guidelines are similar to the management of septic arthritis. Surgical intervention may be indicated if there is a lack of improvement after 48-72 hours [8].

Osteomyelitis of the distal tibia (orthobullets.com)


Orthopedic

  • Legg-Calve-Perthes / Avascular Necrosis of the Hip - Age range 3-12 with a peak at 5-7, male to female ratio 3:1, can be bilateral in 10-20% of patients [9]. Radiographs should be obtained with high clinical suspicion but are often normal early in the course. An MRI would show fragmentation of the femoral head. The patient should be made non-weight bearing and be referred to a specialist. Children under 8 typically have a better prognosis however long-term management is poorly defined as there has been no long-term study [10].


Avascular necrosis of bilateral hip (orthobullets.com)


SCFE of left hip (orthobullets.com)

  • Slipped Capital Femoral Epiphysis - Typically obese child, median age 12, bilateral in 20-40% of cases [11]. Presentation is classically chronic hip pain with antalgic gait however may present with knee pain. Physical exam classically shows external rotation and abduction of the hip during hip flexion. Management is orthopedic consultation for operative stabilization [12].


References

  1. Smith E, Anderson M, Foster H. The child with a limp: a symptom and not a diagnosis. Archives of disease in childhood - Education & practice edition. 2012;97(5):185-193. doi:10.1136/archdischild-2011-301245.

  2. Naranje S, Kelly DM, Sawyer JR. A Systematic Approach to the Evaluation of a Limping Child. Am Fam Physician. 2015 Nov 15;92(10):908-16. PMID: 26554284.

  3. Landin LA, Danielsson LG, Wattsgård C. Transient synovitis of the hip. Its incidence, epidemiology and relation to Perthes' disease. J Bone Joint Surg Br. 1987;69(2):238-242.

  4. Kermond S, Fink M, Graham K, Carlin JB, Barnett P. A randomized clinical trial: should the child with transient synovitis of the hip be treated with nonsteroidal anti-inflammatory drugs?. Ann Emerg Med. 2002;40(3):294-299. doi:10.1067/mem.2002.126171

  5. Bennett OM, Namnyak SS. Acute septic arthritis of the hip joint in infancy and childhood. Clin Orthop Relat Res. 1992;(281):123-132.

  6. Kocher MS, Zurakowski D, Kasser JR. Differentiating between septic arthritis and transient synovitis of the hip in children: an evidence-based clinical prediction algorithm. J Bone Joint Surg Am. 1999;81(12):1662-1670. doi:10.2106/00004623-199912000-00002

  7. Dartnell J, Ramachandran M, Katchburian M. Haematogenous acute and subacute paediatric osteomyelitis: a systematic review of the literature. J Bone Joint Surg Br. 2012;94(5):584-595. doi:10.1302/0301-620X.94B5.28523

  8. Kaplan SL. Osteomyelitis in children. Infect Dis Clin North Am. 2005;19(4):787-vii. doi:10.1016/j.idc.2005.07.006

  9. Johansson T, Lindblad M, Bladh M, Josefsson A, Sydsjö G. Incidence of Perthes' disease in children born between 1973 and 1993. Acta Orthop. 2017;88(1):96-100. doi:10.1080/17453674.2016.1227055

  10. Canavese F, Dimeglio A. Perthes' disease: prognosis in children under six years of age. J Bone Joint Surg Br. 2008 Jul;90(7):940-5. doi: 10.1302/0301-620X.90B7.20691. PMID: 18591607.

  11. Herngren B, Stenmarker M, Vavruch L, Hagglund G. Slipped capital femoral epiphysis: a population-based study. BMC Musculoskelet Disord. 2017;18(1):304. Published 2017 Jul 18. doi:10.1186/s12891-017-1665-3

  12. Reynolds RA. Diagnosis and treatment of slipped capital femoral epiphysis. Curr Opin Pediatr. 1999;11(1):80-83. doi:10.1097/00008480-199902000-00016 


Expert Commentary

Thank you to Drs. Ng and Bigach for compiling a concise approach to a common chief complaint encountered by Emergency Physicians across the county: a child with a new limp or the refusal to bear weight.

The first step to this often-challenging problem is to try to localize the pain, and in non-verbal kiddos, this can be the most difficult task. As highlighted above, if the child is able, observe their ambulation and establish laterality of the limp and when it occurs during the gait cycle. Most of the disease processes we as Emergency Physicians are concerned about will cause an antalgic gait or a shortened stance phase. Shortening the stance phase decreases the amount of time that the child is bearing weight on the painful limb in an effort to decrease their pain. Sometimes this is so effective that their parents will observe a limp, but the child will not complain of any pain. A thorough exam of the back and lower extremities including inspection, palpation, and range of motion of all joints is also imperative for trying to localize the cause of their symptoms.

 Let your exam and history guide lab evaluation and imaging, however, a good place to start is usually basic labs and inflammatory markers and a plain film of the affected joint. In some cases, you won’t be able to localize pain or exam findings at all, and a broad workup including plain film imaging of the entire extremity may be necessary.

A few additional pearls:

  • Always consider non-accidental trauma in children with new limp or refusal to bear weight.

  • Systemic symptoms such as fever should raise your suspicion for infectious etiology such as osteomyelitis or septic arthritis.

  • Classically children with transient synovitis will have had a recent viral illness, but this is not always the case.

  • Always examine the hips and consider hip plain films in children complaining of knee or thigh pain, but with a benign knee exam. They could be hiding an SCFE or Leg-Calve-Perthes disease.

  • Don’t forget to examine the SI joint, as it too can become infected or inflamed.

  • History of night pain should raise your antenna for malignancy like osteosarcoma, Ewing’s sarcoma, or leukemia.

  • Consider Lyme arthritis in your differential for joint pain and swelling in endemic areas.

  • Ultrasound can be useful when evaluating for septic arthritis and transient synovitis and can be performed at the bedside. However, both septic arthritis and transient synovitis can cause effusion, and therefore it is not useful in differentiating between the two. (That’s where the Kocher Criteria should be used to risk-stratify and determine if joint aspiration and fluid analysis are warranted)

Ultrasound evaluation of a pediatric hip joint demonstrating effusion courtesy of Dr. Maulik S Patel (https://radiopaedia.org)

Finally, make sure that the parents understand the diagnosis, expected course, and follow-up plan. If the child continues to refuse to bear weight, their symptoms worsen or do not improve, or they develop new concerning symptoms such as new fever or new urinary retention, they should return to the Emergency Department or their pediatrician for re-evaluation. More than once I’ve had patients who seemed for all the world to have transient synovitis eventually be diagnosed with spinal cord tumor, chronic recurrent multifocal osteomyelitis, etc.

Terese Whipple, MD

Assistant Professor

Department of Emergency Medicine

University of Iowa Hospitals and Clinics


How To Cite This Post:

[Peer-Reviewed, Web Publication] Ng, T. Bigach, P. (2021, Dec 20). Hip Pain in Pediatrics. [NUEM Blog. Expert Commentary by Whipple, T]. Retrieved from http://www.nuemblog.com/blog/hippainpediatrics

Other Posts You May Enjoy


Posted on December 20, 2021 and filed under Orthopedics, Pediatrics.

Resuscitative Hysterotomy

Written by: Aldo Gonzalez, MD (NUEM ‘23) Edited by: Justine Ko, MD (NUEM ‘21)
Expert Commentary by: Paul Trinquero, MD (NUEM '19) & Pietro Bortoletto, MD


Introduction

Resuscitative hysterotomy (RH) is the new term for what was previously called perimortem cesarean delivery (PMCD). The new nomenclature is being adopted to highlight the importance of the procedure to a successful resuscitation during maternal cardiopulmonary arrest (MCPA). It is defined as the procedure of delivering a fetus from a gravid mother through an incision in the abdomen during or after MCPA. The goal of the procedure is to improve the survival of the mother and the neonate.

Physiology

There are physiologic changes that occur during pregnancy which reduce the probability of return of spontaneous circulation (ROSC) during cardiac arrest. Physiologic anemia of pregnancy reduces the oxygen carrying capacity of blood and results in decreased delivery of oxygen during resuscitation. The large gravid uterus elevates the diaphragm and reduces the lung’s functional reserve capacity (FRC),  which when combined with increased oxygen demand from the fetus results in decreased oxygen reserves and resultant risk for rapid oxygen desaturations. The size of a gravid uterus at 20 weeks results in aortocaval compression which reduces the amount of venous return from the inferior vena cava and reduces cardiac output during resuscitation. The theory behind resuscitative hysterotomy is to increase the probability of ROSC by reducing the impact of aortocaval compression.

Supporting Evidence 

A 2012 systematic review primarily investigated the neonatal and maternal survival rates after perimortem cesarean delivery and secondarily attempted to evaluate maternal and fetal neurological outcome and the ability to perform the procedure within the recommended time frame.

Inclusion Criteria

  • original articles, case series, case reports and letters to the editor, and reports from databases

  • had minimum of least five clinical details of the case (e.g. patient age, gravidity, parity, obstetric history, medical history, presenting rhythm, or location of arrest) 

    AND

  • the care administered (chest compression, ventilation, monitoring, drug administration)

    AND

  • maternal return of spontaneous circulation or survival to hospital discharge or fetal neonatal outcome

Exclusion Criteria

  • Post-delivery arrests

  • Studies without enough data to understand the details of the arrests

  • Studies with unclear maternal and fetal outcomes

Population

  • Pregnant woman that

    • (1) had a cardiac arrest or a non-perfusing rhythm 

    • (2) received chest compression and/or advanced life support medications and/or defibrillation

  • Average maternal age: 30.5±6.5 years (median 32, range 17–44, IQR, 26.5–35.5, n = 80)

  • Gravidity: 2.5±1.5 (median 2, range 1–7, IQR 1–4, n = 59)

  • Parity: 1.1±1.3 (median 1, range 0–6, IQR 0–2, n = 57)

  • Singleton Pregnancies: 90.4% (n = 85)

  • Average gestational age at arrest: 33±7 weeks (median 35, range 10–42, IQR 31–39, n = 85)

Results

  • for cases undergoing PMCD, earlier time from arrest to delivery was associated with increased survival (p < 0.001, 95%CI 6.9–18.2)

    • surviving mothers: 27/57; 10.0±7.2 min (median 9, range 1–37)

    • non-surviving mother: 30/57; 22.6±13.3 min (median 20, range 4–60)]

  • for neonates delivered by PMCD/RH earlier time from arrest to delivery was associated with increased survival (p = 0.016)

    • surviving neonates: 14±11 min (median = 10, range = 1–47)

    • non-survivor neonates: 22±13 min (median = 20, range = 4–60) 

  • Only 4 cases met the timeframe of less than minutes

Take-Aways: Performing a PMCD/RH in the 4-5 minutes time frame is difficult. However, PMCD/RH beyond the proposed time is still beneficial and earlier time to delivery from arrest is associated with better outcomes

Guideline Recommendations

Perform basic life support (BLS) in the same way as non-pregnant patients

  • Place patient in supine position

    • Left lateral decubitus (left lateral tilt) positioning is no longer recommended during compressions because of reduced efficacy of chest compressions

  • No modification of Chest compressions 

    • Rate: 100-120 per minute

    • Depth: at least 2 inches (5 cm)

    • Allow for full chest recoil between compressions

    • Avoid interruptions as much as possible

  • No modification of Ventilation

    • Use bag-ventilation 

    • Compression to breath ratio: 30:2 before advanced airway

Perform advanced cardiac life support (ACLS) as in non-pregnant women

  • No modification of Ventilation

    • Once breath every 6 seconds (10 BPM) with advanced airway

  • No modification of medications

    • Use 1 mg Epinephrine of epinephrine every 3-5 minutes

  • No modification to defibrillation

    • Use adhesive pads on patient

    • Place in anterolateral position 

      • Lateral pad should be placed under breast tissue

    • Defibrillate for Ventricular fibrillation or Ventricular tachycardia

    • Use usual Voltages

      • Biphasic: 120-200 Joules

    • Resume compressions after shock is delivered

Special considerations during resuscitation

  • Obtain access above the diaphragm to minimize the effect of aortocaval compression on the administration of drugs

  • Perform left uterine deviation during resuscitation to reduce aortocaval compression

  • If a gravid patient suffers a cardiac arrest mobilize resources to prepare for the need for resuscitative hysterotomy and the resuscitation of the fetus early

  • Palpate the size of the gravid uterus

    • If above the height of the umbilicus then patient is most likely greater than 20 weeks gravid and a candidate for RH

  • Strongly consider performing RH (PMCD) if the patient does not achieve ROSC by the 4-minute mark and qualified staff to perform the procedure are present

  • Aim to have the procedure done by the 5-minute mark

  • Consider performing RH (PMCD) sooner if maternal prognosis is poor or prolonged period of pulselessness

  • RH should be performed at the site of the resuscitation

  • Do not delay procedure to prepare abdomen

    • May pour iodine solution over abdomen prior to incision

  • Do not delay procedure for surgical equipment if scalpel is available

  • Continue performing LUD while performing RH

Figure 1: One-handed left uterine deviation technique

Figure 2: Two-handed left uterine deviation technique

Steps for Resuscitative Hysterectomy

Pre-procedure

  • Gather supplies to perform RH

    • Personal Protective Equipment

      • Gloves

      • Face mask

      • Apron/gown

    • Resuscitative Hysterotomy Equipment

      • Scalpel(the minimum equipment to perform procedure)

      • Blunted Scissors

      • Clamps/Hemostats

      • Gauze

      • Suction

      • Large absorbable sutures

      • Needle Holder

      • Antiseptic Solution

    • Neonatal resuscitation equipment

      • Dry Linens

      • Neonatal Bag Valve Mask

      • Neonatal Airway supplies

      • Suction

      • Umbilical venous access equipment

      • Neonatal resuscitation drugs

      • Baby Warmer

      • Plastic Bag

  • Form teams to perform Resuscitative Hysterotomy

    • Resuscitative Team

    • Resuscitative Hysterotomy Team

    • Neonatal Resuscitation Team

Procedure

  • Maintain patient in supine position and continue compressions

  • Continue Left Uterine Deviation until the start of incision 

  • Quickly prepare the skin with antiseptic solution (do not delay for skin prep)

  • Perform midline vertical Incision with scalpel on the abdomen from pubic symphysis to umbilicus and cut through skin and subcutaneous tissue until fascia is reached

  • Use fingers to bluntly dissect the rectus muscle fascia access the peritoneum (can use scalpel or blunt scissors)

  • Locate the uterus and differentiate it from the bladder (bladder yellow and enveloped in fatty tissue)

  • Make a vertical incision from the lower uterus to the fundus with scalpel (can use blunt scissors)

  • If the placenta is encountered while entering the uterus, cut through it

  • Use a cupped hand to locate the fetal part closest to pelvis

  • Elevate the located fetal part and pass through uterine incision while applying transabdominal pressure with other hand

  • Use traction and transabdominal pressure to deliver the rest of the baby

  • Clamp the cord at two spots and cut in between both clamps

  • Hand the baby to the neonatal team

  • Deliver placenta with gentle traction

Post-procedure

  • Continue performing compressions

  • Consider stopping if ROSC not achieved after several rounds and  depending on the cause of PMCA

  • Give medications to promote uterine contraction

  • Analgesia and sedation may be required if patient achieves ROSC

  • Bleeding will be worse if ROSC achieved and may require pharmacologic and nonpharmacologic interventions

  • Closure will depend on whether the patient achieves ROSC and may necessitate careful closure to prevent further bleeding. Best performed by an obstetrician. If an obstetrician is unavailable, pack the uterus with gauze and clamps actively bleeding vessels to reduce bleeding. 

  • Administer prophylactic antibiotics

References

  1. Einav, S., et al. (2012). "Maternal cardiac arrest and perimortem caesarean delivery: evidence or expert-based?" Resuscitation 83(10): 1191-1200.

  2. Jeejeebhoy, F. M., et al. (2015). "Cardiac Arrest in Pregnancy: A Scientific Statement From the American Heart Association." Circulation 132(18): 1747-1773.

  3. Kikuchi, J. and S. Deering (2018). "Cardiac arrest in pregnancy." Semin Perinatol 42(1): 33-38.

  4. Parry, R., et al. (2016). "Perimortem caesarean section." Emerg Med J 33(3): 224-229.

  5. Rose, C. H., et al. (2015). "Challenging the 4- to 5-minute rule: from perimortem cesarean to resuscitative hysterotomy." Am J Obstet Gynecol 213(5): 653-656, 653 e651.

  6. Soskin, P. N. and J. Yu (2019). "Resuscitation of the Pregnant Patient." Emerg Med Clin North Am 37(2): 351-363.

  7. Walls, R. M., et al. (2018). Rosen's emergency medicine: concepts and clinical practice. Philadelphia, PA, Elsevier.


Expert Commentary

This is an excellent review of an extremely rare, but potentially life-saving procedure. It may seem daunting to perform (and it should), but the evidence would say that a resuscitative hysterotomy (RH), especially if performed promptly, drastically improves survival during the catastrophic scenario of maternal cardiac arrest. This is even more important because these patients are young (and often relatively healthy) and could potentially have decades of meaningful quality of life if they can survive the arrest. That being said, this procedure is so rare that most of us not only have never performed it, but often have never even seen it. Not only that, but unlike other rare lifesaving procedures (such as cricothyroidotomy or resuscitative thoracotomy), RH is extremely difficult to practice in cadaver labs due to the unavailability of pregnant cadavers. So, we are left with the next best thing: familiarizing ourselves with the anatomy, physiology, and simplified technique of the procedure and mentally rehearsing it so that when the time comes, we can be ready.

For these rare procedures, in addition to the excellent and thorough review above, it is also helpful to simplify and rehearse the fundamental steps. I’m not an obstetrician and certainly not an expert on this procedure, but I’ve mentally prepared myself for what I would do in the event that I am faced with this grave situation and categorized it into the following simplified five step plan. Also, prior to writing this commentary I got a curbside consult from a friend from med school and actual obstetrician and gynecologic surgeon, Dr. Pietro Bortoletto. 

First off, the indications-- basically, a pregnant woman estimated to be >20 weeks EGA who has suffered a cardiac arrest. Don’t worry about the 4 minutes, make the decision to perform a RH right away and start prepping. Delegate someone to call the appropriate resuscitation teams if available. Then start the procedure. 

Step 1: Setup. You probably don’t have a c section kit in your trauma bay, so instead open the thoracotomy tray and you’ll have most of what you need. Go ahead and set aside the finochietto rib spreaders so that you don’t have a panic attack trying to remember how to put those together with other people watching. But everything else you’ll need will be in that tray (basically a scalpel, blunt scissors, and hemostats). 

Step 2: Cut into the Abdomen. Splash prep the abdomen with betadine. Then make your long vertical incision from the uterine fundus to the pubic symphysis. Cut through the skin and subcutaneous tissue then bluntly separate the rectus and enter the peritoneum with scalpel or blunt scissors. Extend the peritoneal incision with blunt scissors. 

Step 3: (carefully) Cut into the Uterus. First, locate the uterus. Then, take a deep breath and remember that there is a fetus inside the uterus. With that terrifying thought in mind, cut vertically into the uterus, insert your fingers, and extend the incision upwards with blunt scissors and a steady hand. If you encounter an anterior placenta, cut right through it.

Step 4: Delivery. Deliver the fetus either by cupping the head and elevating it through the incision or by grabbing a leg, wiggling out the shoulders, and then flexing the head. Hand over the neonate to whoever is taking the lead on the neonatal resuscitation (will need to be warmed, stimulated, and potentially aggressively resuscitated). Clamp and cut the cord, leaving a long enough umbilical stump for an easy umbilical line if needed. Then using gentle traction, attempt delivery of the placenta. If it isn’t coming easily, leave it alone so as not to stir up more bleeding. 

Step 5: Extra credit. If you’ve made it this far as an emergency physician and there is still no obstetrician in sight, you can continue resuscitation, focusing on stopping the uterine bleeding. While you don’t need to close the fascia or skin, it can be helpful to close the uterine incision to prevent additional blood loss. You can do this with a whip stitch using 0-0 vicryl (or if that seems like showing off, you can just pack it with sterile gauze. If you’ve got it handy, give 10 IU oxytocin to stimulate uterine contraction and further slow bleeding. Feel free to order some antibiotics as well. Otherwise, continue maternal resuscitation following typical ACLS.

The big picture here is that this is a heroic, potentially life-saving procedure that most of us will never do. But we can all take a few minutes to read an excellent review like the blog post above, watch a video, and mentally walk ourselves through the simplified steps. That preparation will afford us some much-needed confidence if we are ever faced with this terrifying scenario.

Paul Trinquero, MD

Medical Director

Department of Emergency Medicine

US Air Force Hospital - Langley

Pietro Bortoletto, MD

Clinical Fellow

Reproductive Endocrinology & Infertility

Weill Cornell Medical College


How To Cite This Post:

[Peer-Reviewed, Web Publication] Gonzalez, A. Ko, J. (2021, Dec 13). Resuscitative Hysterotomy. [NUEM Blog. Expert Commentary by Trinquero, P and Bortoletto, P]. Retrieved from http://www.nuemblog.com/blog/resuscitative-hysterotomy.


Other Posts You May Enjoy

Nail Trauma

Screen Shot 2018-03-05 at 8.26.14 AM (1).png

Written by: Jon Andereck, MD, MBA (NUEM PGY-3) Edited by: Rachel Haney, MD, (NUEM Graduate 2017, US Fellow MGH) Expert review by:  Danielle McCarthy, MD 


Why Nails are Important

  • Nail injuries may have significant associated functional and cosmetic morbidity

  • Nail bed provides adherence and support for the nail


Nail Anatomy


  • Nail bed overlies the cortex of the distal phalanx and lies directly beneath the nail plate

  • Eponychium is the skin that covers the proximal end

  • Hyponychium is the skin edge at the distal nail margin

  • Cuticle is an outgrowth of the eponychium that provides a seal between the proximal nail fold and nail plate

  • Germinal matrix is the proximal portion of the nail bed responsible for nail formation and begins 7 to 8 mm under the eponychium; the distal end of the germinal matrix is the lunula


Subungual Hematoma

  • A simple subungual hematoma is not an indication to remove the nail; trephination is not indicated if the hematoma encompasses only 25%, there is no significant pain, or if injury was over 24 hours ago as the blood likely clotted and will not flow out.

  •  Blood under the cuticle proximal to the nail is a clue that there is a deeper injury and usually the nail should be removed if there is significant pain.

  • There is controversy regarding treatment of subungual hematomas and whether simple trephination is enough or whether inspection of the nail bed for injury is required.

    •  It was suggested that for subungual hematomas involving more than 50% of the nail bed, the nail should be removed given the risk of nail bed laceration. This was based on an initial study in 1987 that found that 16/27 patients with hematomas >50% had associated nail bed lacerations that required repair This study did not follow up with patients and did not have a control group so long term outcomes are unknown.

    • However, subsequent studies have shown that if there is no other significant finger tip injury, treatment by trephinating alone provides a similar good cosmetic and functional result.

  •  If you don’t have a trephinator, what else can you use?

    • Heated paper clip

    • 23-gauge 1-inch needle. Hold the needle over the hematoma, avoiding the lunula, twist and rotate the needle back and forth like a drill; no pressure needed.

    •  Number 11 scalpel (slower, more painful, larger hole but better drainage)

    •  Insulin syringe needle (29-gauge) can be used on toenails.

  •  What if there is a fracture underneath?

    • Though there is a risk of turning the fracture into an open fracture, consider still performing the procedure if the injury is painful.

  • Can consider antibiotics if trephination is pursued, though there is no data.

  • It is always important to obtain an x-ray with any traumatic injury.


Nail Bed Repair

 
Nail_figure8 pic (1).png


  • Suture the nail bed if a large subungual hematoma is associated with an unstable or avulsed nail

  • Good outcome depends on maintaining the space under the cuticle where the new nail will grow out from (the germinal matrix). If this area scars down, a new nail will not grow

  • If the nail is only partially avulsed or loose, especially at the base, lift the nail slightly to assess the nail bed.

  • If the nail is completely transected, it is best to remove the entire nail to suture the nail bed; in this case, suture the proximal and lateral nail folds first for better approximation prior to repairing the actual nail bed.

  • A sturdy needle (3-0 or 4-0) is needed to suture the nail back in place. Before replacing the nail and suturing it back in place, you can poke a hole through so the needle and suture can pass more easily.

  • A study in 2008 used dermabond for nail bed laceration repair showed similar follow up cosmetic and functional outcomes; using dermabond took about 1/3 of the time. It was a small study with only 40 patients and repair was done by orthopedic residents, but definitely a consideration

  • Some physicians will use dermabond to secure the nail in place as well

  • Key to success is achieving hemostasis and making sure you have a dry field before dermabond application

  • Another method to secure the nail in place is the figure 8 stitch proposed by hand surgeons 

  •  Protecting the exposed nail bed is essential, which can be done with the nail itself (wash well beforehand with normal saline), with the sterile aluminum foil from the suture pack, or with a piece of vaseline gauze. The nail should be reinserted under the eponychium to protect the open space for nail growth.

  • Consider a hand surgeon consult if the nail bed is extensively lacerated or if part of the nail bed is lost, as the patient my need a matrix graft.

  • Tell the patient to return for a wound check 3-5 days post repair. Replace any non-adherent material that was inserted into the proximal nail fold. Afterwards, the patient should perform dressing changes every 3-5 days.

  • Sutures that were used to reattach the nail should be removed in 2 weeks.

  • Nails grow at a rate of 0.1 mm/day and it takes approximately 6 months for a new nail to grow.

  • Instruct the patient to avoid any trauma or chemical irritants to the healing nail.


Tips: 

  • Always use absorbable suture to repair the nail bed

  •  Use a large suture and sturdy needle when suture the nail back in place; consider dermabond as an option

  •  Use a finger tourniquet to maintain a bloodless field

  • Clean the nail bed prior to repair; clean the nail very well before replacement

  • Digital blocks are key

  •  Repair the proximal and lateral nail folds first

  • If possible use the avulsed nail to protect the exposed nail bed and maintain the space for a new nail to grow


Batrick N. Treatment of uncomplicated subungual hematoma. Emerg Med J 2003;20:65.


Bowen WT, Slaven EM. Evidence-based management of acute hand injuries in the emergency department. Emergency Medicine Practice  EB Medicine. 2014;16(12):1-28. http://www.ebmedicine.net/media_library/files/1214%20Hand%20Injuries


Guthrie, Kane. “Minor Injuries 001.” Life in the Fastlane. <http://lifeinthefastlane.com/minor-injuries-001/>.


Last, First M. “Article Title.”Website Title. Website Publisher, Date Month Year Published. Web. Date Month Year Accessed.


Hedges, Jerris, James Robers. “Methods of Wound Closure.” Clinical Procedures in Emergency Medicine, 6th ed. Philadelphia: Elsevier/Saunders, 2014.


Roser SE, Gellman H. Comparison of nail bed repair versus nail trephination for subungual hematomas in children. J Hand Surg [Am]1999;24:1166–70.


Strauss E, Weil W, Jordan C, Paksima N. A prospective, randomized, controlled trial of 2-octylcyanoacrylate versus suture repair for nail bed injuries. J Hand Surg Am. 2008;33(2):250-253.


Posted on December 9, 2021 .

Bicarb in Cardiac Arrest

Written by: Kishan Ughreja, MD (NUEM ‘23) Edited by: Sean Watts, MD (NUEM ‘22)
Expert Commentary by: Dana Loke, MD (NUEM ‘21)


Utility of Sodium Bicarbonate in Cardiac Arrest

Use of sodium bicarbonate as empiric therapy in cardiac arrest has been an area of controversy.  During cardiac arrest hypoxia and hypoperfusion results in severe metabolic acidosis and subsequent impaired myocardial contractility, decreased efficacy of vasopressors, and increased risk of dysrhythmias. Previous ACLS guidelines recommended use of sodium bicarbonate to mitigate these effects; however,  harms are also associated with its routine use  including compensatory respiratory acidosis, hyperosmolarity, increased vascular resistance, and reduction in ionized calcium. 1 Current guidelines no longer recommend routine use of sodium bicarbonate, except in cases of arrest secondary to hyperkalemia, TCA overdose or preexisting metabolic acidosis.2 Regardless of these recommendations, sodium bicarbonate continues to be utilized during routine management of cardiac arrest, and studies are limited in investigating its appropriate use.

The study below investigates the effect of sodium bicarbonate in patients suffering out-of-hospital cardiac arrest with severe metabolic acidosis during prolonged CPR.


Article

Clinical Question

In patients with prolonged, atraumatic out-of-hospital cardiac arrest (OHCA) and severe metabolic acidosis, does sodium bicarbonate (SB) administration with transient hyperventilation improve acidosis without increased CO2 burden, enhance rates of return of spontaneous circulation (ROSC), survival to admission, and favorable neurologic outcomes?

Study Design

Double-blind, prospective, randomized, placebo-controlled, single-center pilot clinical trial 

Population

Inclusion criteria: Atraumatic arrest in patients ≥18yo without ROSC after 10 minutes of CPR in ED and with pH <7.1 or bicarbonate <10 mEq/L on ABG

Exclusion criteria: DNR, ECPR, ROSC w/i 10 minutes of ACLS, absence of severe metabolic acidosis on ABG after 10 minutes of CPR

Data collection over 1 year at Asan Medical Center, a tertiary referral center in Seoul, Korea

Figure 1: Patient Selection

Intervention

Sodium bicarbonate administration of 50 mEq/L over 2 minutes with concurrent increase in ventilation rate from 10 to 20 breaths per minute for 2 minutes

Control

Normal saline administration of 50 mL over 2 minutes (with same transient hyperventilation)

Outcomes

Primary

  • Change in acidosis (per methods section)

Secondary

  • Sustained ROSC — defined as restoration of a palpable pulse ≥20 min (per methods section, but listed as primary outcome in abstract)

  • Survival to hospital admission

  • Good neurological survival at 1 and 6 months (defined as cerebral performance category 1 or 2)

Results

  • 157 patients presented with cardiac arrest, 50 enrolled per inclusion criteria

  • No significant differences between study and control groups regarding demographics, PMH, witnessed arrest, bystander CPR, pre-hospital and initial cardiac rhythm

  • 10% (n=5) of enrolled patients with sustained ROSC and admitted

  • No patients survived at 6 months follow up

Pre-Intervention

  • ABG results at 10 minutes were not significantly different between groups

Post-intervention

  • ABG results at 20 minutes demonstrate that pH and HCO3- were higher in the study group than in the control group

    • pH 6.99 vs 6.90, p=0.038

    • HCO3- 21.0 vs 8.00, p=0.007

  • Within the study group, the increase in pH was not statistically significant after sodium bicarbonate administration; the increase in HCO3- was statistically significant (using Wilcoxon signed rank test)

  • No statistically significant findings in the control group after normal saline administration

  • No significant differences in any secondary outcomes (sustained ROSC, survival to admission, good neurologic outcome)

Strengths

  • Randomized, double-blinded, placebo-controlled study design

  • This study adds additional information to a clinical question that has limited previous research

  • This study added a practical clinical intervention (hyperventilation) to counteract excessive CO2 accumulation secondary to sodium bicarbonate administration, a known deleterious effect of this compound.

  • Strong control over sodium bicarbonate administration (no pre-hospital administration allowed in South Korea), so authors could control when it was given and analyze ABG results at desired intervals)

Weaknesses 

  • Small, single-center study with only 50 enrolled patients

  • Primary endpoint unclear from abstract vs methods, whether it was change acidosis or sustained ROSC; however, neither is truly patient-centered clinical outcome (good neurological outcome would be the ideal primary outcome)

  • Dosing was universal — 50 mEq/L instead of weight based (1-2 mEq/L/kg), which could result in improper dosing

  • Hyperventilation strategy may have benefited sodium bicarbonate administration group by countering respiratory alkalosis, however, it could have harmed the placebo group

  • Possible venous sampling rather than arterial for blood gas analysis at 10-minute point, though this would be a concern in any arrest setting if an arterial line could not be established in this time frame

Author’s Conclusion

“The use of sodium bicarbonate during CPR with transient hyperventilation improves acid-base status without CO2 elevation which is one of the most concerned adverse effects of sodium bicarbonate administration, but it had no effect on the improvement of the rate of ROSC and good neurologic survival.  At this point, we could not advise for or against its administration, our pilot data could be used to help design a larger trial to verify the efficacy of sodium bicarbonate.”

Bottom Line

Based on this study, the use of sodium bicarbonate does not appear to improve clinically significant outcomes, though it improved acid-base status.  Sodium bicarbonate should not be indiscriminately used in all cardiac arrests, and larger trials should be performed to further evaluate its impact on patient-centered outcomes.

Citation

Ahn, S., Kim, Y. J., Sohn, C. H., Seo, D. W., Lim, K. S., Donnino, M. W., & Kim, W. Y. (2018). Sodium bicarbonate on severe metabolic acidosis during prolonged cardiopulmonary resuscitation: a double-blind, randomized, placebo-controlled pilot study. Journal of thoracic disease, 10(4), 2295.

References

  1. White, S. J., Himes, D., Rouhani, M., & Slovis, C. M. (2001). Selected controversies in cardiopulmonary resuscitation. Seminars in respiratory and critical care medicine, 22(1), 35–50. https://doi.org/10.1055/s-2001-13839

  2. Merchant, R. M., Topjian, A. A., Panchal, A. R., Cheng, A., Aziz, K., Berg, K. M., Lavonas, E. J., Magid, D. J., & Adult Basic and Advanced Life Support, Pediatric Basic and Advanced Life Support, Neonatal Life Support, Resuscitation Education Science, and Systems of Care Writing Groups (2020). Part 1: Executive Summary: 2020 American Heart Association Guidelines for Cardiopulmonary Resuscitation and Emergency Cardiovascular Care. Circulation, 142(16_suppl_2), S337–S357. https://doi.org/10.1161/CIR.0000000000000918


Expert Commentary

Thank you Dr. Ughreja and Dr. Watts for this excellent blog post on an important topic. In medicine, we often ask “what else can we do?” but less often do we ask “is what we’re already doing effective?” This is especially important for resuscitation and cardiac arrest. Not everything that is standard-of-care is ultimately effective care, and overtreating patients can lead to other untoward effects. 

In addition to the points made in the above blog, I would add a few important notes into the equation. First, the study excluded in-hospital cardiac arrest and therefore should not be considered in those patients. Second, the study also excluded those patients with early ROSC and absence of severe metabolic acidosis, effectively biasing towards inclusion of sicker patients. It is unclear how administration of sodium bicarbonate may have influenced those patients. Third, the study population was quite small and a striking majority of that population were found to have an initial rhythm of asystole. Fourth, ventilation rates were purposefully increased during bicarb administration. Though this may be practical and can potentially counteract excessive CO2 accumulation secondary to sodium bicarbonate administration, this is not common practice which leads to questions of this study’s external validity at other institutions.  

So, despite this study, at this point in time we still must grapple with the “should-we-or-should-we-not” of sodium bicarbonate administration in prolonged cardiac arrest. Some scenarios certainly do require sodium bicarbonate, most notably TCA overdose and hyperkalemia. In these cases, it’s obvious what to do. But so often what we do in emergency medicine is riddled with uncertainty. An unclear cause of cardiac arrest is certainly one of those situations. Perhaps instead of mindlessly giving sodium bicarbonate to cardiac arrest patients, we should give it once or twice and look for evidence that it has had an effect. Is the rhythm narrowing? Did you obtain ROSC shortly after administration? If not, giving dose after dose of sodium bicarbonate in hopes of meaningful recovery may not be the best path forward.

Dana Loke, MD

Department of Emergency Medicine

Northwestern University Feinberg School of Medicine

Northwestern Memorial Hospital


How To Cite This Post:

[Peer-Reviewed, Web Publication] Ughreja, K. Watts, S. (2021, Dec 6). Bicarb in Cardiac Arrest. [NUEM Blog. Expert Commentary by Loke, D]. Retrieved from http://www.nuemblog.com/blog/bicarb-arrest


Other Posts You May Enjoy

Posted on December 6, 2021 and filed under Critical care.

Hand Nerve Blocks

Written by: Aldo Gonzalez, MD (NUEM ‘23) Edited by: Jason Chodakowski, MD (NUEM '20)
Expert Commentary by: Mike Macias, MD


Hand Nerve Blocks

Nerve blocks are the use of anesthetics to anesthetize an area by injecting directly around the nerve that innervates a certain area. It is useful when there is a large area to provide anesthesia, the area might get distorted by local infiltration and make it difficult to close the tissue, or the distribution of the area to be anesthetized is well-suited to a nerve block.

Indications

Nerve blocks of the median, ulnar, radial, and digital nerves are useful for injuries of the hand including fractures, lacerations, and burns.

Contraindication

  • Overlying infection

  • Previous allergic reaction to anesthetic

 Anesthetics

Landmark versus Ultrasound guidance

Ultrasound guidance is preferred given the ability to visualize the desired nerve and proper instillation of the anesthetic around the nerve. On ultrasound nerves are circular or triangular hyperechoic structures with hypoechoic structures within. Often described as having a “honeycomb” appearance as seen in the image of the median nerve below.

Materials

  • Ultrasound with Linear Transducer

  • Probe Cover

  • Sterile Ultrasound Gel

  • Anesthetic

  • 10 cc syringe

  • 18 gauge needle (to draw medication)

  • 25-27 gauge needle at least 1.5 in in length

  • Antiseptic Solution (ex. Chlorhexidine)

  • Towel

Positioning

The patient can be either supine or seated with their arm slightly abducted and rested on a flat surface. Their elbow can be flexed with the wrist supinated and in slight extension. A rolled towel can be used for patient comfort and help in maintaining slight extension.

Figure 1: Nerves, arteries, and muscles of the human forearm

Radial Nerve Block

The superficial radial nerve travels between the flexor carpi radialis and the radial artery on anterior (volar) and lateral (radial) aspect of the forearm. Near the wrist the radial nerve splits into the medial and lateral branch of the superficial radial nerve. The block of this nerve should be performed at the mid-forearm to distal third of the forearm before the nerve splits. The nerve may be difficult to see at the distal forearm so instead it can be found proximally and followed distally. A lateral (radial) approach of the forearm provides the most direct route to the nerve.

Figure 2: Demonstration of a radial nerve block using a lateral (radial) approach with in-plane ultrasound technique on a patient’s right hand. Radial nerve (yellow line) and ultrasound probe location (blue line).

Ulnar Nerve Block

At the distal forearm the ulnar nerve runs on the medial (ulnar) and anterior (volar) aspect of the forearm between the flexor carpi ulnaris tendon and the ulnar artery. The ulnar nerve lies in very close proximity to the ulnar artery in the distal forearm and increases the risk of accidental intravascular injection. It is safer to identify the ulnar nerve distally and the follow the artery and nerve proximally. Around the proximal third of the forearm the ulnar artery dives deeper and separates from the ulnar nerve. This provides a safer target. A medial (ulnar) approach of the forearm provides the most direct route to the nerve.

Figure 3: Demonstration of an ulnar nerve block using a median (radial) approach with in-plane ultrasound technique on a patient’s right hand. Ulnar nerve (yellow line) and ultrasound probe location (blue line).

Median Nerve Block

At the mid to distal forearm the median nerve runs in the middle of the anterior (volar) aspect of the forearm between the flexor digitorum superficialis and flexor digitorum profundus muscles/tendons. Near the wrist the nerve can be difficult to appreciate due to all the tendons of the anterior compartment of the arm. The nerve can be best appreciated at the mid-forearm. A lateral (radial) or medial (ulnar) approach can be used for in-plane technique or a mid-line approach using out-of-plane technique. Be mindful to avoid accidentally puncturing the radial or ulnar artery If using an in-plane technique with a lateral or medial approach.

Figure 4: Demonstration of a median nerve block using a midline approach with out-of-plane ultrasound technique on a patient’s right hand. Median nerve (yellow line) and ultrasound probe location (blue line).

Figure 5: Demonstration of a median nerve block using a median (ulnar) approach with in-plane ultrasound technique on a patient’s right hand. Median nerve (yellow line) and ultrasound probe location (blue line).

Figure 6: Demonstration of a median nerve block using a lateral (radial) approach with in-plane ultrasound technique on a patient’s right hand. Median nerve (yellow line) and ultrasound probe location (blue line).

Steps for Ultrasound-Guided Nerve Block

  1. Document a neurological exam prior starting the procedure

  2. Select the nerve or nerves best suited to achieve best anesthesia for the injury

  3. Use the linear transducer to visualize the nerve prior beginning the procedure

  4. Plan an approach and select the best site

  5. Draw up anesthetic in the 10 cc syringe with an 18 G needle

  6. Replace 18 G needle with 25-27 G needle

  7. Use antiseptic solution to prepare the skin

  8. Dawn sterile gloves

  9. Cover transducer in sterile cover

  10. Use ultrasound to visualize the nerve and confirm approach

  11. Insert the needle into the skin

  12. Advance the needle using in-plane or out-of-plane technique 

  13. Come close to the nerve but do not puncture the nerve

  14. Draw back to confirm not with-in a vessel

  15. Deliver 5mL of anesthetic

  16. The nerve will become enveloped in hypoechoic anesthetic and peel away from the fascia of nearby muscles

  17. Withdraw the needle.

  18. Wait 3-5 minutes until patient is fully anesthetized

References

  1. Drake, R., Vogl, A. W., & Mitchell, A. W. (2015). Gray's Anatomy for Students (3rd ed.): Elsevier.

  2. Farag, E., Mounir-Soliman, L., & Brown, D. L. (2017). Brown’s Atlas of Regional Anesthesia (5th ed.): Elsevier.

  3. Gray, H. (2000). Gray's Anatomy of the Human Body. 20th edition. Retrieved from https://www.bartleby.com/107/

  4. Harmon, D., Barrett, J., Loughnane, F., Finucane, B. T., & Shorten, G. (2010). Peripheral Nerve Blocks and Peri-Operative Pain Relief (2nd ed.): Elsevier.

  5. Pester, J. M., & Varacallo, M. (2019). Ulnar Nerve Block Techniques. In StatPearls [Internet]: StatPearls Publishing.

  6. Roberts, J. R., Custalow, C. B., & Thomsen, T. W. (2019). Roberts and Hedges' clinical procedures in emergency medicine and acute care (7th ed.): Elsevier.

  7. Waldman, S. D. (2016). Atlas of Pain Management Injection Techniques E-Book (4th ed.): Elsevier.

  8. Waldman, S. D. (2021). Atlas of Interventional Pain Management E-Book (5th ed.): Elsevier.


Expert Commentary

Thank you Drs. Gonzalez and Chodakowski for the excellent post on forearm nerve blocks! This is an important skill that definitely improves the care of our patients, especially since hand injuries are such a common emergency department presentation. This is especially true for injuries that are difficult to anesthetize using traditional local injection such as dog bites, burns, abscesses, large lacerations, and fractures of the hand. I’d like to dive a little deeper into a few aspects of forearm nerve blocks:

Ultrasound guidance

I think that the days of a landmark based approach to the majority of nerve blocks are gone with the widespread availability of ultrasound and its superiority with respect to block success and reduced complications. So if you have it, use it! 

Which nerve to block?

Once you have made the commitment to block one forearm nerve, it doesn’t require much additional time or effort to block a second or even a third! Often, hand injuries will span several nerve distributions so make sure you are providing adequate anesthesia. Here is a quick way to think of it: 

  • Major hand injury (ie burn, multiple hand fractures): Triple block 

  • Injury to radial aspect of hand or digits 1-4: Radial + median nerve block 

  • Injury to ulnar aspect of hand or 5th digit (ie Boxer’s fracture): Ulnar nerve block

It is important to remember that forearm nerve blocks do not provide anesthesia to the volar forearm or wrist and therefore will not be adequate for distal radius fracture reduction. In this case, an above the elbow Radial nerve block should be performed. 

Which local anesthetic should I use?

It’s always important to consider what the goals of your local anesthetic are when determining which one to use. If you are performing a quick procedure, the shorter the better such as lidocaine. If you are providing prolonged pain management such as with a burn, bupivicaine is a better choice. I tend to prefer lidocaine + epinephrine (duration of acton 2-2.5 hours) for most of my hand injuries. Why? In a busy emergency department managing many patients at a time, the initial block and the procedure you plan on performing (ie lac repair, fracture reduction, etc) do not always happen simultaneously (ie patient may still need x-ray, irrigation, ring removal, etc). Using lidocaine + epinephrine will allow you to provide immediate pain relief for your patient but give you time to do other tasks before the patient is ready for the procedure

Positioning

As with any procedure, the set up is extremely important. You nicely described positioning earlier but I just want to highlight a couple additional points. Make sure your patient is comfortable and your ultrasound screen is in-line with your procedure. You don’t want to be turning your head away from your block to look at the screen. For the median and radial nerve block, the patient’s arm should be supinated and resting on a hard flat surface. Both nerves can then be approached using an in-plane technique from the radial aspect of the arm. The ulnar nerve can be cumbersome to get to with this same patient positioning so I recommend abducting the shoulder to about 90 degrees and placing the arm on a Mayo stand next to the patient. This will allow an in-plane approach from the ulnar aspect of the arm. I have also found this positioning technique helpful for the ulnar nerve block. 

Procedural Tips

I wanted to end with a couple of important procedural pearls I have learned during my experience with performing these blocks:

  • Perform a pre-block exam! Always make sure to perform and document a full neurological exam of the hand before you block any nerve. This is important because you want to make sure you know if any sensory or motor changes are present before your perform the block otherwise if a neurological deficit is noted after, it makes it difficult to tell if the block caused the new symptom (you can always wait until the anesthetic wears off but it may be awhile if you used bupivicaine). 

  • Follow the arteries! Sometimes it can be tricky to find the ulnar and radial nerves. The easiest method is to always start distally at the wrist. Both the radial and ulnar nerves run with their paired artery so if you start here and slide proximally, you should see the nerve split away from the artery around the mid forearm. Block them here! 

  • Target the fascial plane! The key to an effective forearm nerve block is “bathing” the nerve in anesthetic. You will want to see spread of the anesthetic around the nerve in a crescent shape, full circumferential spread is not needed. Since these nerves run in the fascial plane the goal is to get your needle tip into this plane to deposit anesthetic. There is never a need to actually touch the nerve so avoid this by aiming for the fascia and not the nerve. 

  • Protect the hand! After you perform a forearm nerve block be sure to communicate with nursing, consultants, and the patient regarding what block was performed and how long the effects will last. If a long acting agent was used such as bupivicaine, the hand should be splinted or arm placed in a sling and instructions provided to patient regarding care at home if they are being discharged. 


Thank you again for providing this excellent piece on forearm nerve blocks. I cannot stress enough how essential I think these blocks are to the toolkit of the modern emergency physician. I promise you once you add these to your practice your patient’s will thank you!

Michael Macias, MD

Global Ultrasound Director, Emergent Medical Associates 

Clinical Ultrasound Director, SoCal MEC Residency Programs


How To Cite This Post:

[Peer-Reviewed, Web Publication] Gonzalez, A. Chodakowski, J. (2021, Nov 29). Hand Nerve Blocks. [NUEM Blog. Expert Commentary by Macias, M]. Retrieved from http://www.nuemblog.com/blog/hand-nerve-blocks


Other Posts You May Enjoy

Posted on November 29, 2021 and filed under Procedures.

Sono Pro Tips and Tricks for Acute Appendicitis

Written by: Morgan McCarthy, MD (NUEM ‘24) Edited by: David Feiger, MD (NUEM ‘22)
Expert Commentary by: Shawn Luo, MD & John Bailitz, MD


Welcome to the NUEM SonoPro Tips and Tricks Series where Local and National Sono Experts team up to take you scanning from good to great for a particular diagnosis or procedure.

For those new to the probe, we recommend first reviewing the basics in the incredible FOAMed Introduction to Bedside Ultrasound Book, 5 Minute Sono, and POCUS Atlas. Once you’ve got the basics beat, then read on to learn how to start scanning like a Pro!

Did you know, appendicitis is one of the most common surgical emergencies. Despite this, some data suggests that appendicitis is missed in 3.8% to 15% of children and 5.9% to 23.5% of adults in ED visits. Appendicitis is difficult to diagnose due to the early nonspecific generalized symptoms (anorexia, generalized pain, nausea, diarrhea or constipation). We can use point of care ultrasound (POCUS) to help evaluate your differential diagnosis. One study showed that after only a 20-minute training ED physicians at various levels of experience were able to scan for appendicitis with a specificity of 97.9% and a sensitivity to 42.8%.

Beyond the classic pediatric patient, who else does the SonoPro scan?

Pocus use for appendicitis is one of the leading diagnostic tools in pediatrics for acute appendicitis. In the pediatric population limiting radiation is generally thought to be of utmost importance. The lack of exposure to radiation and small habitus makes ultrasound a great alternative in the pediatric patient. These tips and tricks can be useful in other high risk adult patients, like pregnant women. It is well known that in adults there is often a higher chance of pathology and surgeons are managing the ultimate say on whether more imaging is necessary. However, the use of ultrasound for acute appendicitis may save time, expedite care, lead to quicker consultation, and potentially augment patient satisfaction and improve outcomes. 

How to scan like a Pro:

  • There are a few ways to scan for the appendix. To start, we recommend simply asking for the patient to point to where the pain is worst and place the probe directly over that spot. 

  •  A simple trick is to have the patient cross their right leg over their left leg; this brings the appendix closer to the abdominal wall. 

  • If neither of these work, start to look for visual landmarks to orient yourself: iliac artery and vein, and the psoas muscle. The psoas muscle will be posterior, the iliac artery will be medial and the iliac crest lateral. Many times the appendix may be on top of the iliac artery. ‘Lawn mowing’ the probe up and down in this area may help it come into view.

What to Look For:

  •  Try to look for a blind ending tubular structure that is not undergoing peristalsis. When you locate this, turn your probe to view the appendix in short axis and measure the anterior to posterior diameter. In a normal appendix this may be shorter than the lateral measurements as a normal appendix is compressible!

  • There are two main criteria for diagnosing appendicitis on ultrasound: 

  1. > 6mm*

  2. non-compressible 

*Note: Make sure to consider your patient’s age; the criteria may not apply to young children as their appendix may be naturally smaller. Appendix growth typically occurs at 3 to 6 years, therefore in this population you may depend more on secondary findings.

There are many secondary findings that many experts believe may be more useful than the measurements of the appendix itself as this can be very difficult to accurately measure:

What to do next:


Ultrasound for appendicitis is very specific, however not very sensitive. If you see a dilated non-compressible blind ending loop of bowel without peristalsis, you may have identified an appendicitis - call your surgeon, follow recommendations and start antibiotics! If you are uncertain, look for secondary signs of appendicitis as above; if they are found you can increase your suspicion of appendicitis. If these findings are not present, more advanced diagnostic imaging may be required with respect to your clinical suspicion. Consider an MRI in a young patient or CT scan with contrast in an adult for further evaluation.

Where to Learn More (References)

  1. Mahajan P, Basu T, Pai C, et al. Factors Associated With Potentially Missed Diagnosis of Appendicitis in the Emergency Department. JAMA Network Open. 2020;3(3):e200612. doi:10.1001/jamanetworkopen.2020.0612.

  2. Y Ravichandran, P Harrison, E Garrow, and JH Chao. Size Matters: Point of care Ultrasound in Pediatric Appendicitis. Pediatric Emergency Care. 2016; 32: 815-816.

  3. Ma, John, et al. Ma and Mateer's Emergency Ultrasound. McGraw-Hill Education, 2020.

  4. Macias, Micheal. TPA, The Pocus Atlas

  5. Availa, Jacob. 5 minute Sono

  6. US G.E.L. Podcast

  7. Nelson, Chiricolo, Raio, Theodoro, Patel, Johnson. Can Emergency Physicians Positively Predict Acute Appendicitis on Focused Right Lower Quadrant Ultrasound?. Annals of Emergency Medicine, 2005; 46: 27-28


Expert Commentary

Excellent job by Morgan and David on this engaging and informative post summarizing the latest and greatest pro-tips and tricks for POCUS for Appendicitis. POCUS again has been demonstrated to be a helpful adjunct to improve time to diagnosis and treatment when utilized by trained clinicians for appropriate patients. On your next pediatric, pregnant, or otherwise thin “Rule out Appy”, begin the exam by asking the patient to cross their leg to flex the psoas muscle to bring the appendix closer to probe. Have the patient point to the pain to identify where to start. If the appendix is not visualized, then go to McBurney’s point in the axial plane, visualizing the iliac artery & vein to find the nearby appendix. Next, start “lawn mowing” by compressing slowly but with adequate depth to displace bowel gas. Once you see what appears to be an inflamed appendix, trace the structure to verify the blind-ending and hold your probe for a few seconds to confirm the lack of peristalsis. Measure the diameter, then turn on color flow and look for other secondary signs of inflammation. Since the specificity is high, when appendicitis is visualized, call your surgeon, and consider skipping the CT. But remember, since the appendix often “hides” within the bowel the sensitivity is low, so other comprehensive imaging will be needed to reach the correct diagnosis.

John Bailitz, MD

Vice Chair for Academics, Department of Emergency Medicine

Professor of Emergency Medicine, Feinberg School of Medicine

Northwestern Memorial Hospital

Shawn Luo, MD

PGY4 Resident Physician

Northwestern University Emergency Medicine


How To Cite This Post:

[Peer-Reviewed, Web Publication] McCarthy, M. Feiger, D. (2021, Nov 22). Sono Pro Tips and Tricks for Acute Appendicitis. [NUEM Blog. Expert Commentary by Luo, S and Bailitz, J]. Retrieved from http://www.nuemblog.com/blog/sonopro-tips-and-tricks-for-acute-appendicitis


Other Posts You May Enjoy

Posted on November 22, 2021 and filed under Ultrasound.

Stingray Stings

Written by: Mike Tandlich, MD (NUEM ‘24) Edited by: Peter Serina, MD, MPH (NUEM ‘22)
Expert Commentary by: Mike Macias, MD (NUEM ‘17)


Expert Commentary

Thank you Drs. Tandlich and Serina for this excellent infographic summarizing stingray envenomation! The good news is that the majority of stingray injuries are nonfatal and will heal without any complications! You hit all of the key points however I just wanted to highlight a few management tips below: 

Treat as a Trauma! 

While majority of the pain from stingray envenomation occurs as a result of its venom, it is important to remember that this is also a traumatic injury. Treat the injury just like you would any other penetrating trauma. Consider the location as well as surrounding structures and make sure to properly examine for tendon, nerve, and vascular injury. Injuries to the chest or abdominal regions should prompt advanced imaging and trauma consultation. 

Hot Water is Key! 

Stingray envenomation is noted to cause severe pain that is often out of proportion to your examination findings. While the exact mechanism is not clear, the venom can lead to not only pain but also local tissue necrosis. The good news is the venom is heat labile! The faster you can get the injured area into hot water the better. You want the water to be as hot as tolerable without causing a thermal burn. A good rule of thumb is to have the patient place their unaffected limb in the water first to see if it is tolerable. As this often occurs at a beach, lifeguards are often your best resource to get hot water fast! Oral analgesics can be administered if needed however often they are unnecessary as soon as the injured area is submerged in hot water. 

Retained Barb?

While uncommon, a retained barb from the envenomation can occur so be sure to consider this and evaluate appropriately. Traditionally, x-ray imaging of the affected area is performed to evaluate for a radio-opaque barb however some evidence suggests this to be a relatively low yield practice [1]. Ultrasound can also be considered if there is suspicion for retained barb or other material. In general ultrasound has been shown to be highly sensitive for identification of foreign body [2]. Not only can it be used to identify the barb but it can be used to facilitate removal [3]. 

Give Prophylactic Antibiotics 

Prophylactic antibiotics are recommended for stingray envenomation given that the limited data suggest a higher rate of wound infection in patients who were not initially treated with antibiotics [1]. Given these injuries often occur in the ocean make sure to cover for salt water species such as Vibro. Levofloxacin is my go to option.

Teach The Stingray Shuffle! 

Keeping these key management points in mind, the good news is that the majority of stingray injuries are nonfatal and will heal without any complications! Before your patient is discharged don’t forget to remind them that the next time they are going out for a surf to do the stingray shuffle!

References

  1. Clark RF, Girard RH, Rao D, Ly BT, Davis DP. Stingray envenomation: a retrospective review of clinical presentation and treatment in 119 cases. J Emerg Med. 2007 Jul;33(1):33-7

  2. Aras MH, Miloglu O, Barutcugil C, Kantarci M, Ozcan E, Harorli A. Comparison of the sensitivity for detecting foreign bodies among conventional plain radiography, computed tomography and ultrasonography. Dentomaxillofac Radiol. 2010;39(2):72-78. doi:10.1259/dmfr/68589458

  3. Nwawka OK, Kabutey NK, Locke CM, Castro-Aragon I, Kim D. Ultrasound-guided needle localization to aid foreign body removal in pediatric patients. J Foot Ankle Surg. 2014;53(1):67-70. doi:10.1053/j.jfas.2013.09.006

Michael Macias, MD

Systems Clinical Ultrasound Director,
Emergent Medical Associates

Ultrasound Director,
UHS SoCal MEC Residency Programs


How To Cite This Post:

[Peer-Reviewed, Web Publication] Tandlich, M. Serina, P. (2021, Nov 15). Stingray Stings. [NUEM Blog. Expert Commentary by Macias, M]. Retrieved from http://www.nuemblog.com/blog/stingray-stings


Other Posts You May Enjoy

Posted on November 15, 2021 and filed under Environmental.

Ankle Injuries

Written by: Eric Power, MD (NUEM ‘24) Edited by: Brett Cohen, MD (NUEM ‘21)
Expert Commentary by: Jake Stelter, MD (NUEM ‘19)


Stepwise Approach to Management of Ankle Injuries in the Emergency Department

Introduction

Ankle injuries are a common presentation to the emergency department. This group of injuries varies in severity with different treatments, discharge instructions, and follow up plans based on the injury classification.. Ankle fractures also have a large degree of variability in severity and require different initial management. In this post, we will focus on the most common types of ankle injuries and discuss the most important steps for initial assessment, management, and discharge instructions ED clinicians should be giving to their patients.

Ankle Sprains

A very common presentation of ankle injuries, especially for young athletes, is a patient coming in saying they “rolled” their ankle. This most often infers a mechanism of an inversion injury to the ankle, often after making a cut or sudden change in direction in a sporting event or landing on another competitor’s foot. In fact, it is estimated that 25% of all musculoskeletal injuries are inversion ankle injuries, and that half of all these injuries occur during sporting events. Sudden, forced inversion of the ankle, often while in slight plantar flexion, may result in injury to one or more ligaments of the lateral ankle ligament complex. The anatomy of this complex, from anterior to posterior, consists of the anterior talofibular ligament (ATFL), the calcaneofibular ligament (CFL), and the posterior talofibular ligament (PTFL) [1]. 

Isolated damage to the ATFL is by far the most frequent injury after “rolling an ankle”, making up two-thirds of all cases. With increased amounts of inversion force there is injury to the CFL followed by the PTFL, which are involved in about 20% of cases [2]. However, as with almost all complaints that come into the ED, a focused history and physical exam is the most important initial step to assess and correctly diagnose an ankle injury. The exam should start with assessments of neurovascular status with pulses, sensation, and capillary refill. The ankle should also be examined for gross deformity, tenderness, swelling, range of motion (ROM), strength, and associated injuries of the foot or knee.

Assessing for other Injuries

It is also important to recognize that ligamentous injuries often do not happen in isolation. Studies have found the prevalence of concurrent bony injuries in patients with ankle sprains to be 15-21%, with an anterior talofibular avulsion injury being the most common type [3,4]. When trying to decide whether to image these patients with ankle pain and likely sprains to assess for bony injury, many EM physicians may be familiar with the Ottawa rules. The rules and several interactive clinical decision-making tools are available online. For review, if the patient meets any of the following criteria, they require imaging of the ankle to assess for bony injuries.

  1. Tenderness at the distal 6cm of the posterior edge of the fibula or tibia

  2. Tenderness at the tip of either malleolus

  3. Tenderness at the base of the fifth metatarsal or navicular

  4. Inability to take four steps immediately after injury and on initial evaluation in the Emergency Department

A recently conducted review by Beckenkamp et al. revealed these rules to be highly sensitive (99.4%), but poorly specific (35.3%) to rule out visible fractures on plain films [6]. 

If x-rays are negative for fracture, the patient still may require orthopedic follow-up, surgery, and have a longer recovery if there is concern for a syndesmotic injury, or “high-ankle sprain”. This is the result of an injury to the tibiofibular ligament and is further discussed in a post by Ford et al [7]. Important considerations when there is clinical concern for this injury include looking for bony overlap on the malleolar films and performing specific exam maneuvers such as a “squeeze test”.

Symptom Management

When deciding what analgesic to use, providers should use clinical gestalt. In order to limit the use of opioid pain medications to prevent dependence and other associated side effects, we recommend they are only used in severe injuries where the patient is in obvious, uncontrolled pain or after a trial of non-opioid pain medications has failed. It is also our recommendation that physicians should not hesitate to use NSAIDs for pain management in fractures without other contraindications, as overall there is limited evidence to suggest it impairs bone healing [8,9]. These medications also provide the benefit of reducing inflammation in patients with swelling and/or joint effusion.

Generally accepted principles to promote healing, decrease swelling, and reduce pain are frequently referred to as the acronym “RICE” or “PRICE”. PRICE is now preferred because it includes protection of the affected structures, along with the other classic teachings. The remainder of the useful acronym includes rest of the injured joint, using ice for 20 minutes on, followed by at least one hour off while there is still pain and effusion, wearing a compression sock or stocking to decrease swelling, and elevating the affected joint above the level of the heart when possible [10]. These strategies should be used in conjunction with anti-inflammatory medications as previously mentioned to provide symptomatic relief while the injury is healing, followed by a focused home exercise program or physical therapy, often after an evaluation and referral from their primary care physician.

For a mild ankle sprain, PRICE with encouragement of early weight bearing is the ideal management. Semi-rigid braces such as an ankle stirrup brace may be superior to an ace wrap [11]. For moderate ankle sprains, give the patient crutches and have them avoid weight bearing for 2-3 days after injury, with encouragement to begin crutch walking when they are able to tolerate it [12]. A common error in treatment of mild and moderate sprains is prolonged immobilization which may delay recovery, these patients should be encouraged to perform range of motion exercises at home. For severe ankle sprains, immobilize the patient in a splint and refer them to follow-up closely with Orthopedic surgery [13]. 

Summary and Recommendation of Steps in Evaluation of Ankle Injuries for the ED Physician:

  1. Expose the joint

  2. Focused history: mechanism, ability to ambulate immediately after injury, co-injuries

  3. Physical examination of the ankle: with a focus on neurovascular status, gross deformity, swelling, point tenderness, ability to ambulate or bear weight, strength, and ROM of the joint

  4. Physical examination of the rest of the extremity: Evaluate the foot, knee and tibia/fibula for associated injuries.

  5. Analgesia: NSAIDs and acetaminophen, adjuncts if needed based on severity of injury and initial pain control

  6. Imaging, if appropriate: recommendation to use tools such as the Ottawa Ankle Rule and Ottawa Foot Rule

  7. Protection: ace wrap, air cast, walking boot up to splint and crutches, if needed

  8. Discharge instructions for acute recovery (“PRICE”) from injury and follow-up appointment

References:

  1. van den Bekerom MP, Kerkhoffs GM, McCollum GA, Calder JD, van Dijk CN. Management of acute lateral ankle ligament injury in the athlete. Knee Surg Sports Traumatol Arthrosc. 2013 Jun;21(6):1390-5. doi: 10.1007/s00167-012-2252-7. Epub 2012 Oct 30. PMID: 23108678.

  2. Brostrom L (1966) Sprained ankles. V. Treatment and prognosis in recent ligament ruptures. Acta Chir Scand 132:537–550

  3. Debieux P, Wajnsztejn A, Mansur NSB. Epidemiology of injuries due to ankle sprain diagnosed in an orthopedic emergency room. Einstein (Sao Paulo). 2019 Sep 23;18:eAO4739. doi: 10.31744/einstein_journal/2020AO4739. PMID: 31553355; PMCID: PMC6905160.

  4. Bachmann LM, Kolb E, Koller MT, Steurer J, Ter Riet G (2003) Accuracy of Ottawa ankle rules to exclude fractures of the ankle and mid-foot: systematic review. BMJ 326:417–423

  5. Stiell IG, McKnight RD, Greenberg GH, McDowell I, Nair RC, Wells GA, et al. Implementation of the Ottawa ankle rules. JAMA. 1994;271(11):827-32.

  6. Beckenkamp PR, Lin CC, Macaskill P, Michaleff ZA, Maher CG, Moseley AM. Diagnostic accuracy of the Ottawa Ankle and Midfoot Rules: a systematic review with meta-analysis. Br J Sports Med. 2017;51(6):504-10. Review.

  7. [Peer-Reviewed, Web Publication] Ford W, Li-Sauerwine S. (2019, May 27). Not All Ankle Sprains are Created Equal. [NUEM Blog. Expert Commentary by Levine M]. Retrieved from http://www.nuemblog.com/blog/high-ankle-sprain.

  8. 1. Adolphson, P., Abbaszadegan, H., Jonsson, U., Dalen, N., Sjoberg, H.E., Kalen, S. No effects of piroxicam on osteopenia and recovery after Colles’ fracture: A randomized, double-blind, placebo-controlled prospective trial. Archives of Orthopaedic and Trauma Surgery, 1993; 112: 127-130.

  9. [Peer-Reviewed, Web Publication] Farcas A, Bode, J. (2020, April 6). Clinical Question: are we impeding our patients’ fracture healing by giving them NSAIDs? [NUEM Blog. Expert Commentary by Levine, M]. Retrieved from http://www.nuemblog.com/blog/fx-nsaids

  10. Ivins D. Acute ankle sprain: an update. Am Fam Physician. 2006 Nov 15;74(10):1714-20. PMID: 17137000.

  11. Lardenoye S, Theunissen E, Cleffken B, Brink PR, de Bie RA, Poeze M. The effect of taping versus semi-rigid bracing on patient outcome and satisfaction in ankle sprains: a prospective, randomized controlled trial. BMC Musculoskelet Disord. 2012;13:81.

  12. Birrer RB, Fani-Salek MH, Totten VY, Herman LM, Polit V. Managing ankle injuries in the emergency department. J Emerg Med. 1999;17(4):651-660.


Expert Commentary

This is a great review of ankle sprain injuries.  Ankle sprains are one of the most common musculoskeletal injuries to present to the Emergency Department.  From an emergency perspective, these injuries do not often require extensive intervention and are usually treated as discussed above with PRICE therapy.  However, there are some important pitfalls to mention in regard to more serious injuries that can often be missed.  The ankle joint is complex.  It has multiple directions of motion and receives and distributes a lot of force and weight.  It is the connection point between the lower leg and the foot, with multiple muscles and tendons originating in the lower leg, passing through the ankle and attaching to insertions on the foot.  As a result of this anatomy, it is essential to not only evaluate the ankle, but to also pay attention to the foot and lower leg when evaluating an ankle sprain.  

As pointed out, the most important first step in evaluating an ankle injury is to assess for neurovascular compromise and deformity.  Dislocations or fractures causing neurovascular compromise require immediate reduction.  Next, identifying the amount of swelling and ecchymosis is important.  The more swollen and ecchymotic the ankle is, the more likely there is to be a severe injury.  Palpation of the ankle is essential to guide further workup.  Examining and palpating the base of the 5th metatarsal is important to evaluate for potential fractures to that bone.  In addition, palpation of the entire fibula is important as well.  External rotation injuries of the ankle can lead to syndesmotic sprains and a fracture of the proximal fibula called a Maisonneuve fracture.  This will not be readily apparent on isolated ankle radiographs.  In addition, I have a low threshold to image ankle injuries.  Often when patients are in acute pain, it can be difficult to narrow down areas of tenderness.  In addition, these patients will get x-rays if they follow up in an orthopedic clinic regardless.

My treatment of ankle sprains involves protecting the ankle, usually with an ace wrap and a stirrup ankle brace.  I will provide crutches for non-weight bearing for the first 24 hours, after which I encourage patients to weight bear as tolerated. I also give instructions on ankle exercises to be done at home to prevent stiffness. For severe swelling or for high ankle sprains (discussed in a separate blog post), I will place the patient in a high rise controlled ankle movement (CAM) walking boot.  Intermittent ice application for the first forty-eight hours definitely helps with swelling and pain, as does elevating the ankle when sitting.  Compression stockings can be used, but are often painful.  Hence, I prefer using an ace wrap for localized compression. Avoiding activities more intense than walking can worsen the injury and delay healing, so I typically tell patients to avoid running and returning to sports for a week or until reassessed, depending on the extent of injury.  Reevaluation after a week with a sports medicine or orthopedic provider is beneficial to assess for healing, determine if further imaging, such as an MRI, is required, and begin rehab therapy. 

Jacob Stelter, MD CAQ-SM

Division of Emergency Medicine

NorthShore Orthopaedic Institute

NorthShore University HealthSystem


How To Cite This Post:

[Peer-Reviewed, Web Publication] Power, E. Cohen, B. (2021, Nov 8). Ankle Injuries. [NUEM Blog. Expert Commentary by Stelter, J]. Retrieved from http://www.nuemblog.com/blog/ankle-injuries.


Other Posts You May Enjoy

Posted on November 8, 2021 and filed under Orthopedics.

Mechanical Ventilation Oversimplified

Written by: Shawn Luo, MD (NUEM ‘22) Edited by: Sam Stark, MD, MA (NUEM ‘20)
Expert Commentary by: Ruben Mylvaganam, MD


The ventilator: we’ve all learned about it - the lectures, the bed-side demonstrations on those mind-numbingly long ICU rounds. But we were also told, repeatedly, “Don’t touch it!” Unless you are an attending, fellow, or respiratory therapist (RT) of course. So for a lot of us, the ventilator is a black box, mythical and intimidating. 

In this blog, I hope to demystify ventilators a little so when duty calls, you can set initial settings and make some basic adjustments.

Physiology

1. How Mechanical Ventilation affects Oxygenation: PEEP & FiO2

You can reference this nice ARDSnet table for FiO2/PEEP combinations.

FiO2 – its effect is immediate

PEEP – takes up to an hour to show full effect

Therefore, when weaning, wean FiO2 before weaning PEEP so that if the patient desaturates, you have room to go up on FiO2.

2. How Mechanical Ventilation affects Ventilation: Tidal Volume, Respiratory Rate, Inspiratory Pressure or Inspiratory Time

This should be titrated in response to the patient's CO2 levels. Patients in respiratory failure from profound metabolic acidosis will need you to set higher minute ventilation to attempt respiratory compensation.

3. Peak Pressure and Plateau Pressure

     Peak pressure is the summation of both airway resistance (dynamic compliance) and plateau pressure (static compliance). Most modern ventilators will automatically report peak pressures without any special maneuvers required. When thinking about airway resistance, think of when you blow air through a straw – the narrower the tubing the higher the resistance and thus a lot of pressure is needed to generate that flow. To measure airway resistance, have the RT set the flow rate to 60 LPM, adjust the flow pattern to a square wave form, and ask them to perform an inspiratory hold. 

     Plateau pressure is related to lung compliance (higher plateau pressure = less compliant lung). It is the pressure “felt” by the alveoli, and keeping it less than 30 cm H2O helps to prevent barotrauma. It’s only measured after the air stops moving (via an inspiratory hold maneuver – ask RT how to do this on your ventilator) so that dynamic airway resistance is not a factor. 

4. Breath-stacking / Auto-PEEP

This occurs when the patient does not have enough time to finish exhalation before the next breath is delivered. This results in progressive hyperinflation of the lung, high peak pressures, and eventually hemodynamic collapse if not identified and intervened upon. It is most common in obstructive airway diseases such as asthma and COPD. Be vigilant for the flow diagram below on the ventilator to detect it early.

Modes

Volume vs Pressure – WHAT TYPE of breath is targeted

  • Volume mode means the vent will deliver a set tidal volume of air and results in whatever pressure (i.e. stiffer lungs result in higher pressure)

  • Pressure mode in turn means the vent will deliver at a set inspiratory pressure, and results in whatever volume (i.e. stiffer lungs result in lower volume)

A/C (Assist/Control) vs Support – WHEN the breath is delivered

  • In A/C mode, the machine delivers breath at a pre-set frequency (control), but the patient can also trigger additional breaths (assist) to faster than the set frequency. A quick and dirty trick is that any mode that contains the word “Control” means there will be a minimal respiratory rate set by the clinician.

  • Support (or Spontaneous) mode, in turn, will only deliver a breath when the patient initiates it. It senses the negative pressure generated by the patient and delivers a breath. If the patient does not breathe, it will not deliver. Usually safety back-up is in place to prevent prolonged apnea.

Volume Control

  • Delivers set tidal volume at or above a set rate

  • You set: tidal volume (6-8mL/kg ideal body weight), respiratory rate (16-22 breaths per minute), flow rate (60-80 LPM), and PEEP & FiO2 as needed

  • Check: Plateau pressure <30 (inspiratory hold maneuver)

  • This is a good initial setting for most of the patients you just intubated

Pressure Control

  • Delivers set pressure at or above set rate

  • You set: inspiratory pressure (5-15 cm H2O), inspiratory time (“I-time”; 0.6-0.8), respiratory rate (16-22), PEEP & FiO2 as needed

  • Check: to make sure the patient is getting tidal volumes of 6-8 mL/kg

  • This can be a helpful setting in some patients that do not tolerate volume control. Adjust pressure support to achieve tidal volume of 6-8 mL/kg while ensuring total pressure is less than 30-35 cm H20. 

Pressure Support

  • Delivers set pressure when the patient initiates a breath to help the patient move the air

  • You set: Pressure support (5-15 cm H2O), PEEP & FiO2 as needed

  • Check: to make sure the patient is getting tidal volumes of 6-8 mL/kg

  • Usually a weaning mode to check if the patient is likely to tolerate extubation

*The bottom line is, by adjusting the parameters, you can achieve the same result with different ventilation modes.


My step-wise approach to initiate mechanical ventilation on most patients:

  1. Build initial settings around Volume Control (tidal volume 6-8mL/kg ideal body weight, respiratory rate 16-22, PEEP 5, FiO2 100%)

  2. Tweak according to patient’s clinical scenario – e.g. higher respiratory rate for acidotic patients, higher initial PEEP for hypoxemic respiratory failure, longer expiratory time for asthmatics/COPD patients with auto-PEEP

  3. Start mechanical ventilation, quickly wean FiO2 for a goal SpO2 of 94-98%

  4. Adjust settings further based on clinical response and ABGs

  5. When in doubt, disconnect and bag the patient.

References:

The Acute Respiratory Distress Syndrome Network. Ventilation with lower tidal volumes as compared with traditional tidal volumes for acute lung injury and the acute respiratory distress syndrome. N Engl J Med. 2000;342:1301-1308.

Weingart, S. Managing Initial Mechanical Ventilation in the Emergency Department. Annals of Emergency Medicine, Volume 68, Issue 5, November 2016, Pg 614-617

Hyzy, R. Modes of Mechanical Ventilation. In: UpToDate, Parsons P. Finlay G (Ed), UpToDate, Waltham, MA. (Accessed on May 5, 2020.)


Expert Commentary

Thank you for the opportunity to review this very helpful and concise review on the basics of invasive mechanical ventilation. I hope to make this commentary brief, a contrast to our notoriously long ICU rounding habits. I would recommend any reader to view this editorial for a more in depth and nuanced understanding of mechanical ventilation. (1)

As you have described above, one way in which to think about mechanical ventilation is in the context of the most common scenarios in which we implement it, ie: hypoxemia and hypercapnia. Understanding that for hypoxemic patients, our tools to improve physiology are by manipulating the set FiO2 and PEEP to achieve specified targets for oxyhemoglobin saturation or P/F ratios (with regard to ARDS management). It is important to note that a few studies have demonstrated that an FiO2 greater than 50-60% can be toxic and may result in an increase in reactive oxygen species, increased airway damage (tracheobronchitis), and secondary infection from impaired bactericidal action of immune cells. (2,3) For our hypercapnic patients, knowing their prior baseline PCO2 is helpful in determining how to adjust the respiratory rate and tidal volume to appropriately improve their respiratory acidosis. 

An important common 3 part methodology to better appreciate modes of mechanical ventilation is understanding the “trigger”, “target”, and “cycle” of each ventilator mode. In the simplest of terms, the “trigger” is what prompts the ventilator to deliver the breath (ie: an assisted breath when the ventilator senses a patient generated decrease in flow/pressure or a control breath when enough time has elapsed as mandated by the set respiratory rate). The “target” is what the ventilator aims to achieve with each breath (in the mode of AC-VC: a targeted flow rate [often ~60 L/min] or in the mode of AC-PC: a targeted inspiratory pressure [often ~15 cwp]). Finally, the “cycle” is a term that describes how the ventilator recognizes when it is time to terminate the breath that is delivered (in the mode of AC-VC: cycling off after the goal TV is reached [~600cc] or in the mode of AC-PC: cycling off after the set inspiratory time has occurred [~ 0.7 seconds]). See table below for a quick summary. 

Finally, the best practical way to simplify mechanical ventilation is to request the changes by the respiratory therapist and see the effects. I encourage you to interpret all VBGs and ABGs, approach your respiratory therapist, pulmonary/CCM fellow, and suggest everything from initial ventilator settings, changes to both modes and individual parameter settings, and see the reflection of this work in your subsequent blood gases.

References

1. Walter JM, Corbridge TC, Singer BD. Invasive Mechanical Ventilation. South Med J. 2018 Dec;111(12):746-753. doi: 10.14423/SMJ.0000000000000905. PMID: 30512128; PMCID: PMC6284234.

2. Suttorp N, Simon LM. Decreased bactericidal function and impaired respiratory burst in lung macrophages after sustained in vitro hyperoxia. Am Rev Respir Dis. 1983 Sep;128(3):486-90. doi: 10.1164/arrd.1983.128.3.486. PMID: 6311064.

3. Griffith DE, Garcia JG, James HL, Callahan KS, Iriana S, Holiday D. Hyperoxic exposure in humans. Effects of 50 percent oxygen on alveolar macrophage leukotriene B4 synthesis. Chest. 1992 Feb;101(2):392-7. doi: 10.1378/chest.101.2.392. PMID: 1310457.

Ruben Mylvaganam, MD

Instructor of Medicine

Department of Pulmonology & Critical Care Medicine

Northwestern Memorial Hospital


How To Cite This Post:

[Peer-Reviewed, Web Publication] Luo, S. Stark, S. (2021, Nov 1). Mechanical Ventilation Oversimplified. [NUEM Blog. Expert Commentary by Mylvaganam, R]. Retrieved from http://www.nuemblog.com/blog/mechanical-ventilation-tips


Other Posts You May Enjoy

Posted on November 1, 2021 and filed under Critical care.

How to Talk Like a Neurologist

Written by: Saabir Kaskar, MD (NUEM ‘23) Edited by: Nick Wleklinski (NUEM ‘22)
Expert Commentary by: Fan Caprio, MD


Neurology Scores: LVO, NIHSS, and ICH

As first line providers, being able to effectively communicate with ancillary services and specialties is key to advancing patient care within the emergency department. When patients present with symptoms concerning for ischemic or hemorrhagic stroke, there are a variety of clinical decision tools available to help direct interventions and predict patient outcomes.  Having a basic understanding of these scoring systems helps ED providers communicate more effectively with our neurology colleagues. This post highlights indications, strengths, and limitations of common stroke assessment scales used in the prehospital and hospital setting.  

Cincinnati Prehospital Stroke Scale (CPSS)

The Cincinnati Prehospital Stroke Scale is a simple, easy to teach, three-part evaluation and is the most cited scale in statewide EMS protocols. Patients with one of these three findings, as a new event, will have 72% probability of ischemic stroke. If they have three of these deficits, that probability increases to 85%. Further, those scoring higher on this scale are more likely to have a large vessel occlusion (LVO) and warrant transfer to a comprehensive stroke center. One major limitation is that the CPSS does not identify features of posterior circulation strokes.

Figure 1: Cincinnati Prehospital Stroke Scale components

Predicting Large Vessel Occlusion 

There are many stroke severity scales that are useful in predicting large vessel occlusion (LVO) in the pre-hospital setting. Early LVO detection is useful as these patients have better outcomes if transported to comprehensive stroke centers (CSCs) which have endovascular interventions, such as thrombectomy, readily available. Such interventions are not available at primary stroke centers (PSC). LVO screening tools include the Rapid Arterial Occlusion Evaluation Scale (RACE), the Cincinnati Prehospital Stroke Severity Scale (CP-SSS/C-STAT), the Los Angeles Motor Scale (LAMS), and the Emergent Large Vessel Occlusion Scale (ELVO). While these scales are good, none have achieved an optimal sensitivity/specificity combination which is why there is no “gold standard” test per the most recent 2019 AHA guidelines (Powers et al. Guidelines for Early Mgmt of Patients with AIS. Stroke 2019). 

The Rapid Arterial Occlusion Evaluation Scale (RACE), for example, is one of these severity scales that predicts stroke caused by large vessel occlusion. It is based on the NIHSS but provides quicker assessment in the pre-hospital environment. It focuses on facial palsy, extremity motor function, head deviation, gaze deviation and aphasia or agnosia. The scale ranges from 0-9 with scores ≥ 5 being associated with detection of an LVO. RACE has a sensitivity of 85% and specificity of 68% for LVO at scores ≥ 5. 

Another example of a LVO screening tool is the Cincinnati Prehospital Stroke Severity Scale (CP-SSS/CSTAT) which is important to differentiate from the CPSS outlined above.  CSTAT focuses on gaze deviation, level of consciousness and arm weakness. Both RACE and CSTAT are validated in the prehospital setting and with external data sets. However, CSTAT is more convenient with fewer items to score. 

EMS protocol in Chicago (Region XI), utilizes a two-tier system that first involves the Cincinnati Stroke Scale and finger to nose test. If either aspect is abnormal, then stroke severity is assessed with the 3-Item Stroke Scale (3I-SS) which assesses level of consciousness, gaze preference and motor function, scored from 0-6. If the 3I-SS score is ≥4 and the last known normal is ≤6 hours ago then the patient is transported to the closest CSC instead of the closest primary stroke center (PSC), as long as the added transport time is not >15 minutes.  

National Institutes of Health Stroke Scale (NIHSS)

The NIHSS is a 11-part scoring tool and is the gold standard when assessing stroke patients in hospital (figure 3). Higher scores indicate a more severe stroke and usually correlate with infarct size on CT and MRI. Taken within the first 48 hours of acute stroke, the NIHSS helps predict three month and one-year clinical outcomes. For example, patients with a NIHSS of 1-4 have a high likelihood of functional independence and favorable outcome regardless of treatment. The NIHSS does not serve as the primary clinical guide in determining tPA administration. However, given that higher scores correlate with larger infarct size, caution is advised when considering tPA in patients with a NIHSS >22 as there is a higher risk of hemorrhagic conversion (see figure 2 for full tPA exclusion criteria). Analysis from subjects of the NINDS trials show that a NIHSS of >20 was associated with a 17% rate of intracranial hemorrhage with tPA when compared to 3% hemorrhage rate in patients with a score of <10.

Figure 2: Contraindications for tPA administration

Overall, the NIHSS is a reliable scoring tool to quicky assess the effects of stroke. Medical providers and nurses have been shown to have similar levels of accuracy when trained. Limitations include assessing posterior circulation stroke that involve gait abnormality, dizziness, or diplopia.

Figure 3: NIHSS, adopted from the American Stroke Association

Intracerebral Hemorrhage Score (ICH Score)

The ICH score is an important tool when evaluating a hemorrhagic stroke. This score was developed to standardize clinical grading of ICH and to improve communication between providers. This five-component scoring system (Figure 4) helps quantify ICH severity and subsequently 30-day mortality  (Figure 6) with a sensitivity of 66%. It is not used to determine treatment modality. This score helps universalize the grading of ICH severity, providing a standardized language that can be used between EM providers, neurologists, and neurosurgeons. Further, this score can help providers guide goals of care conversations with patient’s families and determine appropriate level of care or transfer.

Figure 4: ICH score, adapted from the American Stroke Association

Figure 5: Mortality rates based on ICH score

*No patients in the study scored 6, but estimated 100% mortality

Conclusion

In summary, it is important to understand how to utilize these scoring tools for ischemic and hemorrhagic stroke. Knowing how to interpret pre-hospital stroke scores and how to calculate a NIHSS score accurately and quickly is helpful in not only quantifying severity but also in improving communication between providers. Improved understanding and effective use of these tools can help better advance care of our stroke patients efficiently. These tools can also remind us of the severity of the neurologic deficit we observe on clinical exam. Subsequently, this can be helpful in guiding discussions with patients and their families regarding the severity of their condition.

References

Adams HP Jr, Davis PH, Leira EC, et al. Baseline NIH Stroke Scale score strongly predicts outcome after stroke: A report of the Trial of Org 10172 in Acute Stroke Treatment (TOAST). Neurology 1999; 53:126.

Goldstein, L. (2019). Use and utility of stroke scales and grading systems. Up To Date

Goldstein L, Bertels C, Davis JN. Interrater reliability of the NIH stroke scale. Arch Neurol 1989; 46:660.

Generalized efficacy of t-PA for acute stroke. Subgroup analysis of the NINDS t-PA Stroke Trial. Stroke 1997; 28:2119.

Hemphill JC 3rd, Bonovich DC, Besmertis L, Manley GT, Johnston SC. The ICH score: a simple, reliable grading scale for intracerebral hemorrhage. Stroke. 2001 Apr;32(4):891-7. PubMed PMID: 11283388.

Kothari RU, Pancioli A, Liu T, et al. Cincinnati Prehospital Stroke Scale: reproducibility and validity. Ann Emerg Med 1999; 33:373.

Pérez de la Ossa N, Carrera D, Gorchs M, et al. Design and validation of a prehospital stroke scale to predict large arterial occlusion: the rapid arterial occlusion evaluation scale. Stroke 2014; 45:87.

Schlemm L, Ebinger M, Nolte CH, Endres M. Impact of Prehospital Triage Scales to Detect Large Vessel Occlusion on Resource Utilization and Time to Treatment. Stroke 2018; 49:439.


Expert Commentary

Thanks for writing this comprehensive summary of common screening tools used in stroke patients. Having a good handle on these tools will allow you to quickly and effectively communicate with comanaging care providers. It is also important to understand how and why each scale was developed, so they can be used in the appropriate setting to expedite care in extremely time-sensitive neurologic emergencies.

Keep in mind that scales are merely screening tools and are not meant to give a definitive diagnosis. No scale is perfect, but you have highlighted some that yield the highest sensitivity and specificity for identifying a potential stroke patient. In addition to leaning on these scales as decision support tools, always use your clinical judgement. A few things to remember in addition to the neurologic symptoms:

* Strokes are potentially intervenable within the first 24 hours:

1. Up to 4.5 hours – IV-TPA / tenecteplase.

2. Up to 6 hours – Thrombectomy with LVO on vessel imaging.

3. Up to 24 hours – Thrombectomy with LVO + favorable penumbra on perfusion imaging.

* Last known normal (LKN) starts the timer to when stroke patients are eligible for intervention (not to be confused with time of symptom discovery!)

* Strokes typically cause a sudden loss of function (in contrast to positive phenomena such as convulsive movements, tingling sensation, sparkling vision, which can point away from a stroke diagnosis)

* In patients with prior deficits, ask which symptoms are new or different in comparison to their baseline.

The NIHSS is widely accepted as THE stroke severity scale, and it has many strengths and some pitfalls. The NIHSS was initially developed to be used in research, and, as mentioned here, was designed to be reproducible between various groups – physicians, nurses, research staff. Higher scores correlate with bigger infarct volume. The NIHSS is not an accurate scale in that it does not necessarily capture each patient’s deficits, omitting brain functions such as gait, distal limb dexterity, and cognition. It also scores higher for dominant (L) hemispheric functions as many points depend on language function.

When screening for large vessel occlusion, remember key brain structures and functions from the L MCA, R MCA, and posterior circulation. Looking for cortical signs can be very helpful to identify larger stroke syndromes: aphasia, neglect, gaze deviation, visual field deficit.

Last but not least, keep in mind that hemorrhagic strokes (intracerebral hemorrhage, subarachnoid hemorrhage) account for about 15% of all strokes. The same screening tools for acute neurologic symptoms can be used to identify these patients, though they more often have concurrent headache or LOC than ischemic strokes (due to increased ICP and irritation from blood products). For SAH, two scales are commonly used to describe the clinical and radiographic severities: Hunt-Hess (surgical risk index) and modified Fisher scales (risk index for developing vasospasm).

Figure 1: Hunt-Hess Scale

Figure 2: Modified Fisher Scale

Fan Caprio, MD

Assistant Professor of Neurology (Stroke)

Department of Neurology

Northwestern Memorial Hospital


How To Cite This Post:

[Peer-Reviewed, Web Publication] Kaskar, S. Wleklinski, N. (2021, Oct 25). How to Talk Like a Neurologist. [NUEM Blog. Expert Commentary by Caprio, F]. Retrieved from http://www.nuemblog.com/blog/neuro-scores


Other Posts You May Enjoy

C-Spine Intubation

Written by: Daniel Levine, MD (NUEM ‘24) Edited by: Zach Schmitz (NUEM ‘21)  Expert Commentary by: Matt Levine, MD

Written by: Daniel Levine, MD (NUEM ‘24) Edited by: Zach Schmitz (NUEM ‘21)
Expert Commentary by: Matt Levine, MD


The “Evidence” Behind Manual In-Line Stabilization During Intubation of Trauma Patients

Background

Even in the absence of frank head and neck trauma that may cause bleeding or distortions in usual anatomy, trauma patients present challenging airways because of cervical spine precautions. Standard-of-care technique according to EAST (Eastern Association for the Surgery of Trauma), West (Western Trauma Association), and ATLS (Advanced Trauma Life Support) guidelines for intubating acute trauma patients with known or potential cervical spine injury involves manual in-line stabilization (MILS). (1,2) This is a two-person technique whereby one provider performs laryngoscopy while another holds the patient’s neck in place.  The two most common techniques for this procedure are depicted below, one in which the stabilizer crouches down at the head of the bed (A), and the other where the stabilizer approaches from the side of the bed (B). (3)

(photo from Strange and Schafermeyer's Pediatric Emergency Medicine, 4th edition) (3)

(photo from Strange and Schafermeyer's Pediatric Emergency Medicine, 4th edition) (3)

Evidence

Like many practices in medicine, MILS has never been studied in randomized controlled trials, and the practice stems more from weak data and expert opinion. (4) The practice of spinal stabilization began during the 1970s after a retrospective review published in 1979 of 300 patients with acute cervical injuries who presented to Johns Hopkins hospital between 1950 and 1972. Although the main focus was on the effects of laminectomy and steroids, the review also found that 11 of the 300 patients developed neurologic deficits after reaching the hospital. Of the 11 patients, 7 developed these deficits “after neck immobilization was not provided”, with no clear comment as to whether immobilization was not provided during intubation or during some other process of the patient’s care. (5) These observations led to concerns that mobilization of the neck during intubation may worsen spinal cord injury, so manual in-line stabilization became standard of care in the 1980s.

Existing data for spinal stabilization comes from trials of cadaveric models, case series, and uninjured patients. Data from cadavers with post-mortem surgically created cervical spine injuries have shown mixed results on the effects of the amount of measured movement at the injured site with versus without MILS. For example, a 1993 study by Donaldson et al. found higher degrees of subluxation and angulation at C5-C6 during orotracheal intubation without MILS compared to with stabilization in five cadaveric specimens with injuries created in that area. (6) On the other hand, a 2001 Lennarson et al. study on cadavers found MILS significantly increased subluxation in C4-C5 during the same movements. (7) While it is somewhat counterintuitive that performing MILS might be associated with increased cervical motion, this may be explained by the laryngoscopist’s need to apply greater force with the laryngoscope in order to obtain an adequate view. This is what Santoni et al. (2009) found in a matched control study of 9 patients undergoing elective surgery. The patients in this study underwent two sequential laryngoscopies and oral intubations with a Macintosh 3 blade. Pressure transducers attached to the end of the blades detected higher maximum pressures at best glottic view with MILS compared to without. (8)

What is more clear in the literature on MILS than its effect on cervical motion is that it impairs glottic visualization and subsequent first pass intubation success. In the aforementioned Donaldson study on cadavers, MILS was shown to have a negative impact on Cormack-Lehane (CL) grade. (6) Similarly, in the aforementioned Santoni et al. study of 9 patients who underwent two sequential intubations with and without MILS, glottic visualization was worse in 6 patients with MILS, and intubation failure occurred in 2 of these 6 patients compared to no intubation failures among these patients when the intubation was performed without MILS. Thiboutot et al. (2008) performed a randomized controlled trial that further demonstrated this effect. In their study, 200 elective surgical patients were randomized to receive MILS or no MILS, and the primary endpoint was rate of failed intubation at 30 seconds with a Mac 3 blade. The rate of failed intubation was half in the MILS group (50%, 47/94), significantly higher compared to the control group (5.7%, 6/105). When they released manual in-line stabilization, they were able to intubate all patients. Secondary outcomes of rate of CL grade 3-4 as well as mean latency to successful intubation were also both significantly higher in the MILS group. (9) Additionally, these data were from patients undergoing elective surgery being intubated in the controlled OR setting by anesthesiologists. It is likely that the rate of failed intubation would be even higher in the chaotic emergency department environment with an acutely injured trauma patient. While 30 seconds is a somewhat arbitrary cutoff for a failed intubation, and it is quite possible many of the patients in the MILS group who “failed” may have been successfully intubated if a longer cut-off time were chosen, hypoxia caused by failed or delayed intubation is associated with poor outcome in central nervous system injury. (10)

Conclusion

In an ideal world, a large-scale randomized controlled trial of trauma patients studying the effects of MILS on mortality and important functional neurologic outcomes would help elucidate the utility of this commonly accepted practice. However realistically, completing such a study has significant obstacles. Cervical spine injuries are relatively rare (4% of trauma injured patients)4 and only a small fraction of those cases involve unstable injuries with potentially salvageable cord function. Thus, a study with sufficient power to detect any meaningful difference in outcomes would take many thousands of patients, many trauma centers, and many years to complete. Perhaps an even larger hurdle is the ethical and medicolegal hurdle of randomizing patients to not getting MILS and possibly putting them at risk of quadriplegia. (4) So what’s a clinician to do when faced with the common scenario of having to intubate a trauma patient? I personally like the approach that Dr. Reuben Strayer discusses in his video “Advanced Airway Management for the Emergency Physician” (link below). (11) To summarize his strategy:

Screen Shot 2021-10-17 at 10.22.17 AM.png

*The exception: in the rare situation where the patient has a highly suspected (e.g. obvious bony deformity, focal neurologic deficit) or known cervical spine injury, Dr. Strayer recommends lowering the threshold to perform a cricothyroidotomy. Additionally, he recommends considering an awake intubation approach in these patients. 


Another consideration is intubating using a hyper-angulated video GlideScope, which has been shown to have improved CL views and high rates of intubation success in c-spine immobilized patients. (12) That said, occasionally equipment availability or a bloody airway may preclude the use of video laryngoscopy in the trauma setting.

References

  1. Mayglothling J, Duane TM, Gibbs M, McCunn M, Legome E, Eastman AL, Whelan J, Shah KH; Eastern Association for the Surgery of Trauma. Emergency tracheal intubation immediately following traumatic injury: an Eastern Association for the Surgery of Trauma practice management guideline. J Trauma Acute Care Surg. 2012 Nov;73(5 Suppl 4).

  2. Brown CVR, Inaba K, Shatz DV, Moore EE, Ciesla D, Sava JA, Alam HB, Brasel K, Vercruysse G, Sperry JL, Rizzo AG, Martin M. Western Trauma Association critical decisions in trauma: airway management in adult trauma patients. Trauma Surg Acute Care Open. 2020 Oct 9;5(1)

  3. Leonard, J et al. "Strange and Schafermeyer's Pediatric Emergency Medicine, 4th edition." Chapter 24: Cervical Spine Injury. https://doctorlib.info/pediatric/schafermeyers-pediatric-emergency-medicine/24.html, accessed 5/7/21. 

  4. Manoach S, Paladino L. Manual in-line stabilization for acute airway management of suspected cervical spine injury: historical review and current questions. Ann Emerg Med. 2007 Sep;50(3):236-45. 

  5. Bohlman HH. Acute fractures and dislocations of the cervical spine. An analysis of three hundred hospitalized patients and review of the literature. J Bone Joint Surg Am. 1979;61:1119- 1142. 

  6. Donaldson WF 3rd, Towers JD, Doctor A, et al. A methodology to evaluate motion of the unstable spine during intubation techniques. Spine. 1993;18:2020-2023 
 

  7. Lennarson PJ, Smith DW, Sawin PD, Todd MM, Sato Y, Traynelis VC. Cervical spinal motion during intubation: efficacy of stabilization maneuvers in the setting of complete segmental instability. J Neurosurg. 2001 Apr;94(2 Suppl):265-70.

  8. Santoni BG, Hindman BJ, Puttlitz CM, Weeks JB, Johnson N, Maktabi MA, Todd MM. Manual in-line stabilization increases pressures applied by the laryngoscope blade during direct laryngoscopy and orotracheal intubation. Anesthesiology. 2009 Jan;110(1):24-31.

  9. Thiboutot, F et al. Effect of manual in-line stabilization of the C-spine on the rate of difficult orotracheal intubation by direct laryngoscopy; a randomized controlled trial. Can J Anaesth. 2009 Jun;56(6):412-8.  

  10. Chesnut RM, Marshall LF, Klauber MR, Blunt BA, Baldwin N, Eisenberg HM, Jane JA, Marmarou A, Foulkes MA. The role of secondary brain injury in determining outcome from severe head injury. J Trauma. 1993 Feb;34(2):216-22. 

  11. “Advanced Airway Management for the Emergency Physician”, uploaded by Reuben Strayer, https://vimeo.com/12440392

  12. Bathory I, Frascarolo P, Kern C, Schoettker P. Evaluation of the GlideScope for tracheal intubation in patients with cervical spine immobilisation by a semi-rigid collar. Anaesthesia. 2009 Dec;64(12):1337-41. 


Expert Commentary

So once again a review of a significant body of literature leaves a clinical question unanswered, leaving the practitioner to either follow dogma or make one’s own conclusions.  Like most of our medical decision making, this is a risk/benefit analysis.  So let’s go through the process.

Some background context to keep in mind:

Most cervical spine injury occurs from the initial traumatic event (primary neurologic injury).  Secondary neurologic injury is a cascade of events at the cellular level that worsen primary injury and is exacerbated by hypoxia and hypercarbia, which are frequent events in difficult/prolonged intubations.  These must be minimized when the brain or c spine are injured!  

The movements of the cervical spine that occur during ED care pale in magnitude to the cervical spine motion that caused the primary injury to occur.  These likely contribute less to neurologic outcome than secondary neurologic injury from other events during ED care like hypotension, hypoxia, and hypocarbia.

It’s too difficult to intubate with a collar on.  It must be carefully and temporarily removed.  As Dr. Levine taught us, MILS impairs glottic visualization and first pass intubation success.  Dr. Levine also taught us that we don’t know whether the injured cervical spine actually moves less or more with MILS during intubation attempts.

The synthesis:

These factors all lead me to agree with Dr. Strayer’s approach.  It is reasonable to minimize cervical spine motion as much as possible, but not at the expense of adequate glottic visualization. Maybe MILS helps minimize motion during intubation.  But abandon MILS when glottic visualization is suboptimal because MILS can be contributing to this, leading to hypoxia, hypercarbia, and secondary neurologic injury.  Practice MILS only until it is possibly prolonging airway success, because now it is more likely to be harming than helping.

Even more future questions remain.  Much of the prior literature is based on use of traditional orotracheal intubation techniques.  How much of that knowledge applies to the now widespread use of fiberoptic video intubations (i.e. Glidescope), which may have better first pass success rates and less neck motion?  Do we even need to perform MILS for these intubations?  Or can we reliably rapidly intubate with MILS and the Glidecope – so we can have our cake and eat it too?

Matthew Levine, MD

Associate Professor of Emergency Medicine

Department of Emergency Medicine

Northwestern Memorial Hospital


How To Cite This Post:

[Peer-Reviewed, Web Publication] Levine, D. Schmitz, Z. (2021, Oct 18). C-Spine. [NUEM Blog. Expert Commentary by Levine, M]. Retrieved from http://www.nuemblog.com/blog/cervical-spine-intubation


Other Posts You May Enjoy

Posted on October 18, 2021 and filed under Trauma.

Managing Minor Thermal Burns in the ED

Written by: Mitch Blenden, MD (NUEM ‘24) Edited by: Vytas Karalius, MD, MPH, MA (NUEM ‘22) Expert Commentary by: Matt Levine, MD

Written by: Mitch Blenden, MD (NUEM ‘24) Edited by: Vytas Karalius, MD, MPH, MA (NUEM ‘22) Expert Commentary by: Matt Levine, MD


Managing Minor Thermal Burns in the ED Final.png

Expert Commentary

Dr. Blenden and Dr. Karalius provided an excellent handy, high-yield, quick reference of thermal burn considerations in the ED.  There are some nuances of thermal burn care that I’d like to provide further commentary:

  • A pitfall is underestimating the severity of the burn when the patient presents within a few hours of the event.  Burn appearance evolves over 24-48 hours. What initially appears as erythematous skin can be covered in bullae the next day.  Consider a repeat examination in 24-48 hours, or at least discuss with the patient the possibility that this may occur and what to do if it does.  Otherwise, if you initially diagnosed the patient with superficial burns and provided only instructions for superficial burns, which require little treatment or follow-up, the patient can be set up for a worse outcome when these burns subsequently declare themselves to be partial thickness.

  • For years, most non-facial burns were sent home with instructions to use silver sulfadiazine (AKA Silvadene) cream. This would require teaching of how to apply and remove it. The cream needs to be removed daily before applying a new coat (I always sent the patient home with tongue blades to scrape it off).  The benefits of this are that it debrides some nonviable tissue when the cream is removed and provides a moist antimicrobial barrier.  The down sides are that removal can be painful and some patients have difficulty performing this procedure, which requires teaching.  Silver sulfadiazine can also cause skin staining.  There is scant evidence recommending one topical antimicrobial over another.  For these reasons, practice (including mine) has evolved in many places to simply prescribe whatever antibiotic ointment is on hand for ease of use and less painful and technically challenging application.

  • Another controversy is whether to debride blisters and bullae or leave them intact.  This is another area without definitive evidence and practice is often guided by gestalt, local custom, or prior teachings.  On one hand, intact bullae can be thought of as “sterile” coverings and may be less painful than dermal layers exposed to air and friction.  On the other hand, when bullae rupture, the patient is left with dead skin which can be a nidus for infection.  My practice has been to leave small blisters intact and debride large bullae if it seems like they will soon rupture and leave the patient with hanging skin fragments.  If the patient has reliable follow up burn care then I may choose a less aggressive approach in debriding.  Other clinicians are likely to give alternate approaches so ask your attendings what they do in these scenarios so you can develop a practice pattern that makes sense to you.

mattlevine.png

Matthew Levine, MD

Associate Professor of Emergency Medicine

Department of Emergency Medicine

Northwestern Memorial Hospital


How To Cite This Post:

[Peer-Reviewed, Web Publication] Blenden, M. Karalius, V. (2021, Oct 18). Managing Minor Thermal Burns in the ED. [NUEM Blog. Expert Commentary by Levine, M]. Retrieved from http://www.nuemblog.com/blog/managing-minor-thermal-burns


Other Posts You May Enjoy

Posted on October 11, 2021 and filed under Trauma.

SonoPro Tips and Tricks for Aortic Aneurysm and Dissection

Written by: John Li, MD (NUEM ‘24) Edited by: Andra Farcas, MD (NUEM ‘21) Expert Commentary by: John Bailitz, MD &amp; Shawn Luo, MD (NUEM ‘22)

Written by: John Li, MD (NUEM ‘24) Edited by: Andra Farcas, MD (NUEM ‘21) Expert Commentary by: John Bailitz, MD & Shawn Luo, MD (NUEM ‘22)


SonoPro Tips and Tricks

Welcome to the NUEM Sono Pro Tips and Tricks Series where Sono Experts team up to take you scanning from good to great for a problem or procedure! For those new to the probe, we recommend first reviewing the basics in the incredible FOAMed Introduction to Bedside Ultrasound Book and 5 Minute Sono. Once you’ve got the basics beat, then read on to learn how to start scanning like a Pro!

Aortic ultrasound is a staple in emergency point of care ultrasound. It has incredible sensitivity (97.5-100%) and specificity (94.1-100%) in detecting abdominal aortic aneurysms and can provide a diagnosis for critically ill patients in seconds. [1-4] However, it can often be a technically difficult study for beginner sonographers due to shadowing bowel gas and patient body habitus. Follow along in this installment of our Sono Pro Tips and Tricks Series to become an expert in finding aortas!

Beyond the classic elderly male smoker with abdominal, flank, or back pain, what are other scenarios where you would use aortic ultrasound?

  1. Older patients with limb ischemia - an aortic aneurysm can have atherosclerosis or a mural thrombus which can embolize and cause an arterial occlusion!

  2. “But they fixed my aorta!” Aortic endograft leakage can sometimes present with symptoms that are similar to a AAA rupture, such as back pain, flank pain, or hemodynamic instability.

How to scan like a Pro

Always Start Smart: Aortic ultrasound can be tricky because of factors that seem out of our control, such as bowel gas or patient body habitus.

  1. When scanning for an abdominal aortic aneurysm, start scanning in the epigastric region with a transverse view and apply constant pressure, gently pushing the bowel gas out of the way as you slide the probe down towards the patient’s feet.

  2. Tell your patients to bend their knees! This relaxes the abdominal musculature and can help you move bowel gas or make better contact with the probe.

What if you still can’t see it? Try looking in the right upper quadrant view of the FAST exam!

  1. Start with your probe in the right mix-axillary line and use the liver as your acoustic window. You may need to fan anteriorly or posteriorly depending on the patient’s body habitus and your positioning.

  2. Unfortunately, this view predominantly visualizes the superior aspect of the abdominal aorta, and it can be difficult to visualize the inferior abdominal aorta or the bifurcation.

Here we are looking at a modified RUQ view, where the aorta is visualized on the bottom part of the screen using the liver as an acoustic window. (acep.org)

Pro Pickups!

  1. What’s that weird aneurysm?

    • Most people are familiar with the classic fusiform aortic aneurysm, but saccular aneurysms can be easily missed because of shadowing bowel gas obstructing parts of the aorta. Saccular aneurysms actually have a higher risk of rupture and repair is recommended for smaller diameters.

Here you can see two images in the longitudinal axis of the different kinds of abdominal aortic aneurysms. On the left is a saccular aneurysm and on the right is a fusiform one. Be sure to pay attention to the mural thrombus in the walls of both of these aortas - they can embolize and cause arterial occlusions! (med.emory.edu)

Here you can see two images in the longitudinal axis of the different kinds of abdominal aortic aneurysms. On the left is a saccular aneurysm and on the right is a fusiform one. Be sure to pay attention to the mural thrombus in the walls of both of these aortas - they can embolize and cause arterial occlusions! (med.emory.edu)

2. How big is that aorta anyways?

  • Be sure to always measure the aorta from outside wall to outside wall!

  • Many aortic aneurysms have a mural thrombus or intraluminal clot, and it can be very easy to mistake these for extra-luminal contents.

  • Remember the concerning numbers: >5.5cm for men and >5cm for women!

What the Pros Do Next

Abdominal Aortic Aneurysm

  1. If the patient is hemodynamically unstable (defined as BP <90/60, altered mental status, or other signs of end-organ damage), go straight to the OR!

  2. If the patient is hemodynamically stable (defined as the absence of any of the above), then the next step is to obtain further imaging, such as a CT Angiogram, which is the imaging gold standard.

    • If you are concerned about a large AAA that could be a contained leak but the patient is hemodynamically stable, then we recommend an emergent vascular surgery consult

    • If you find a small AAA (defined as <5cm in women or <5.5cm in men) that you do not think is actively contributing to the patient’s symptoms, then we recommend outpatient vascular surgery follow up

SonoPro Tips - Where to Learn More

Do you want to review more examples of pathologic images that you may see when you are doing an aortic ultrasound? Be sure to check out The Pocus Atlas by our expert editor Dr. Macias. Aortic pathology is quite rare, and going through these images will help immensely in recognizing this diagnosis in emergent situations.  If you’re interested in looking at some of the evidence behind aortic ultrasound, be sure to check out the evidence atlas here as well.

References

  1. Rubano E, Mehta N, Caputo W, Paladino L, Sinert R. Systematic review: emergency department bedside ultrasonography for diagnosing suspected abdominal aortic aneurysm. Acad Emerg Med. 2013 Feb;20(2):128-38. doi: 10.1111/acem.12080. PMID: 23406071.

  2. Hunter-Behrend, Michelle, and Laleh Gharahbaghian. “American College of Emergency Physicians.” ACEP // Home Page, 2016, www.acep.org/how-we-serve/sections/emergency-ultrasound/news/february-2016/tips-and-tricks-big-red---the-aorta-and-how-to-improve-your-image/.

  3. Ma, John, et al. Ma and Mateer's Emergency Ultrasound. McGraw-Hill Education, 2020.

  4. Mallin, Mike, and Matthew Dawson. Introduction to Bedside Ultrasound: Volume 1. Emergency Ultrasound Solutions, 2013.

  5. Macias, Michael. TPA, www.thepocusatlas.com/.


Expert Commentary

Another great Sono Pro Post! Thank you John Li and Andra for helping everyone move from good to great when scanning for Abdominal Aortic Aneurysms. As noted, this application defines Emergency Ultrasound as a fast (pun intended), accurate, and life saving diagnostic tool for every EM physicians tool belt. When consistent probe pressure does not do the trick, consider the RUQ view for a quick look. Since most AAA’s are fusiform, this may quickly confirm your suspicions and prompt the call to get the OR ready. Be sure to visualize the entire abdominal aorta throughout in both short and long axis to identify saccular aneurysms and even the rare aortic occlusion!

John Bailitz, MD

Vice Chair for Academics, Department of Emergency Medicine

Professor of Emergency Medicine, Feinberg School of Medicine

Northwestern Memorial Hospital

Shawn Luo, MD

PGY4 Resident Physician

Northwestern University Emergency Medicine


How To Cite This Post:

[Peer-Reviewed, Web Publication] Li, J. Farcas, A. (2021 Oct 11). SonoPro Tips and Tricks for Aortic Aneurysm. [NUEM Blog. Expert Commentary by Bailitz, J. Shawn, L.]. Retrieved from http://www.nuemblog.com/blog/sonopro-tips-and-tricks-for-aortic-aneurysm


Other Posts You May Enjoy

SonoPro Tips and Tricks for Pulmonary Embolism

Written by: Megan Chenworth, MD (NUEM ‘24) Edited by: Abiye Ibiebele, MD (NUEM ‘21) Expert Commentary by: John Bailitz, MD &amp; Shawn Luo, MD (NUEM ‘22)

Written by: Megan Chenworth, MD (NUEM ‘24) Edited by: Abiye Ibiebele, MD (NUEM ‘21) Expert Commentary by: John Bailitz, MD & Shawn Luo, MD (NUEM ‘22)


SonoPro Tips and Tricks

Welcome to the NUEM Sono Pro Tips and Tricks Series where Sono Experts team up to take you scanning from good to great for a problem or procedure! For those new to the probe, we recommend first reviewing the basics in the incredible FOAMed Introduction to Bedside Ultrasound Book and 5 Minute Sono. Once you’ve got the basics beat, then read on to learn how to start scanning like a Pro!

Did you know that focused transthoracic cardiac ultrasound (FOCUS) can help identify PE in tachycardic or hypotensive patients? (It has been shown to have a sensitivity of 92% for PE in patients with an HR>100 or SBP<90, and approaches 100% sensitivity in patients with an HR>110 [1]). Have a hemodynamically stable patient with PE and wondering how to risk stratify? FOCUS can identify right heart strain better than biomarkers or CT [2].

Who to FOCUS on?

  1. Patients presenting with chest pain or dyspnea without a clear explanation, or with a clinical concern for PE. The classic scenario is a patient with pleuritic chest pain with VTE risk factors such as recent travel or surgery, systemic hormones, unilateral leg swelling, personal or family history of blood clots, or known hypercoagulable state (cancer, pregnancy, rheumatologic conditions).

  2. Patients presenting with unexplained tachycardia or dyspnea with VTE risk factors

  3. Unstable patients with undifferentiated shock

  4. When PE is suspected but CT is not feasible: such as when the patient is too hemodynamically unstable to be moved to the scanner, too morbidly obese to fit on the scanner, or in resource-limited settings where scanners aren’t available

    1. One may argue AKI would be another example of when CT is not feasible (though there is some debate over the risk of true contrast nephropathy - that is a discussion for another blog post!)

How to scan like a Pro

  1. Key is to have the patient as supine as possible - this may be difficult in truly dyspneic patients

  2. If difficulty obtaining views arise, the left lateral decubitus position helps bring the heart closer to the chest wall

FOCUS on these findings

You only need one to indicate the presence of right heart strain (RHS).

  1. Right ventricular dilation

  2. Septal flattening: Highly specific for PE (93%) in patients with tachycardia (HR>100) or hypotension (SBP<90) [1]

  3. Tricuspid valve regurgitation

  4. McConnell’s sign

    • Definition: Akinesis of mid free wall and hypercontractility of apical wall (example below)

    • The most specific component of FOCUS: 99% specific for patients with HR>100bpm or SBP<90 [1]

  5. Tricuspid annular plane systolic excursion (TAPSE)

  • The most sensitive single component of FOCUS: TASPE < 2cm is 88% sensitive for PE in tachycardic and hypotensive patients; 93% sensitive when HR > 110 [1]

Where to FOCUS

Apical 4 Chamber (A4C) view: your best shot at seeing it all

  1. Find the A4C view in the 5th intercostal space in the midclavicular line

  2. Optimize your image by sliding up or down rib spaces, sliding more lateral towards the anterior axillary line until you see the apex with the classic 4 chambers - if the TV and MV are out of the plane, rotate the probe until you can see both openings in the same image; if the apex is not in the middle of the screen, slide the probe until the apex is in the middle of the screen. If you are having difficulty with this view, position the patient in the left lateral decubitus.

  3. Important findings:

    1. RV dilation: the normal RV: LV ratio in diastole is 0.6:1. If the RV > LV, it is abnormal. (see in the image below)

    2. Septal flattening/bowing is best seen in this view

    3. McConnell’s sign: akinesis of the free wall with preserved apical contractility

McConnell’s Sign showing akinesis of the free wall with preserved apical contractility

4. Tricuspid regurgitation can be seen with color flow doppler when positioned over the tricuspid valve

Tricuspid regurgitation seen with color doppler flow

Tricuspid regurgitation seen with color doppler flow

5. TAPSE

  • Only quantitative measurement in FOCUS, making it the least user-dependent measurement of right heart strain [3]

  • A quantitative measure of how well the RV is squeezing. RV squeeze normally causes the tricuspid annulus to move towards the apex.

  • Fan to bring the RV as close to the center of the screen as possible

  • Using M-mode, position the cursor over the lateral tricuspid annulus (as below)

  • Activate M-mode, obtaining an image as below

  • Measure from peak to trough of the tracing of the lateral tricuspid annulus

    • Normal >2cm

How to measure TAPSE using ultrasound

How to measure TAPSE using ultrasound

Parasternal long axis (PSLA) view - a good second option if you can’t get A4C

  1. Find the PSLA view in the 4th intercostal space along the sternal border

  2. Optimize your image by sliding up, down, or move laterally through a rib space, by rocking your probe towards or away from the sternum, and by rotating your probe to get all aspects of the anatomy in the plane. The aortic valve and mitral valve should be in plane with each other.

  3. Important findings:

    1. RV dilation: the RV should be roughly the same size as the aorta and LA in this view with a 1:1:1 ratio. If RV>Ao/LA, this indicates RHS.

    2. Septal flattening/bowing of the septum into the LV (though more likely seen in PSSA or A4C views)

Right heart strain demonstrated by right ventricle dilation

Right heart strain demonstrated by right ventricle dilation

Parasternal Short Axis (PSSA) view: the second half of PSLA

Starting in the PSLA view, rotate your probe clockwise by 90 degrees to get PSSA

  1. Optimize your image by fanning through the heart to find the papillary muscles - both papillary muscles should be in-plane - if they are not, rotate your probe to bring them both into view at the same time

  2. Important findings:

    1. Septal flattening/bowing: in PSSA, it is called the “D-sign”.

“D-sign” seen on parasternal short axis view. The LV looks like a “D” in this view, particularly in diastole.

“D-sign” seen on parasternal short axis view. The LV looks like a “D” in this view, particularly in diastole.

Subxiphoid view: can add extra info to the FOCUS   

  1. Start just below the xiphoid process, pointing the probe up and towards the patient’s left shoulder

  2. Optimize your image by sliding towards the patient’s right, using the liver as an echogenic window; rotate your probe so both MV and TV are in view in the same image

  3. Important findings

    1. Can see plethoric IVC if you fan down to IVC from RA (not part of FOCUS; it is sensitive but not specific to PE)

Plethoric IVC that is sensitive to PE

Plethoric IVC that is sensitive to PE

What to do next?

Sample algorithm for using FOCUS to assess patients with possible PE. *cannot completely rule out PE, but negative FOCUS makes PE less likely

Sample algorithm for using FOCUS to assess patients with possible PE.

*cannot completely rule out PE, but negative FOCUS makes PE less likely

Limitations to keep in mind:

  1. FOCUS is great at finding heart strain, but the lack of right heart strain does not rule out a pulmonary embolism

    1. Systematic review and meta-analysis concluded that the overall sensitivity of FOCUS for PE is 53% (95% CI 45-61%) for all-comers [5]

  2. Total FOCUS exam requires adequate PSLA, PSSA, and A4C views – be careful when interpreting inadequate scans

  3. Can see similar findings in chronic RHS (pHTN, RHF)

    1. Global thickening of RV (>5mm) can help distinguish chronic from acute RHS

    2. McConell’’s sign is also highly specific for acute RHS, whereas chronic RV failure typically appears globally akinetic/hypokinetic

8.png

SonoPro Tips - Where to Learn More

  1. Right Heart Strain at 5-Minute Sono: http://5minsono.com/rhs/

  2. Ultrasound GEL for Sono Evidence: https://www.ultrasoundgel.org/posts/EJHu_SYvE4oBT4igNHGBrg, https://www.ultrasoundgel.org/posts/OOWIk1H2dePzf_behpaf-Q

  3. The Pocus Atlas for real examples: https://www.thepocusatlas.com/echocardiography-2

  4. The Evidence Atlas for Sono Evidence: https://www.thepocusatlas.com/ea-echo

References

  1. Daley JI, Dwyer KH, Grunwald Z, Shaw DL, Stone MB, Schick A, Vrablik M, Kennedy Hall M, Hall J, Liteplo AS, Haney RM, Hun N, Liu R, Moore CL. Increased Sensitivity of Focused Cardiac Ultrasound for Pulmonary Embolism in Emergency Department Patients With Abnormal Vital Signs. Acad Emerg Med. 2019 Nov;26(11):1211-1220. doi: 10.1111/acem.13774. Epub 2019 Sep 27. PMID: 31562679.

  2. Weekes AJ, Thacker G, Troha D, Johnson AK, Chanler-Berat J, Norton HJ, Runyon M. Diagnostic Accuracy of Right Ventricular Dysfunction Markers in Normotensive Emergency Department Patients With Acute Pulmonary Embolism. Ann Emerg Med. 2016 Sep;68(3):277-91. doi: 10.1016/j.annemergmed.2016.01.027. Epub 2016 Mar 11. PMID: 26973178.

  3. Kopecna D, Briongos S, Castillo H, Moreno C, Recio M, Navas P, Lobo JL, Alonso-Gomez A, Obieta-Fresnedo I, Fernández-Golfin C, Zamorano JL, Jiménez D; PROTECT investigators. Interobserver reliability of echocardiography for prognostication of normotensive patients with pulmonary embolism. Cardiovasc Ultrasound. 2014 Aug 4;12:29. doi: 10.1186/1476-7120-12-29. PMID: 25092465; PMCID: PMC4126908.

  4. Hugues T, Gibelin PP. Assessment of right ventricular function using echocardiographic speckle tracking of the tricuspid annular motion: comparison with cardiac magnetic resonance. Echocardiography. 2012 Mar;29(3):375; author reply 376. doi: 10.1111/j.1540-8175.2011.01625_1.x. PMID: 22432648.

  5. Fields JM, Davis J, Girson L, et al. Transthoracic echocardiography for diagnosing pulmonary embolism: a systematic review and meta‐analysis. J Am Soc Echocardiogr 2017;30:714–23.e4.


Expert Commentary

RV function is a frequently overlooked area on POCUS. Excellent post by Megan looking specifically at RV to identify hemodynamically significant PEs. We typically center our image around the LV, so pay particular attention to adjust your views so the RV is optimized. This may mean moving the footprint more laterally and angle more to the patient’s right on the A4C view. RV: LV ratio is often the first thing you will notice. When looking for a D-ring sign, make sure your PSSA is actually in the true short axis, as a diagonal cross-section may give you a false D-ring sign. TAPSE is a great surrogate for RV systolic function as RV contracts longitudinally. Many patients with pulmonary HTN or advanced chronic lung disease can have chronic RV failure, lack of global RV thickening. Lastly remember, that a positive McConnell’s sign is a great way to distinguish acute RHS from chronic RV failure.

John Bailitz, MD

Vice Chair for Academics, Department of Emergency Medicine

Professor of Emergency Medicine, Feinberg School of Medicine

Northwestern Memorial Hospital

Shawn Luo, MD

PGY4 Resident Physician

Northwestern University Emergency Medicine


How To Cite This Post:

[Peer-Reviewed, Web Publication] Chenworth, M. Ibiebele, A. (2021 Oct 4). SonoPro Tips and Tricks for Pulmonary Embolism. [NUEM Blog. Expert Commentary by Bailitz, J. Shawn, L.]. Retrieved from http://www.nuemblog.com/blog/sonopro-tips-and-tricks-for-pulmonary-embolism


Other Posts You May Enjoy

SonoPro Tips and Tricks for Pneumothroax

Written by: Morgan McCarthy, MD (NUEM ‘24) Edited by: Jon Hung, MD (NUEM ‘21) Expert Commentary by: John Bailitz, MD & Shawn Luo, MD (NUEM ‘22)


SonoPro Tips and Tricks

Welcome to the NUEM Sono Pro Tips and Tricks Series where Sono Experts team up to take you scanning from good to great for a problem or procedure! For those new to the probe, we recommend first reviewing the basics in the incredible FOAMed Introduction to Bedside Ultrasound Book and 5 Minute Sono. Once you’ve got the basics beat, then read on to learn how to start scanning like a Pro!

Did you know that Lung Ultrasound (LUS) has a higher sensitivity than the traditional upright anteroposterior chest X-ray for the detection of a pneumothorax? (LUS has a reported 90.9 for sensitivity and 98.2 for specificity. CXR were 50.2 for sensitivity and 99.4 for specificity). Busy trauma bay? Ultrasound is faster than calling for X-ray. Critically ill patient? Small pneumothoraces are less likely to be missed with ultrasound. To take your Sono Skills to the next level, read on:

Beyond the classic trauma patient during your E-Fast Exam, who else does the Sono-Pros scan?

  1. Primary spontaneous pneumothorax: the classic scenario is a tall, young adult, with symptoms such as breathlessness, along with potentially those with risk factors of pneumothoraxes such as smoking, male sex, family history of pneumothorax

  2. Secondary spontaneous pneumothorax: those with underlying lung disease including but not limited to COPD, tuberculosis, necrotizing pneumonia, pneumonocystis carini, lung cancer, sarcoma involving the lung, sarcoidosis, endometriosis, cystic fibrosis, acute severe asthma, idiopathic pulmonary fibrosis

  3. Of course, traumatic pneumothorax, especially in penetrating trauma or blunt trauma with broken ribs

  4. Don’t forget iatrogenic causes of pneumothorax including transthoracic needle aspiration, subclavian vessel puncture, thoracentesis, pleural biopsy, and mechanical ventilation

SonoPro Tips - How to scan like a Pro

  1. The key is to have the patient completely supine - air rises! - with the probe in the anterior field in sagittal orientation pointing towards the patient's head.

  2. It is commonly taught to start at the second intercostal space, midclavicular line, and scan down a few lung spaces to at least the 4th intercostal space, however, keep in mind some studies show that trauma supine trauma patients had pneumothoraces seen more commonly in the 5-8 rib spaces.

  3. Important Landmarks

Green = Subcutaneous tissue. Red = Pleural space. Blue = A - lines.

4. Look for lung sliding, improve your image by turning down gain and decrease depth to have lung sliding become clearer

What to Look For:

  1. To Rule-Out a pneumothorax

  • Lung Sliding - Lung sliding has a negative predictive value of 100% for ruling out a pneumothorax, however only at that interspace

  • Additional Findings: B-lines and Z lines also help to rule out pneumothorax!

2. To Rule-In a pneumothorax

  • Lung point - the interface between where lung sliding is happening and where the absence of lung sliding is happening has been shown to have 100% specificity for pneumothorax.

  • Keep in mind the border of where the heart and lung come in contact and the border where the diaphragm and lung come in contact can cause a false lung point.

  • The lung point may be hard to find in a larger pneumothorax, and impossible to find in a completely collapsed lung.

3. Next turn on M-mode:

Sandy Beach Shore = Lung sliding (left). Barcode Sign = No lung sliding (right)

Sandy Beach Shore = Lung sliding (left). Barcode Sign = No lung sliding (right)

What to do next:

  1. Lung sliding = sensitive, Lung point = specific

  2. If you see lung sliding, there is no pneumothorax

  3. If you do not see lung sliding it does not rule in a pneumothorax -> look for a lung point, the interface between where lung sliding is happening and where the absence of lung sliding is happening to rule it in

    • Always keep in mind other causes that result in lack of lung sliding before management decisions take place!: atelectasis, main-stem intubation, adhesions, contusions, and arrest or apnea. Check out this great table from 5 - Min Sono.

4. If your patient is apneic or has a mainstem intubation look for lung pulse, when the heart beats if the parietal and visceral pleura are touching (no pneumothorax) it will show a pulse at the interfaces of the pleura

5. Sub-Q emphysema - Always look for E - lines. When there is subcutaneous air above the pleural line it creates a false pleural line above the actual pleural. You may also see B-lines obscuring the actual pleural line. This is most likely subcutaneous air and you can not interpret it for a pneumothorax.

SonoPro Tips - Where to Learn More

  1. American College of Emergency Physicians. Emergency ultrasound imaging criteria compendium. Ann Emerg Med. 2006;48(4):487-510.

  2. Ma, John, et al. Ma and Mateer's Emergency Ultrasound. McGraw-Hill Education, 2020.

  3. Macias, Micheal. TPA, The Pocus Atlas.

  4. Availa, Jacob. 5 minute Sono.

  5. US G.E.L. Podcast

  6. Alrajhi K, Woo MY, Vaillancourt C. Test characteristics of ultrasonography for the detection of pneumothorax: a systematic review and meta-analysis. Chest. 2012;141(3):703-708.


Expert Commentary

Morgan went “beyond lung sliding” and dove deep into how to increase your sensitivity & specificity for PTX with POCUS. Supine is ideal to make PTX visible against the anterior chest wall, but if the patient cannot tolerate lying flat, look at the apical pleural superior to the clavicles. First, identify the true pleural line--it should be the bright line just deep to the ribs in your view. SQ emphysema may obscure the view or even mimic the pleura, although its outline is usually more hazy & irregular, a little pressure helps to move the SQ air out of the way can be helpful. Sliding? Great, PTX ruled out. But absent sliding does not automatically mean PTX. Make sure there is no B-line or “lung pulse”, as sometimes pleural adhesion or poor ventilation can cause absent sliding too. Most of the time you don’t need M-mode unless the movement is very subtle and you want to be extra sure. The lung point is pathognomonic for PTX, but don’t waste time digging around for it if the patient is unstable with a good clinical story for PTX > decompress instead!

John Bailitz, MD

Vice Chair for Academics, Department of Emergency Medicine

Professor of Emergency Medicine, Feinberg School of Medicine

Northwestern Memorial Hospital

Shawn Luo, MD

PGY4 Resident Physician

Northwestern University Emergency Medicine


How To Cite This Post:

[Peer-Reviewed, Web Publication] McCarthy, M. Hung J. (2021 Sept 20). SonoPro Tips and Tricks for Pneumothorax. [NUEM Blog. Expert Commentary by Bailitz, J. Shawn, L.]. Retrieved from http://www.nuemblog.com/blog/sonopro-tips-and-tricks-for-pneumothorax


Other Posts You May Enjoy

Posted on September 20, 2021 and filed under Ultrasound, Pulmonary, Trauma.

Buprenorphine Use in the ED

Written by: Diana Halloran, MD (NUEM ‘24) Edited by: Sean Watts, MD (NUEM ‘22) Expert Commentary by: Quentin Reuter, MD (NUEM ‘18)

Written by: Diana Halloran, MD (NUEM ‘24) Edited by: Sean Watts, MD (NUEM ‘22) Expert Commentary by: Quentin Reuter, MD (NUEM ‘18)


The United States has been facing a debilitating opioid epidemic, which has been partially fueled by the over-prescription of these medications in the emergency department setting. In addition, the opioid epidemic has grown exponentially during the COVID-19 pandemic. More than 40 states have reported increases in opioid-related mortality, resulting in an increased burden on an already overstrained healthcare system. (1) Prescribing the medication Buprenorphine in the emergency department offers an opportunity to ameliorate these past faults and rising statistics.

The basics:

Buprenorphine, which goes by the trade name Subutex, works by acting as both a partial mu agonist and weak kappa antagonist on opiate receptors in the brain. (2) This mechanism of action enables buprenorphine to exert analgesic effects, as well as antagonistic effects when additional opiates are consumed. In addition, buprenorphine does not carry significant sedative effects, making respiratory depression extremely rare. (3) Buprenorphine is also safe in pregnancy – a 2016 meta-analysis found no difference in pregnant patients given methadone versus buprenorphine when assessing for congenital malformations. (4) The American College of Obstetrics & Gynecology has released a committee position statement, encouraging the use of buprenorphine in pregnant patients with opioid use disorder. (5)

How to prescribe:

While the DEA X-waiver is required to write a prescription for buprenorphine for addiction treatment, withdrawal, or detox, it is not required to order or administer a dose in the hospital or emergency department. (6) This exception, called the “three-day rule”, allows a patient to come to the emergency department for three consecutive days to obtain a dose of buprenorphine if found to be in opioid withdrawal. (7)

In order to dose buprenorphine in the emergency department, the patient must be in mild acute opioid withdrawal, with a Clinical Opiate Withdrawal Score (COWS) of at least 8. (8,9) Administration of buprenorphine should not occur if the patient does not appear to be clinically withdrawing, as administration in this setting could actually precipitate withdrawal.

Dosing: (10)

  • 4mg of sublingual buprenorphine can be given initially, allowing 20-40 minutes for resolution of withdrawal symptoms with repeat dosing every 1-2 hours as needed. (10)

  • On Day 2, the patient’s response to Day 1 should be assessed. If the patient’s opioid withdrawal symptoms were controlled, the same dose can be continued. If not, the dose should be increased by 2-4mg. (10)

  • On Day 3, the patient’s response to Day 2 should be assessed. Again, if the patient’s withdrawal symptoms are controlled then the same dose can be continued. If not, the dose can be increased by 2-4mg for Day 3. (10)

  • After 3 days this dose should be continued for 3-7 days until steady-state levels are achieved (10)

  • Doses should be decreased by 2mg if the patient experiences opioid intoxication (10)

Use in the emergency department:

While buprenorphine and long-term treatment of opioid use disorder may seem confined to primary care physicians and psychiatrists, emergency medicine physicians have been shown to be successful providers for initiating buprenorphine treatment versus brief intervention and referral with a result of decreased self-reported illicit opioid use. (11) In addition, Dr. Gail D’Onofrio, chair of the Department of Emergency Medicine at Yale, found that emergency department initiated buprenorphine treatment was associated with the increased self-reported engagement of addiction treatment and reduced illicit opioid use within a two-month interval. (12)  Increasing evidence demonstrates that the emergency department provides an opportunity to intervene on opioid use disorder, with more and more emergency medicine physicians becoming X-waiver certified.

References

  1. Issue brief: Reports of increases in opioid and other drug-related overdose and other concerns during COVID pandemic. American Medical Association. https://www.ama-assn.org/system/files/2020-12/issue-brief-increases-in-opioid-related-overdose.pdf. Published December 9, 2020.

  2. Wakhlu S. Buprenorphine: a review. J Opioid Manag. 2009 Jan-Feb;5(1):59-64. doi: 10.5055/jom.2009.0007.

  3. Walsh SL, Preston KL, Stitzer ML, Cone EJ, Bigelow GE. Clinical pharmacology of buprenorphine: ceiling effects at high doses. Clin Pharmacol Ther. 1994 May;55(5):569-80. doi: 10.1038/clpt.1994.71.

  4. Zedler BK, Mann AL, Kim MM, Amick HR, Joyce AR, Murrelle EL, Jones HE. Buprenorphine compared with methadone to treat pregnant women with opioid use disorder: a systematic review and meta-analysis of safety in the mother, fetus and child. Addiction. 2016 Dec;111(12):2115-2128. doi: 10.1111/add.13462.

  5. Committee Opinion No. 711 Summary: Opioid Use and Opioid Use Disorder in Pregnancy. Obstetrics & Gynecology. 2017;130(2):488-489. doi:10.1097/aog.0000000000002229

  6. Special Circumstances for Providing Buprenorphine. SAMHSA. https://www.samhsa.gov/medication-assisted-treatment/statutes-regulations-guidelines/special-circumstances. Published August 19, 2020.

  7. Nagel L. Emergency Narcotic Addiction Treatment. https://www.deadiversion.usdoj.gov/pubs/advisories/emerg_treat.htm.

  8. Wesson DR, Ling W. Clinical Opiate Withdrawal Scale. PsycTESTS Dataset. June 2003. doi:10.1037/t48752-000

  9. D'Onofrio G, O'Connor PG, Pantalon MV, et al. Emergency department-initiated buprenorphine/naloxone treatment for opioid dependence: a randomized clinical trial. JAMA. 2015;313(16):1636-1644. doi:10.1001/jama.2015.3474

  10. Dosing Guide For Optimal Management of Opioid Dependence. The National Alliance of Advocates for Buprenorphine Treatment.

  11. D’Onofrio G, O’Connor PG, Pantalon MV, et al. Emergency Department–Initiated Buprenorphine/Naloxone Treatment for Opioid Dependence: A Randomized Clinical Trial. JAMA. 2015;313(16):1636–1644. doi:10.1001/jama.2015.3474

  12. D'Onofrio G, Chawarski MC, O'Connor PG, Pantalon MV, Busch SH, Owens PH, Hawk K, Bernstein SL, Fiellin DA. Emergency Department-Initiated Buprenorphine for Opioid Dependence with Continuation in Primary Care: Outcomes During and After Intervention. J Gen Intern Med. 2017 Jun;32(6):660-666. doi: 10.1007/s11606-017-3993-2.


Expert Commentary

Thanks to Dr. Halloran and Watts for providing an informative discussion on buprenorphine prescribing from the ED. Buprenorphine continues to emerge as the state of the art treatment strategy for opioid use disorder (OUD) and thus, developing a working knowledge for when and how to use it is essential.

While there is little doubt that the medical field fueled the opioid epidemic through the prescribing of pain medications, EM is often given a disproportionate amount of blame for the current situation.  In 2012, EM prescriptions made up only 4.3% of all opioids in circulation (1). Furthermore, I anticipate our specialty will continue to lead the fight against the opioid epidemic as practices such as naloxone prescribing, education around safe injecting practices, reduction and optimization of opioid prescribing efforts, and buprenorphine initiation gain further traction in the ED.

Obtaining a DEA X is the first step to prescribing buprenorphine. In April of this year guidelines for the administration of buprenorphine were updated to allow practitioners to treat up to 30 patients at a time with no extra training (2). While these changes will likely expand buprenorphine prescribing from the ED, it is vital that we do not operate in a silo.

To effectively manage this complex patient cohort, a coherent system of addiction medicine services is vital.  EDs must partner with local community resources to make rapid addiction medicine appointments available. Our department utilizes specially trained addiction care coordinators, nurses with extensive training in addiction medicine to help evaluate OUD patients and navigate the fractured array of outpatient services.

Prior to the implementation of our Medication for Opioid Use Disorder (MOUD) program, our clinicians had relatively little to offer patients that directly addressed their underlying addiction.  While anecdotal, we believe that by utilizing MOUD, we have begun to rebuild trust between OUD patients and the medical system.  A once generally negative relationship between OUD patients and our ED staff has been replaced with a hopeful rapport, confident that recovery for these patients is a distinct possibility.  This therapeutic relationship continues to grow and we believe will lead to long-term sustained recovery for many of our OUD patients in the surrounding community. 

References

  1. Levy B, Paulozzi L, Mack KA, Jones CM. Trends in Opioid Analgesic-Prescribing Rates by Specialty, U.S., 2007-2012. Am J Prev Med 2015;49:409-13.

  2. Reuter Q, Smith G, McKinnon J, Varley J, Jouriles N, Seaberg D. Successful Medication for Opioid Use Disorder (MOUD) Program at a Community Hospital Emergency Department. Acad Emerg Med 2020.

quentin reuter.png

Quentin Reuter, MD

Emergency Medicine Physician

Core Faculty at Summa Health


How To Cite This Post:

[Peer-Reviewed, Web Publication] Halloran D., Watts S. (2021, Sept 13). Buprenorphine Use in the ED. [NUEM Blog. Expert Commentary by Reuter Q.]. Retrieved from http://www.nuemblog.com/blog/buprenorphine


Other Posts You May Enjoy